Showing posts with label sail. Show all posts

11 June 2015

Photo: Pot of Gold

Legend goes that there is a pot of gold at the end of the rainbow.
Maybe it's true.

Commander at Straddie_1_c
SeaDog Commander in the sun shower

.

25 May 2015

GEAR: SeaDog Commander.

I fell in, again.
I have been surfing for an hour and now I was heading home.
I sailed for a while but then I turned directly into the wind and I wanted to stow my sail away.
Stretching myself forward trying to reach the shock cord to secure the folded bundle of my sail made my loose my balance and I kept on falling in.
I realized that I needed a sail that would fold easily on my kayak deck.

Commander testing_1

My high aspect SeaDog sail (0.7 Code Zero) catches the wind beautifully and allows me to cut into the wind at a higher angle than before, but I had a problem with it.
Since I like to have my spray deck area clear my sail is mounted differently than a typical set up.

Commander1 at Peel_r
image courtesy of SeaDog
A typical mount for the sprit style sail (SeaDog, Flat Earth etc.) calls for a tall mast with stays mounted below the boom.
I prefer to have my sail mounted lower to allow the mast not to protrude in my "paddling area" when stowed on deck.
I don't like a folded sail that encroaches the deck where my hands swing when paddling.
It's simple: I want that area clear so my hands don't catch the sail.

On my high aspect sail the boom is substantially shorter than the luff (mast section) resulting in an uneven bundle when the sail is lowered down: the boom is much further away from me when I lower my sail onto the deck.
In need to secure the sail firmly onto the deck I use a section of sock-cord to wrap around the mast, battens and boom to create one solid bundle that I know will not fill up with water when waves wash over the deck or I roll the kayak.
In the bumpy waters, I was now having trouble reaching that boom and I was loosing my balance.

SD_CodeZero 07_c_gd
SeaDog CodeZero 0.7, folded. In order to reach the boom this sail intrudes the cockpit area.

It has been in the back of my mind for some time now: I wanted a sail with a slightly lower aspect and a longer boom.
I consulted with SeaDog sails and after I proposed my design to Richard a technical compromise was hatched: the design I had in mind might end up less efficient and might cause some loss of upwind reach.
One other trait that I really desired in my new sail was that it would be quiet.
Douglas Wilcox aptly calls it "motoring"; the sound that the leech makes when sailing cross-wind.
I don't like that at all and a highly value a quiet sail.
I proposed a double batten to Richard and after some measuring we decided on an optimal length, given my initial request of "neat bundle" when folded.

SD_commander_5_c_gd
SeaDog Commander Mk1, folded on deck

SeaDog sails distinguish themselves for utilizing the very best high tech materials and superb cut and manufacture.
I love the pattern that the carbon fibre makes in the sail cloth used for the batten pockets; it looks really high-tech matching the finish of my Greenland paddles :-)
The twin battens shape the sail perfectly and there are no areas where the sail puckers; the sail stays aerodynamically shaped to catch light breezes allowing a high angle of head wind sailing.
My concerns for decreased upwind performance did not materialize: the SeaDog Commander stays inflated at really high angles too.

SD_commander_3_c_gd
SeaDog utilizes a special thin thread that is incredibly tenacious and UV resistant: the results is beautiful stitching.

I asked for a combination of sail cloth that would be stretch resistant, dry fast and remain stable. I also wanted to add the Clear-View feature into the bottom panel so I could easily see where I was going. Somehow vinyl windows cut into my previous sails never really helped with forward vision; they were just too milky and were ruining a smooth surface with a puckered section of sail (different stretch).

The new Clear-View panel really offers a better vision of on-water obstacles and boat traffic while the sail surface remains perfectly tensioned and smooth.
The orange tip adds incredible high visibility on the water while the pattern in the other panels makes for a stunning sail. The SeaDog Black Diamond series (with the Clear-View TM lower panel) are the highest technology sails that I have see so far: a true masterpiece.

SD_commander_2_c_gd

The new SeaDog Commander has a surface area of about 0.8m² to match the sail I most use in winds up to 20 knots.
Above 20 knots, in a beam wind, there is more heeling (pushing over) that I am comfortable with while my kayak does not really go any faster (max. hull speed).
If I know that there will be high winds forecasted I rather use my SeaDog CodeZero 0.7m²
I mounted this SeaDog Commander sail high enough on my carbon mast so I can reach it when folded onto the deck but not too high to intrude into my paddling area.

SD_commander_1_c

Disclaimer: my association with SeaDog has grown where we now collaborate on new projects. After purchasing my first sail from SeaDog I started to offer feedback and stimulated Richard with new ideas. Richard recognized that there was room for improvement with the original sprit sail design. Being able to quickly accommodate to special needs or requests with custom sails, SeaDog is able to blend high-tech sailing cloth to create sails that I wanted to realize for a while. I paid for the materials and he offers his workmanship: we both benefit from it.
 

24 February 2015

Video: Petra surfing Dugong

Let's name her Dugong!
Short, stubby and just a bit "a face only a mother could love" look... the Whisky16 (designed by Nigel Foster) is not a pretty kayak in a traditional sense.
Dugong seemed an appropriate name for Petra's new kayak.
While looks are often deceiving, this kayak fits Petra very well and being very maneuverable spurs confidence in rough water.
The inspiration for the name came from the previous day's event where Petra and I were kayak-sailing back from my favorite play spot. A dugong suddenly surfaced too close to my kayak and looked at me with spooked eyes: I don't know who got the bigger fright, me or the dugong.
Then he quickly dived, his tail flew inches away from my face wetting me completely while I ducked my head avoiding the slap as he desperately tried to miss my kayak.

That evening a sail was hastily mounted to the Whisky16's deck as next day's forecast was promising conditions for a pseudo tidal race: wind against ebbing tide.
With the new SeaDog sail mounted up front Dugong really brings smiles


click on image above to play video

Edging and rolling the Whisky16 seemed easier than the borrowed kayaks: a good fit where one can brace without having to splay the legs too far could be the reason.
The keyhole cockpit where the legs can be kept relatively close together, allowing some wiggle room but still offering a solid wide area of contact, is probably a better solution than the diminutive thigh braces wings I see in most kayak cockpits.
So far the two kayaks that I own with such keyhole cockpits are way more comfortable than the other system I have tried.
The rear deck is not particularly low in the Whisky16 however layback rolls are still reasonably easy since the seat is not jammed right against the rear of the cockpit rim.
For once the seat is not shaped as a racing short-pan paddler crunched-over design: a lower front lip allows for more relaxed seating.
My experience with short seat that have a higher front has not been positive as I often end up with "dead legs". A flatter pan and longer seating area is key for longer paddles where my thighs don't suffer from blood circulation cut off.
Petra, while being the exact opposite of my bio-metrics, seems to agree: she dislikes short peaked seats and loves the flatter pan. The seat of the Whisky16 is here to stay.

The front deck however has already been modified to accept a sail and place it at closer reach. Details here.

03 February 2015

SHOP: filling-in the compass recess

.
Mounting a sail on a sea kayak requires a few considerations: position and deck strength.
On the newly acquired Whisky16 the front hatch is positioned surprisingly way far forward.
In front of that there is a deck-mounted compass recess.
The previous owner of that kayak had a small sail mounted there and I used the existing holes to mount mine.

PT65N_Whisky16_bow
first run with the Whisky16
A test run revealed that the sail worked well on the Whisky16 but the reach was a bit too far for grabbing the sail and stow it on deck, securing it.
Most other sailing buddies use a 3 stay set up ending with a rather long mast.
I see their stowed sails going past the front of the cockpit ending with a sail mast half way across the spray deck. I prefer to have mine clear off my deck so I do not rub it with my hands when paddling.

The Whisky16 however has the sail mounting spot just a bit too far out or reach for the sail to fit nicely on deck. As I use my sails on several kayak I need to have them fit all decks well, with the same stay lengths.
I could increase the size of the mast and bring the sail higher (and make an ill-fit on other kayaks),  but I prefer to keep the sail as low as possible and minimize the heeling force of a beam wind exerted on the sail.
The compass was not really needed on that kayak so I removed it and decided to utilize that space to mount the sail closer.
I wanted to fill the void left (recess on the deck) and create a solid base for the mast fitting.
I could have used a simple block of wood somehow attached to the deck but I knew I could do better.
I shaped a block of foam (polystyrene) to fit a bit loose within the cavity of the recess. Shaping the foam was easy: a bit of coarse sandpaper on a cork block.

Once the foam was shaped I placed kitchen cling wrap (Glad® wrap) over the deck and wetted out some fiberglass with epoxy. I draped the block of foam (under side) and pressed it into the cavity.
Once cured (overnight) I removed the excess and trimmed the glass.
The finish was really rough; maybe I could have used wax and mold release to have a perfect fit but nobody was going to see that part.
The top was done similarly.
I carved out foam from the area where the screws for the fitting would go for my mast base and filled it with epoxy glue (mix of epoxy and microfiber). While wet I then used a few layers of glass for the top and a scrap of carbon fibre for where the main load would be.
Polystyrene foam compresses easily when spot loaded so I needed a sturdy surface.

compass fill-in1
the "black patch" is carbon fibre cloth over the carved-out foam filled with epoxy glue.

The next step was to clean and cut back the edges a bit leaving a bit of a gap between foam block and kayak deck. I filled that with epoxy glue again to create a hard edge and seal the two surface together creating a monocoque style item. Of course I waxed and prepped the kayak deck so epoxy would not stick to it...

compass fill-in2
the new mast-base fitting placed only for testing

The last step was to add a nice layer of carbon fibre weave: partly structural, partly looks.
A few coats of UV stabilized epoxy later and my block was ready for installation of the mast base.
I used wood screws that secured the mount very solidly: the epoxy glue is very dense.

compass fill-in3
the foam block now covered with carbon fibre cloth

Final step: securing the foam block to the deck.
This one was simple: a small bead of polyurethane all around the edge (only!) to then seal perfectly against the deck.
The original deck void was now sealed and the sail mounted closer to the cockpit.

compass fill-in4
notice the difference between old position and new closer location for the mast base. The old holes will get filled with matching gel coat

So, do 4" make a difference? *
Not in handling of the kayak but when reaching for the sail to be bundled on deck when stowed (reaching for the boom particularly) is now much better.

*Hell yes, she said :-)

28 January 2015

Video: Best Moments of 2014 in Moreton Bay

Once a year a new video is edited focusing specifically on local paddling's best moments.
This one was shot over 2014 in Moreton Bay alone.


Of course, only a very small portion of "the fun stuff" is recorded despite spending most weekends on the water.
I compiled mostly "orphan" clips that were not previously included in a other videos; the shots are short and highlight the best moments of a day's outing.

In order of appearance: Gnarlydog, Vanilla and Petra.

PS: work has already commenced on the 2015 edition...

.

12 January 2015

Photo: sail-surfing the New Year

Conditions were just right: a running out tide met by an opposing 15 knots of wind created waves steep enough to be caught by a small sail.

Surfing Dugong Jan15_1

Petra sail-surfing with Northern Light paddle and SeaDog sail.

.

25 November 2014

VIDEO: sailing with SeaDog 0.7

This time the wind was really blowing and I was glad that I had my smaller sail installed on my kayak: the SeaDog 0.7m².
I could feel that there was less heeling as I didn't have to transfer all my weight to the windy side.
My large sail of 1.0m² would have been too much and harder to handle while my SeaDog 0.7m² was still giving me plenty of speed to surf the waves with ease.

Here is a short video of a few different outings with the SeaDog 0.7m²


I believe that the SeaDog 0.7m² is a great sail for when the wind starts to blow and white caps appear on the water; it offers me plenty of power while still allowing me to handle my more tippy kayaks without a white-knuckled grip on my paddle.
I figured out that a kayak can only go so fast and no matter how big of a sail I mount on the deck it just won't go any faster. A larger sail however just catches more wind and when loaded from the side wind it wants to push the kayak over. I have been at times hanging way over the side of my kayaks trying to keep them from tipping while not noticing any increase in speed over a smaller sail.

Of course, if the wind is from behind (stern wind) and the waves have built up to a size that they start to lift the stern of the kayak where I can surf; my kayak will indeed go faster than hull speed.
It is these times that I find the SeaDog 0.7m² exceptional and easier to handle. As I surf down the wave (on a wind right behind me) the kayak will come to a point where the sail no longer seems to be inflated. At the bottom of the wave I will have the boom flap loose over the deck and wanting to swap sides. Then the gust of wind catches up with me and with a shuddering noise the sail slaps to the other side taken in by the main sheet. It is in this moment that a smaller sail will save me from a sudden imbalance and possible precarious lean that might result in a dunk. I don't feel the raw slap that bigger sails give me in high winds: the 0.7m² is easier to handle.

Another benefit of a smaller sail is when things do go pear shaped and I fall in.
I have been practicing rolling with a sail; starting from dead calm conditions to increased breezes and more bumpy seas. I find that a sail with a smaller surface has much less drag underwater and in a roll I can scull up without too much effort. Recently I have been trying to forego releasing the main sheet and just leave the sail alone while falling in. While slightly more difficult than releasing the main sheet (or uphaul) I am more confident in recovering with the sail just left as it was before falling in.

As winds increase to 20 knots and above I wonder if a smaller sail would not be even better?
Maybe that is something I should look into...

.

22 October 2014

GEAR: SeaDog sail Code Zero

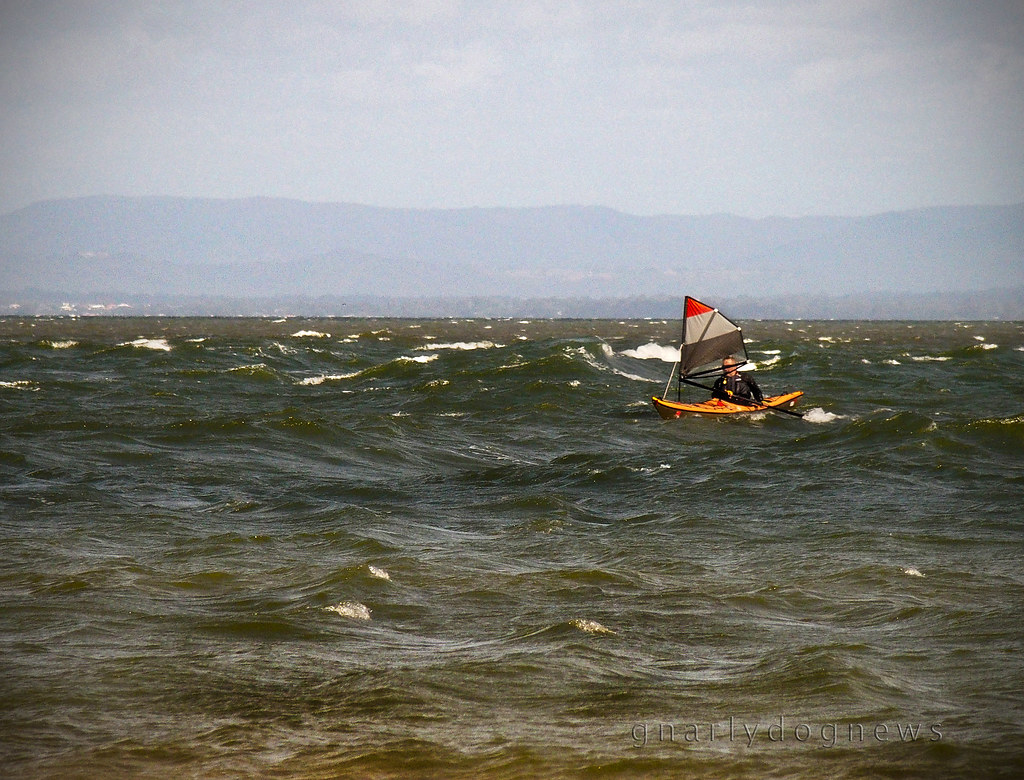
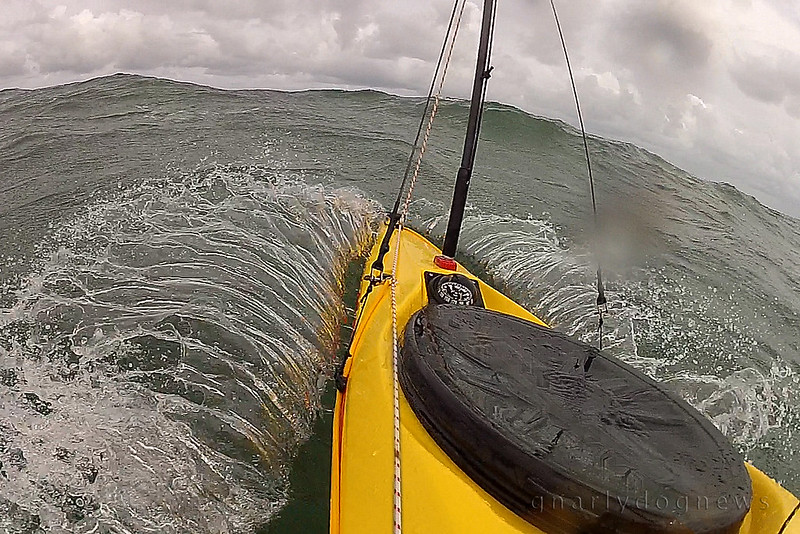
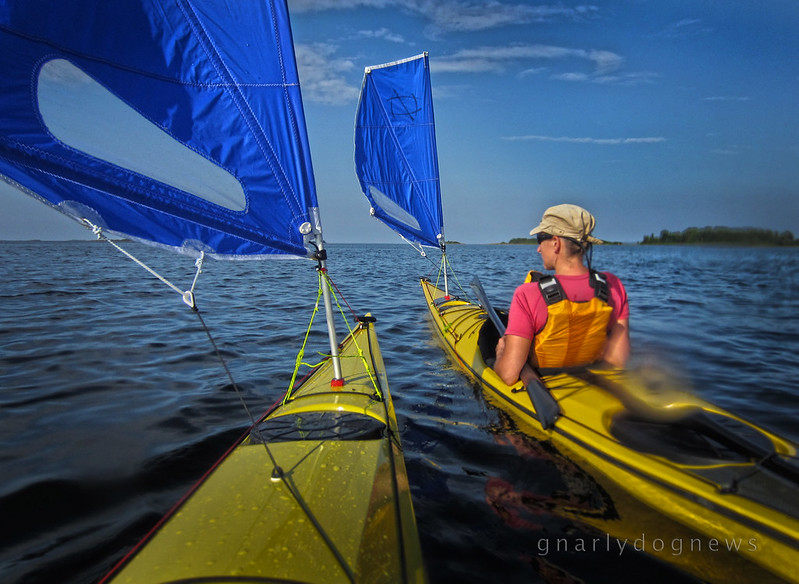
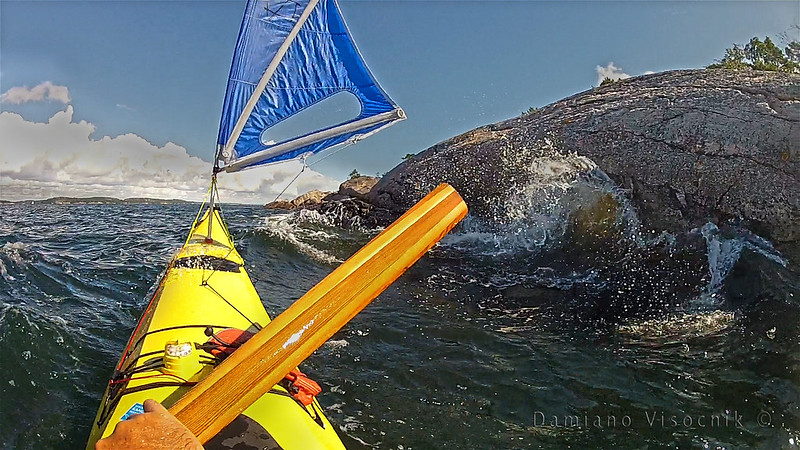
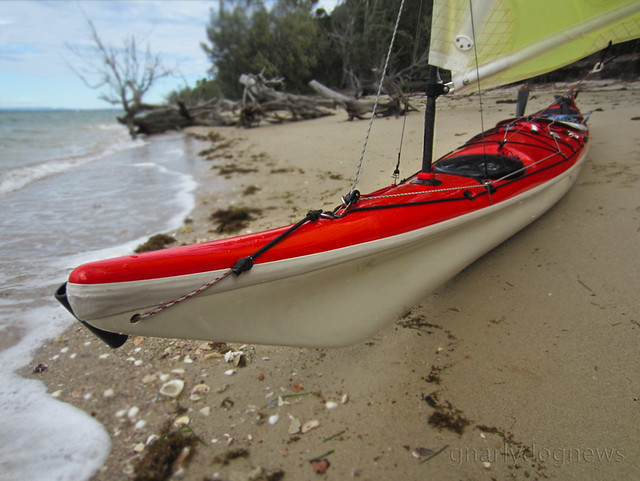
I nearly tipped in and went for a swim when a small set picked up my kayak and I started surfing.
I was in my 
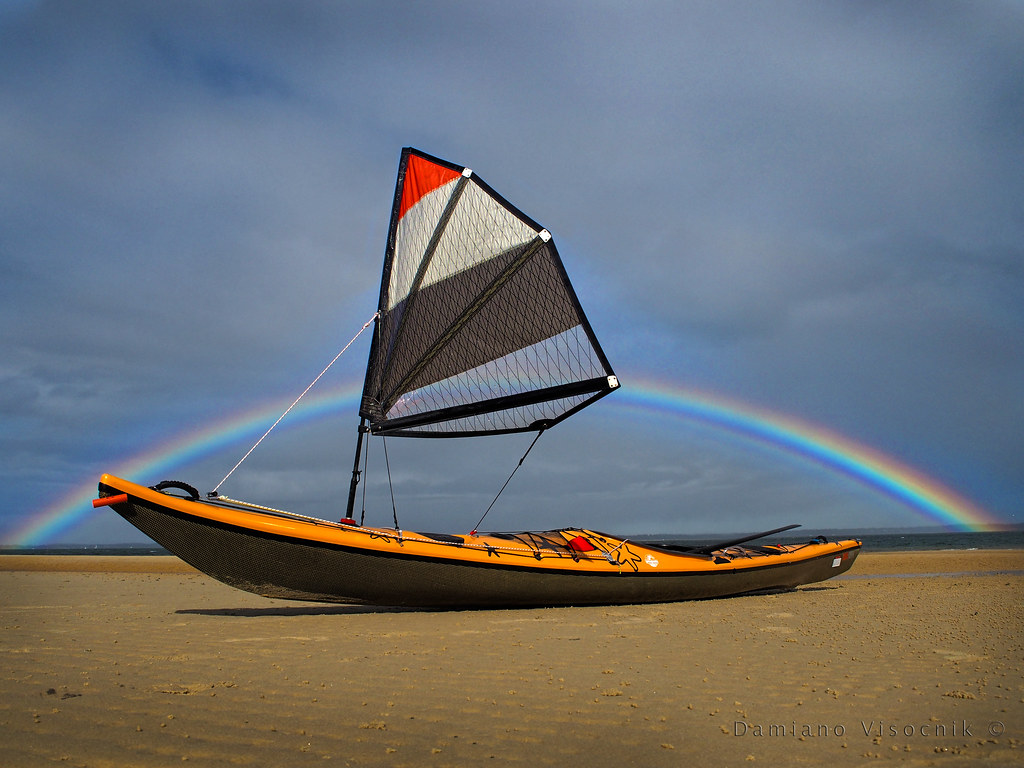
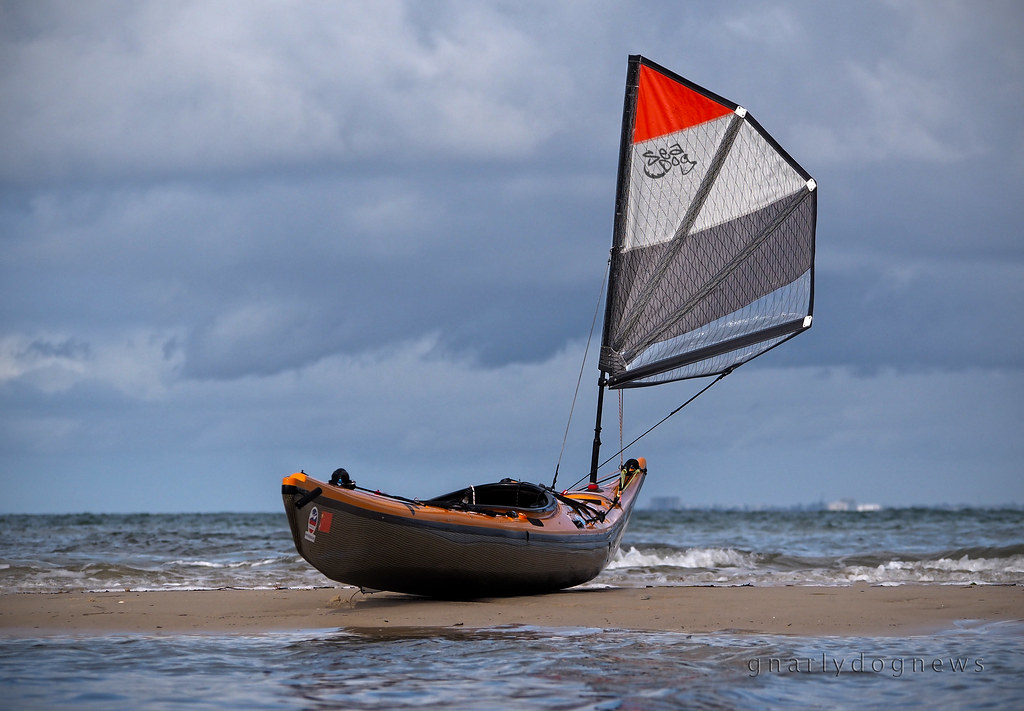
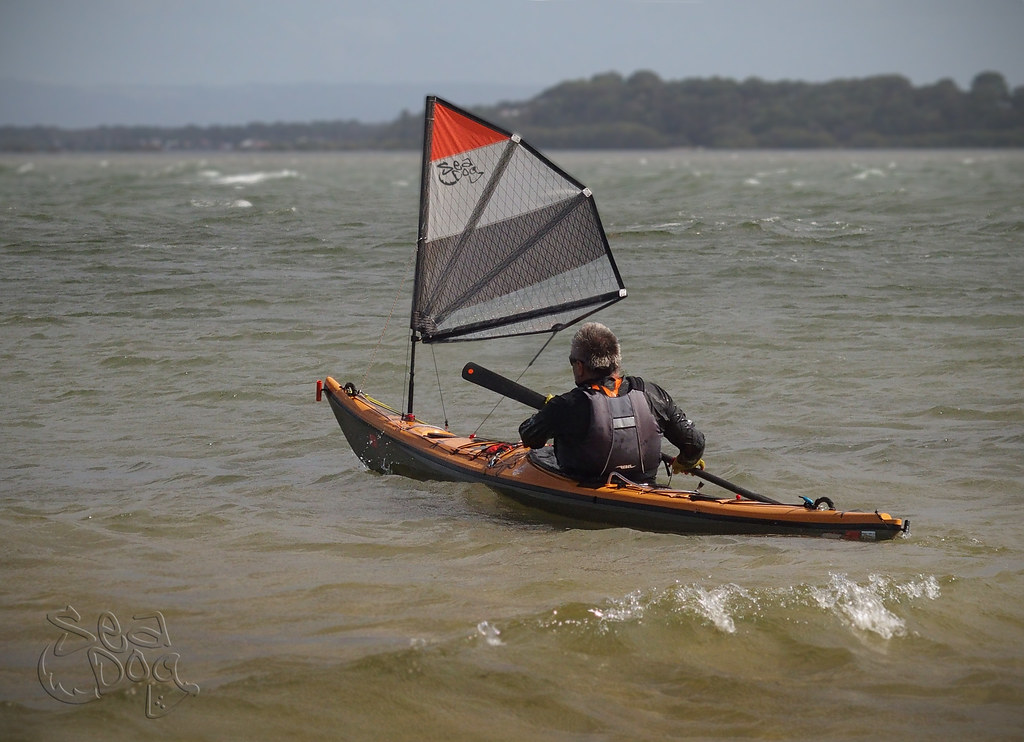
"tippy" kayak and half an hour into testing a new sail: the SeaDog 0.7 mt² in Code Zero .

SeaDog Code Zero 0.7mt_1

I was having fun trying to catch the short wind waves that the tidal flow against a healthy breeze was producing.
I am familiar with this location and often I wait for the conditions to be just right to be able to surf with my kayaks.
I am not sure if the long waterline Swede form narrow beam low rocker kayak was ideal for the small steep short waves but I wanted to see if a smaller sail would be easier to use in a stiffer breeze.
I have several sails from Flat Earth of 1.0 mt² and 0.8 mt². They work great and are very efficient sails for sea kayaking. Their design is a derivative from the decade old, or more, proven system that the Tasmanian sea kayakers have been using in strong winds.
That lead to the development of a sail mounted further forward, away from the paddler's cockpit as explained here.
The SeaDog sail is an unapologetic close resemblance of  Norm Sander's rigs and Flat Earth sail.
Actually the design is strikingly similar.

SeaDog sail_3

I have been kayak sailing with other paddlers that have been using SeaDog sails for the last couple of months.
Richard, an avid SE Queensland Sea Kayakers paddler, is the man behind the brand and his passion for sailing is evident.
He can be seen paddling every weekend (and often during the week) sporting sails of his own creation on his kayak.
It all started innocently when Richard decided to add some color to his sail.
A special one was made just before Xmas and of course, inspired by the festive season, it was green and red. It was different and unique; people noticed.

Xmas sails_SeaDog
photo: SeaDog sails
I was impressed by his early work even tho I didn't share his passion for the color choice :-)
A few weeks later a new colorful sail appeared in the paddling group. Again the work was impeccable.
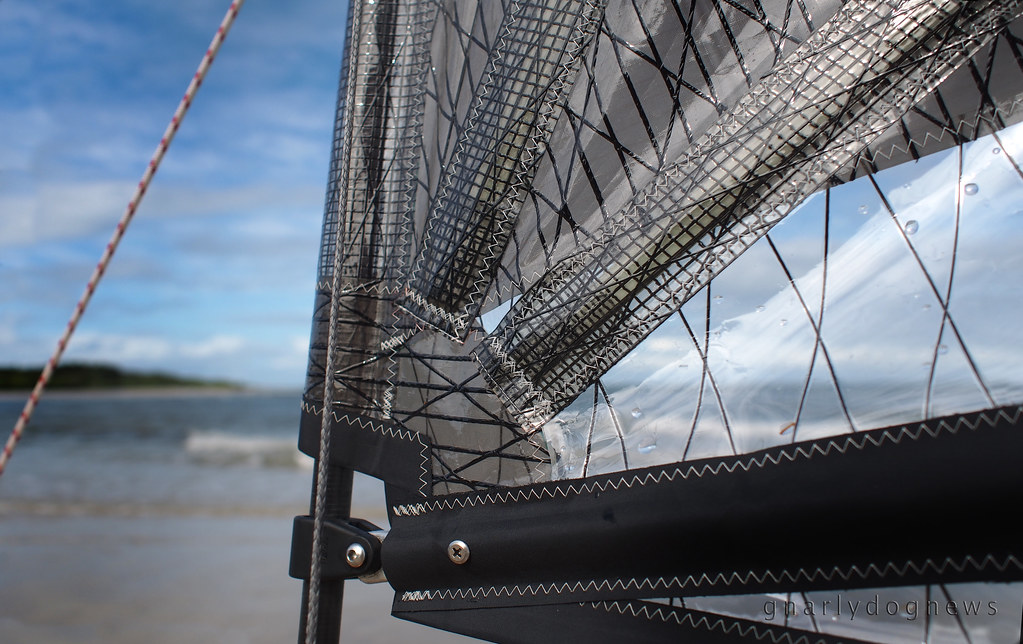
I watched those sail taking the wind very well and I noticed them filling with air at even very acute angles into the wind. One thing that I was very surprised is that Richard's sails did not flutter.

Eventually Richard made me a sail that I was missing in my quiver: I wanted a small sail that will allow me to be used in winds of 15 knots and above.

SeaDog sail_1

I have used my Flat Earth of 0.8 mt² in winds where I no longer was comfortable with the heeling force of the strong wind. Unless surfing, the hull speed of my kayak will really determine how fast I can go, no matter how big my sail is

As the small waves started to pick up my kayak the SeaDog sail was hit by a gust from the side. Any other time I would have to quickly react with a solid brace with the risk of tipping over.
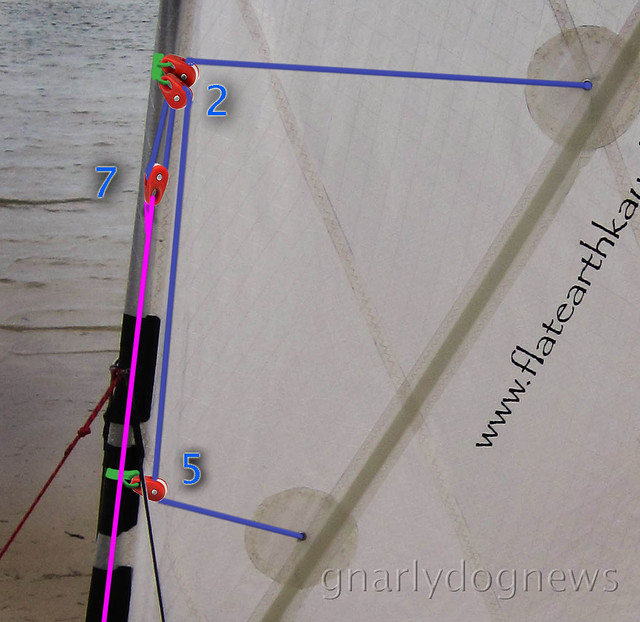
This time the jolt was softer and the shock cord on the main sheet (the rope that pulls-in the boom) released some of the pressure from the wind. This sail being smaller helped reduce the heeling force that wanted to tip the kayak into the water. I was able to stay upright and continued to surf.

The downside of a smaller sail is that I have to work harder and paddle more when the wind is from behind (running with the wind). As the waves catch up with me I have to put an extra effort to then accelerate down the wave.
Side-by-side with a buddy using a 1.0 mt² sail I had to really crank to catch the marginal waves, while I could see that he was getting more push from the wind.
However, I am sure if the wind was 20 knots +  he would be a bit worried with his larger sail...

SeaDog sail_2

In essence the SeaDog sail of 0.7 mt² is best suited for stronger winds or paddlers that have just starting out sailing, possibly with less bracing skills. Lighter paddlers will also appreciate this sail as their lack of counterbalance body weight is noticeable in strong winds.
SeaDog sails also makes 0.8 mt² sails, in traditional colorful Dacron® or the fancy laminated Code Zero (unfortunately white only).
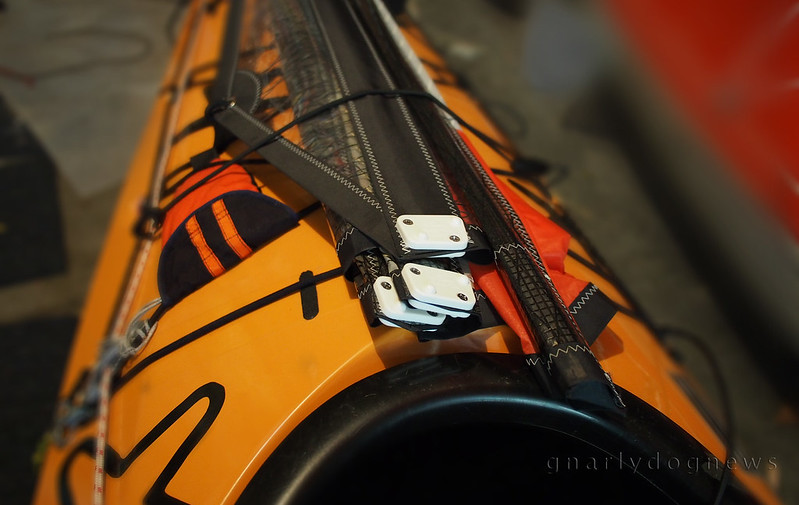
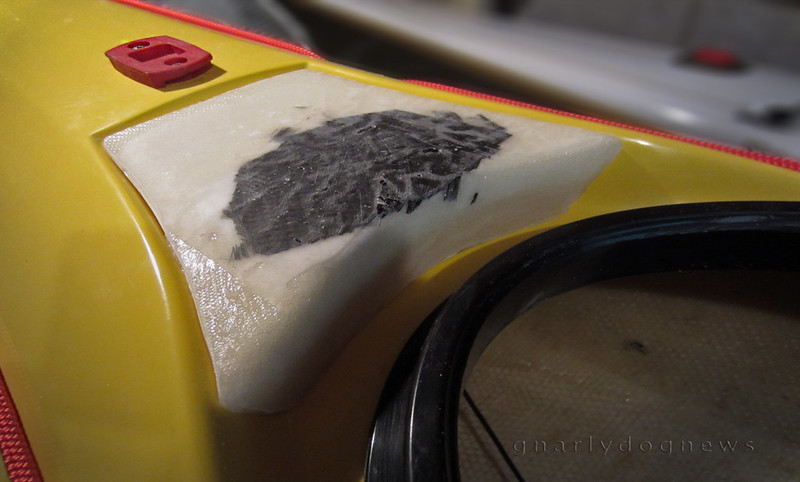
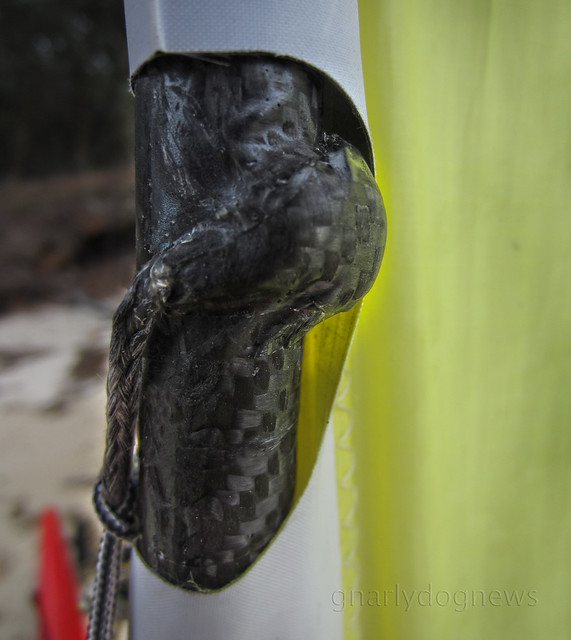
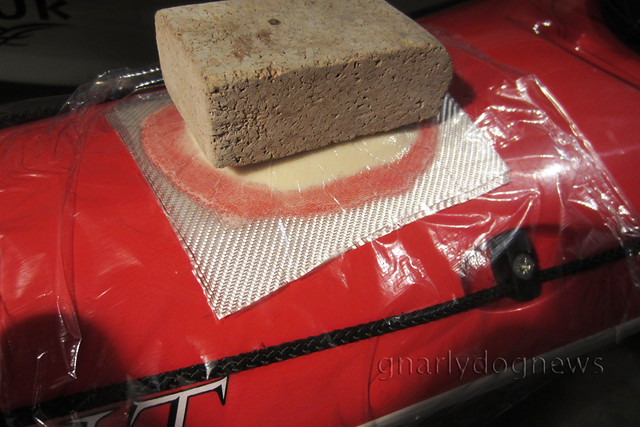
On closer inspection I notice very clean seams and stitching on the SeaDog; every stitch is continuous from one end to the other with absolute precision. Every end is reverse stitched to prevent unravelling and the tension on the bottom and lower cotton is perfect to create a very clean stitch.
Attention to details is superb and the finish is outstanding: every rivet and every reinforcement is very well executed.

SeaDog sail_4

Is SeaDog a better sail for me?
I can't say that as Flat Earth has served me well and I had no trouble for years now.
What I notice is no flutter in the leech, something that mildly annoys me in the Flat Earth sails.
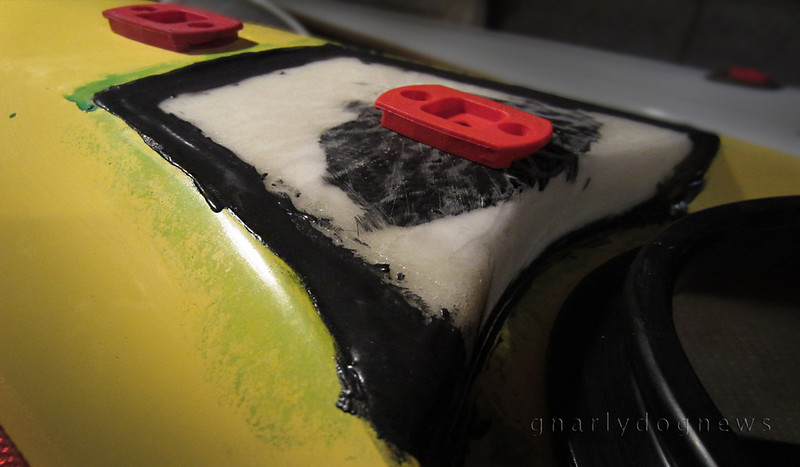
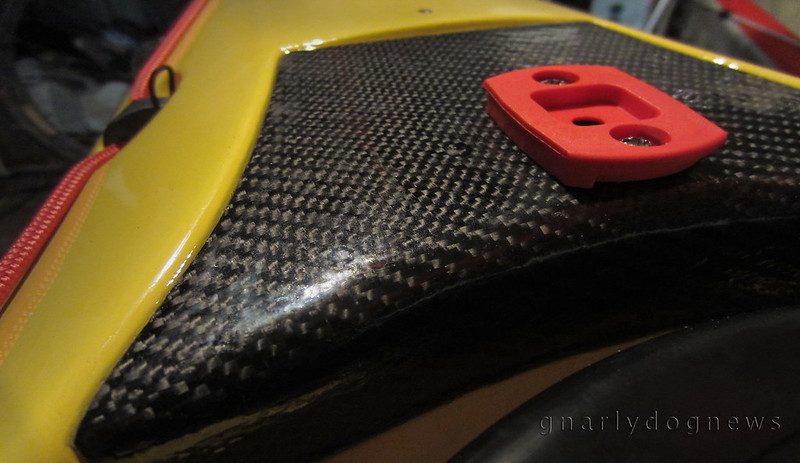
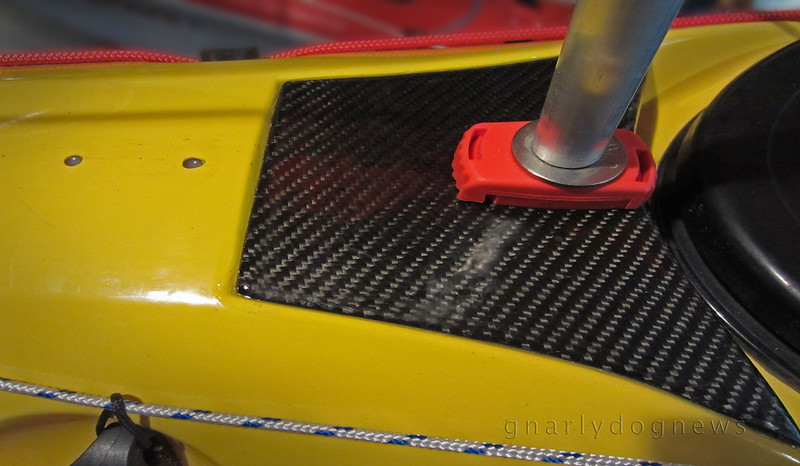
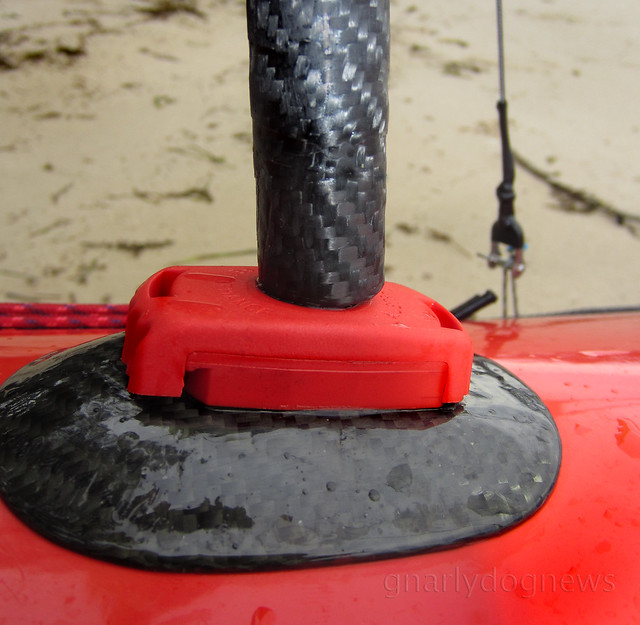
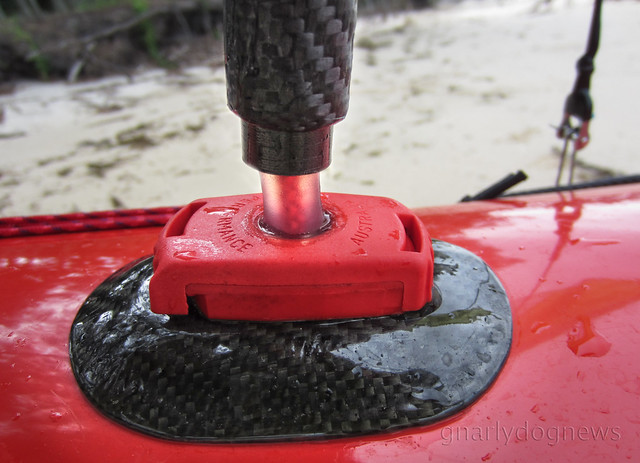
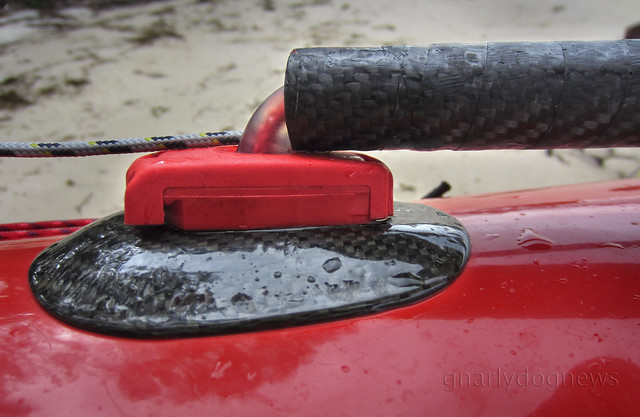
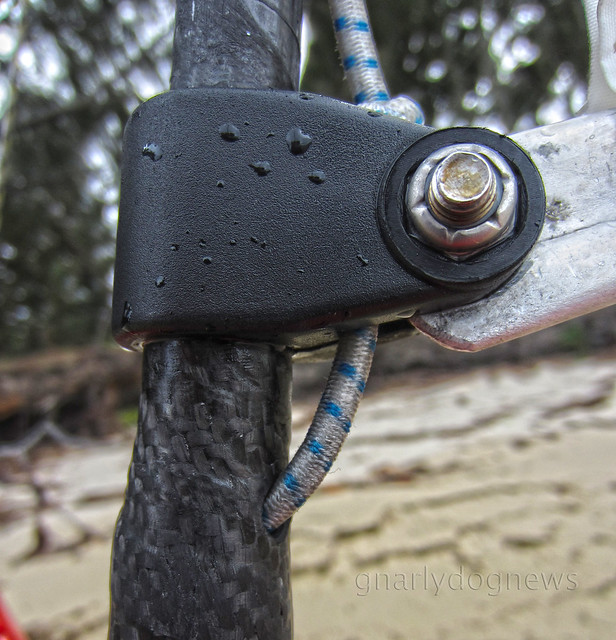
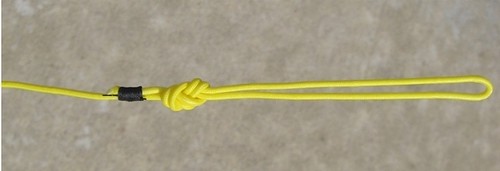
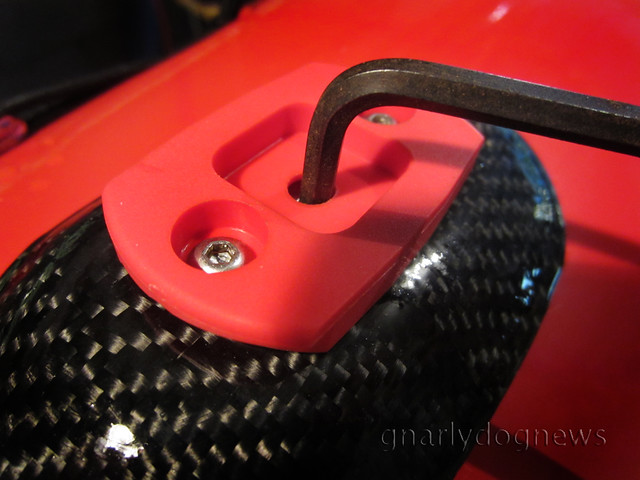
I mounted the SeaDog sail with two back/side stays, as I have done on all my other sails.
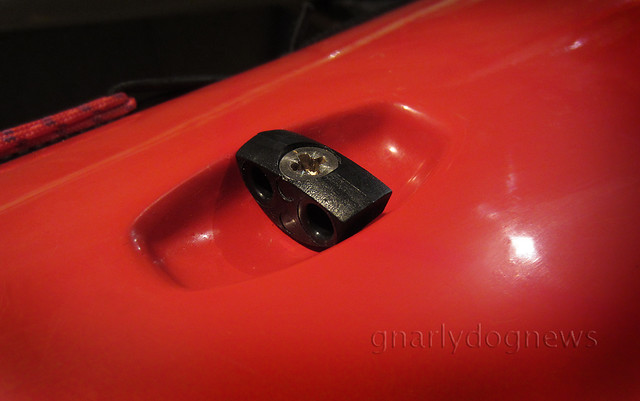
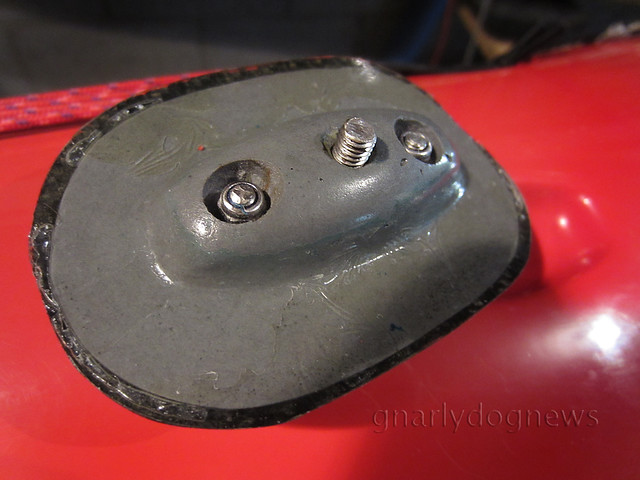
Richard recognizes that kayakers have preferences in mounting styles and hardware used for doing so. He supplies the sail with the mast, Spectra stays and the flexible polymer base only, leaving the rest up to the sailor.
I much prefer that since some of the (Flat Earth) sail kits that I have used had parts that failed on me.


06 May 2014

Video: Sailing with Vixen

Of the kayaks in my shed Vixen is the most demanding.
I have kayaks that are high volume and are great on extended trips although I find them a bit dull for sheltered waters paddling.  I have low volume kayaks that are oh so easy to roll and a bit tricky to handle in rough waters, I also have a kayak that despite having a tendency to lee cock a bit it is very easy to live with when I do hand's free photography on the water.
And then there is Vixen: a Point65North XP designed by Johan Wirsen.
I need to pay attention when I paddle that kayak; she won't let me be sloppy or careless.
I find her a demanding in short wind waves; because of her longer waterline she tend to bury bow and stern (video here).
With her deep V shaped keel she wants to sit on one side when stationary and novices find it disconcerting.
Vixen however is great for sailing: the deeper keel prevents some of the lateral drift in a beam wind and I can maintain a straighter course over waves.
The longer keel line in the stern resists broaching and I have to use less correctional strokes compared to my other fish-form British kayak.


If you aren't viewing this on a mobile device, go big and watch it in full HD glory
Over the week end the Westerly wind really picked up an despite the shorter fetch over the waters of Moreton Bay I had times when the wind was up to 30 knots.
It was then where I no longer could sail as the bow was getting pushed downwind; maybe a smaller sail could have been still manageable for the beam wind?
Even with the sail stowed on deck I had to take care of occasional lee cocking when the bow will crest a wave and then be blown downwind.
Myself and AdvetureTess had the bay to ourselves with only the occasional yacht enjoying the strong wind.

.

14 November 2013

GEAR: sea kayak sail set up options

I was now heading for the cliffs fast and frantically tried to depower my sail.
I had been sailing in following seas with increasingly stronger winds and having a ball.
My kayak was humming along and surfing from wave to wave; it was one of the most exciting days of a month long trip in the Swedish East coast archipelago.
I was in a borrowed kayak and loaded with a lot of gear and food, my kayak was tracking pretty straight.

FEKS high mount_gdn
borrowed kayaks set up with Flat Earth sails and KariTec hardware

I let go of my main sheet, the rope that holds the boom in position and with the wind from behind the sail swung to the front. I felt relief as my kayak slowed down and I was travelling now at a much lower speed thinking I had avoided ending up against the cliffs.
I then let go of my up haul (the rope that holds the mast upright) and nothing happened. I tried to lower my sail altogether and stow it back on deck but that just would not happen; the wind kept on pushing my bow downwind and the kayak would not broach on the waves coming from behind! I continued to head to the cliffs…

FEKS high mount3_c
not actual footage of event
Desperately I pulled the main sheet again hoping to bring my sail around but the wind was too strong and the boom was just stuck in a forward position. I was not happy, actually a bit panicky to tell the truth; I have never experienced that before.

On my sails when the conditions become unmanageable I just simply let my uphaul rope out from the cleat, the kayak broaches pushed by the wave from behind and the sail falls into the water.
The forward momentum brings the sail close to the cockpit where I can collect it and secure it on deck: I have done it hundreds of times.
With the sail set up with the boom above the side stays, the boom could swing all the way around instead of stopping on the stays at about 90 degrees with the kayak. Once the boom is in the forward position I could not bring it back to me as the wind was exerting too much pressure on the sail; the mast stood up proud and solid.
Eventually, with monumental effort, great acceleration and strong sweep strokes I managed to bring my kayak around enough to let the sail fall into the water. I caught up with my paddling partner who was new to sailing; she was having the same problem as me and I helped her out of danger of the cliffs. It was an experience that I did not predict and did not want to repeat. However a few days later the same thing happened but this time I was in open waters and I had time to get myself sorted.

Things I learned from this experience:
- I prefer the predictability of my sail set ups: if the wind is too strong I can just drop my sail anytime
- While theoretically the full swing boom should make things easier in high winds it did not for me as I could no longer lower the sail.

I paid close attention to some sail set ups in my paddling circles and noticed somebody with an additional rope coming from the mast back to his cockpit. He had boom-above-3 stays set up and explained to me that the additional rope was to bring his mast down when sailing down wind. It made sense to me: he must have similar problems than me although he usually does not sail in stiff breezes.

FEKS_high mount2_gdn
sail set up with additional down haul rope

One question remains: to bring down the sail in a downwind situation he must use two hands to pull the rope back in?
That reminds me of V sails where one must actively pull the sail down instead of letting it just fall down on its own. It was one of the reasons that I opted out from those sails: I wanted a more efficient way of handling dicey situations.

I understand that my system of two side/back stays has a few problems:
- there is more pressure from the mast onto the deck of the kayak; decks need to be very stiff or reinforced internally
- the boom can not swing all the way around for de-powering in case of a stiff breeze, but as I found out that might not be a good thing?

The advantages:
- there is less pressure on the mast as the stays anchor higher up. I wonder how many mast would I have broken by now if I used the other system ( I do hear of people braking masts in higher winds)
- sail mounted lower therefore less healing (force of wind trying to tip me over),
- two less ropes to deal with on deck. On the 3 stays set up more ropes add to more chances of entanglement if tipped over and trying to roll back up? I know that occasionally I have to wiggle my paddle out of a loose stays before I scull my kayak if tipped over.

While there is an increased risk with ropes on deck I am used to them now and deal with them. However I rather not add any more than I have to.

These are my findings on sailing with both systems: 2 side/back stays and 3 stays.
I know that there is a strong following with the 3 stays set ups but I also hear that that is not recommended for winds that I usually enjoy sailing in.
I wanted to share my experience of sailing sea kayaks for ten years, the last 4 with Flat Earth.

.

06 November 2013

VIDEO: sea kayak sailing best hits

A short collection of sea kayak sailing best moments.
From expedition distance paddling to fast afternoon outings Flat Earth Sails have been a trusted companion on my rudderless kayaks.
After years of using Flat Earth Sails these days I welcome windy conditions when sea kayaking.
Every kayak that I have fitted a sail to has delivered great fun, but some kayaks sail better than others.

 
Video produced for a sea kayak gathering in Austria. View it in full screen if not using a mobile device.

If the winds are blowing above 20 knots I prefer a smaller sail of 0.8m² since most kayaks I own have a relatively low hull speed; a bigger sail does not equate to higher speed. However, with lighter breezes I often can sail slightly faster with a 1.0m² as I usually don't reach the kayak's hull speed.
I prefer masts in carbon fibre with only two side/backstays instead of the often recommended 3 stays.
On my sail set ups the boom swing is limited to 180° and I now firmly believe that this configuration is safer than the full 360° swing of a 3 stays set up.
After recently sailing for a month and 500 Km (in borrowed kayaks) I have concluded that limiting the boom swing prevents dangerous situation when sailing in higher winds.
More details on my findings in this post here

.

21 March 2013

VIDEO: Sailing with Flat Earth 0.8

.
A few months ago I received a new sail.
For years I have been using a Flat Earth Sails of 1.0 m² in all conditions and I wanted a new one to use specifically in higher winds. Paddling in stiffer breezes and sailing with the FEKS 1.0 has proven to be a bit tricky for me. I also have come to the conclusion that a larger sail does not equate to higher speed on my kayaks.

The large Flat Earth Code ZERO 1.0 mt sail seems to shine in lighter breezes up to 15 knots; my kayaks are propelled along at a reasonable speed where I still need to paddle along if I want to reach hull speed (the maximum sustainable speed achieved by paddling alone). At around 15 knots of beam wind I find that I no longer add to the kayak’s speed if I add my paddle strokes; maybe with a short furious burst I have a sudden sprint, but not a continuous increased speed.
At higher winds (like 20 knots) the kayak does not travel any faster, despite the sail offering more resistance and heeling over my boat.
As I have to lean over with the weight of my body to prevent the kayak from tipping and I don’t feel too comfortable in winds higher than 20 knots; I get tired from twisting my body.
In reality, the only time I can really make my kayak’s skeg hum is when I have following seas and my kayak is propelled by the wave hitting it from behind.
A few short fast strokes bring the kayak to the speed of the wave and suddenly I am surfing.
 

Sailing with Green-Piece: the lime-green Impex Cutticuk

I was intrigued to try the new sail: would it still give me the fun rides that I was used to with the big sail but make it easier in higher winds?
After a few months of using the new Flat Earth 0.8 sails (two different ones) I realize that less is more.
The smaller sail propels my kayaks (skeg, fish-form, British style 5 meter-ish) just as fast as the larger FEKS 1.0, when the breeze sends most small motorized watercraft back to the boat ramp.
The smaller sail gives me enough resistance to bring my kayaks to hull speed but not too much heeling over. I can handle the sail better in wind gusts.
 
While rigging the 0.8 sail I made a taller mast to allow me to reach the boom when stowing the sail on deck. In a lowered position the mast (pocket) is longer than the boom and to keep the two together, when folded, I now have the mast slightly protruding over the cockpit.
As sea kayak sails are generally useless for tacking (head wind) I lower mine and stow it on-deck. The mast, boom and sail cloth are bundled and tied together to prevent wind and waves catching the sail and balloon. A sail hastily stored on deck has filled up with water and made boat handling very precarious; I like my sails secure with a low profile to make head wind paddling easier too.
An unplanned advantage of having a higher mounted is to gain a clearer view between deck and boom without much need for a window.

.

27 November 2012

VIDEO: too windy

I believe in pushing myself in environments that are often outside my comfort level.
It is in conditions that test my skills and endurance that I gain a better understanding of my potential and abilities. I encourage others to do so too because I see it as the only thing that really improves a person's confidence, fast.
Lately I have been spending more and more time paddling in windy conditions because I feel that I greatly need to gain more skills in developed seas.
I used to dread a windy forecast; anything above 15 knots would make me reconsider my paddling plans. Now I look for winds that will oppose a tidal flow hoping for some waves that will mimic a tidal race. Bumpy is good.
Saturday's forecast was mild (up to 15 knots) but Sunday was shaping to have 25-35 knots wind against an ebbing tidal flow. I have paddled a few times there before and I knew that with onshore winds waves will form.
What I didn't know is that too much wind doesn't make for better fun.


I reefed my Code Zero Flat Earth sail to reduce it's surface knowing that a full square meter was going to be too much for me to handle.
Soon after I launched I was again glad to be paddling with a Greenland paddle remembering how much more wind effected my Euro paddles used to be in a stiff breeze.
My progress was a bit erratic and the strong wind kept on pushing my bow downwind. The British kayak I was paddling has proven a handful before I relocated the seat forward (to balance its trim for beam winds); this time her handling was really lousy. I wished I would have weighted the bow with ballast to release the stern a bit as I could barely turn my kayak around and paddle back out into the waves for another run.


I will take a weathercocking kayak over a "neutral" one any day. In a weathercocking one I can drop a bit of skeg; in a so called neutral, when the wind really blows, it suddenly becomes lee cocking, something I definitely DO NOT want.
My attempt at sailing was dismal: even with only half sail I could not get my kayak going and I quickly capsized. It was then that all the futzing with sculling training in clam conditions came handy as I managed to roll back up without having to wet exit in a rather tricky scenario. I packed the sail back on the deck and continued to just surf the messy waves.
After a few hours of battling with the wind I called it a day.
Getting the kayak back from the shore across the sandblasting beach with me leaning at a great angle into the wind, was another story.

.

30 October 2012

VIDEO: sea kayak sailing afternoon

Once again the forecast was not too conducive for sea kayaking as we know it: the wind was to blow up to 30 knots!
I didn’t have any specific destination in mind and no major crossing to tackle, so I resorted to have some fun with my kayak sail again.


What could have been a rather tedious slog paddling in a stiff breeze turned out to be a fun filled afternoon of zipping up and down the gentle wind waves.
I only wished that the tidal flow would have opposed the wind direction, to create a bit bumpier conditions :-)

.

29 August 2012

VIDEO: kayak sailing in the bay

A few years back I would cherish the days when the forecast would call for little or no wind; these days I prefer a bit of breeze to ripple the waters of the bay and occasionally produce a few small waves. And there is nothing like popping the sail on a beam wind to make paddling so much easier.


A common misconception is to assume that a sail on a kayak is only good for downwind sailing.
With a well designed sail like the Flat Earth Sail I find that I can sail out and back with very little effort from my paddling; the wind does most of the work for me. When the breeze is not strong enough (below 10 knots) a few strokes often help to catch a wave.

.

12 July 2012

GEAR: sea kayak sail_update

.
Several years of using sails on my sea kayaks has lead to refining my initial set up.
I no longer sew my sails but I still create my rigging, using custom made carbon masts.
On some narrower kayaks my sail set up was not as bombproof as I would like it to be where in a strong breeze (above 20 knots) the mast would not keep vertical and the little polymer base would deform under the lateral pressure of the wind. In a beam wind I would like to have my mast in a vertical position, making the sail more efficient and increase a bit of speed.
Mick at Flat Earth Kayak Sails has developed a brilliant way to reduce the down pressure on the flexible joint and is now shipping his sail with a new system where the mast contacts directly the removable fitting.
I want to use carbon fibre masts but I have been unable to find an off-the-shelf mast that would replicate Mick's system.
Not wanting to bond aluminum to carbon to create the oversize sleeve for the mast, the only way I could achieve what I wanted was to modify my existing masts to create the sliding foot sleeve.
mast base_sleeved_c
mast uphauled
Instead of having a larger diameter mast running the whole length, I just made a short sleeve out of glass fibre tape wound around a tube of slightly larger diameter than my carbon mast. Once cured I bonded a the sleeve section to the base of the existing mast and covered it with carbon cloth for strength, and looks :-)
The sleeve section slides over a stubby base with the flexible polymer allowing the mast touch the actual hard surface of the red plastic base.
No load is now exerted on the polymer so it will no longer deform when the mast is uphauled and cinched down hard.
mast base sleeve_c
mast lifted for demo purposes
Of course the mast can still be lowered as before and when the sail is folded onto the deck the mast slides back up just enough to allow the flexible polymer do its job.

mast folded_c

To prevent the sliding mast and the stubby base come apart I have used a short piece of shock cord threaded internally holding the two together.

boom junction_c

I have also improved my anchor point for the stays on the mast.
I no longer use a stainless steel ring riveted with a saddle to the carbon tube but I prefer the use of soft Dyneema core line bonded directly to the mast with a section of carbon fibre cloth.
The load is distributed better and there is no risk of cracking the thin carbon tube with the pressure of installing (pulling) a stainless steel rivet.
mast stays junction_c
mast rotated to show the carbon cloth anchor for the Dyneema cord
I have been using the new recessed anchors with great success, locating them right on the seam of the hull/deck to achieve a wider stance and a better load angle.
The stainless steel shackles are now heat shrunk (see warning below) to the Dyneema stays so they don't rotate when the sail is lowered on deck.

anchor and stays_c

The whole assembly, viewed from the bow.
on beach_c

WARNING:
update 04JAN13
Richard Sharp from SEQSK has this to say:
"I had the sail up in 20knots and got hit by a gust which tipped me in. It
was at that point that I noticed the sidestay had snapped. Finding it hard
to believe that this was possible given the breaking point of spectra, I
examined the break closely. It was then that I discovered that where it had
snapped the internal spectra cord was melted together. See the enclosed
photos."

P1010037

P1010038

It appears that the core has melted while the outer sheet remained OK.
Using a heat gun at close quarters causes the Dyneema/Spectra fibres to fuse and become very weak.
The melting point of Dyneema is much lower than the outer polyester (pictured here black) and no noticeable damage was visible from the outside.
He now prefers to use the heat shrink only over the loose end of the rope, not over the entire knot and apply very gentle heat for longer to allow the tube to shrink.

image001

05 July 2012

VIDEO: sailing to fend off cabin fever

The June long week-end (Australia) proved to be a bit wet and windy for SE Queensland.
My initial plan to spend two nights on Moreton Island had to be changed due to a strong wind warning forecast.
Instead of festing indoors and risk of getting cabin fever myself and Stevatron headed out in a relative sheltered location to experience the fun of sea kayak sailing instead of paddling.
It has been a while since Stevatron had a sail on his kayak and he had forgotten how much fun one could have with just the wind.


select 720p if you have fast Internet connection
It didn't take long to get the feel for the new Flat Earth Sail and despite the gusty conditions there were no capsizes.

Details on the new mast base mount here
.

12 June 2012

VIDEO: first time with Flat Earth sails

If you have never kayak sailed you don't know what you are missing out.
While sails on sea kayaks are rather popular in Australia, they are not as common in other countries.
USA and Great Britain have recently been introduced to Flat Earth Sails but my Swedish friend assured me that it has never seen a sail on a kayak in Scandinavia
Beside designing brilliant sea kayaks, Johan also designs, builds and sails small sailing boats so sailing a sea kayak was a must-do while on a visit to Australia.


select HD if you have high speed Internet connection
I don't think words are necessary to describe the feeling of gliding along the sea under just wind power.
What is surprising tho is the immediate know-how that Johan displayed when sailing with a Flat Earth kayak sail for the first time: the sails are simple, easy to manage and forgiving in a lumpy sea.
While sea kayak sailing is not strictly sea kayaking and some people frown upon its use when "records" or "firsts" are claimed, I regard them as an integral part of the fun that I can have on the water.
As long as it doesn't have a motor it's all good to me :-)

.

10 January 2012

SHOP: sail mast base on Valley kayak

Following Jim's set up for a sail mast base on a Valley sea kayak utilizing the compass recess, I want to detail here a fitting that requires no additional holes drilled to the deck.
On the Valley decks there is usually a fitting that holds bungee cords in place typically used for stowing split paddles on the foredeck.
I have a hard time placing a paddle under those bungee cords and prefer the paddle parks.
Actually these days I prefer to carry a Greenland style storm paddle on the rear deck.
So, that fitting on the deck is the perfect anchor for a sail mast base.

Valley deck fitting recess

I remove the fitting and grease up the cavity/recess with several layers of mold release. I find that a final layer of PVA mold release works best before I fill the cavity with epoxy paste (I mix epoxy, microfibre and filler to the consistency of peanut butter).

filling cavity

Working-in the paste ensures that there are no air bubbles. I build the base high sitting proud of the deck.

filling cavity_2

glass layer

I add a layer or two of fibreglass to keep the epoxy paste from running too much

flattening top

A final layer of kitchen cling wrap to be able to shape the paste into a neat bump and I place a square object to create a flat surface.
Once the epoxy cures overnight I pry the fitting out of the mold and smooth it with sandpaper. There will be a dimple where the original bolt held the deck fitting: that's where I drill through the sail base and countersink the top to accept a new longer bolt of the same thread pitch (M6, metric). I cover the mast base with a layer of carbon (just for looks) and UV stable epoxy (West System 105/207). I make sure I push the countersunk area down to maintain the recess for the bolt's head. Often I place a small greased-up plastic cap just of the right size with a tiny weight on it to keep the wet carbon cloth in place.
Once cured, I drill through the last thin carbon layer to insert the central bolt.

Central bolt

The base of the mast is carefully positioned onto the carbon base and holes drilled to accept the fasteners.
A recess is needed for the nuts underside making sure they clear the deck.

underside

I use M4 stainless steel Allen key button head fasteners and nylock nuts.

fastened to deck

The plastic red base is bolted to the carbon base which in term is secured to the original Valley factory anchor on deck.
The base does not rotate because of the recess. No holes were drilled into the deck for the mast base but I still needed to create some recessed anchors for the mast stays.
I also reinforced the underdeck area with a rib fabricated from foam-core, fibreglass, carbon and epoxy under the mast base since the deck is too flexible.
However I discovered that this location is not ideal on all Valley decks. The deck fitting is not located in the same place on the different model Valleys. One of my Valley kayaks tends to leecock when paddled at slow speeds.
Just like when I used to windsurf, where I tilted the mast back to turn into the wind, I have now tilted the mast of my Flat Earth Sail backwards to give the kayak a neutral direction in beam winds. 
Video of sailing with this kayak and the new Code ZERO Flat Earth Sail coming soon.


.

12 December 2011

SHOP: reefing the Flat Earth Code Zero sail

In a previous post I have reviewed the new Code Zero Flat Earth kayak sail.
It features reefing point to make the sail smaller when the wind is really blowing and a smaller sail is called for.
My solution to reef the sail is simple: two little loops that pull the sail to the mast and reduce the surface area. One drawback: I need somebody to help me with the reefing since I can’t be seated in my cockpit and reach the loops; they are just too far away from me.
Gnarlydog News reader Kris Carlson, a designer from Swansea MA, USA has designed a relatively simple way to reef the Code Zero sail when paddling solo.
Most of his sea kayaking is usually alone and he wants to have the ability to safely reduce the surface area when seated in his kayak.
He sent me some drawings and explanation of his idea.
Here is his concept


click on image to enlarge


Above is a composite image of his concept using Ronstan superlight plastic blocks.
Below are the itemized components from Kris:

1. Upper Reinforced Grommet in Sail

2. Upper Double Reef Block

3. Upper Webbing Strap

4. Lower Reinforced Grommet in Sail

5. Lower Reefing Block

6. Lower Webbing Strap

7. Reef System Downhaul Block

8. Mast Base Turning Block

9. Bullseye

10. Clamcleat

FEKS CodeZero_reefing_det

Installation:
Webbing straps (3,6) need to be sewn onto the mast sleeve of the sail. A double block (2) needs to be lashed to the upper webbing strap. A block (5) needs to be lashed to the lower webbing strap. A block (8) needs to be lashed to the base of the mast. A bullseye (9) needs to be installed near the edge of the deck to guide the line down the side of the boat. A Clamcleat (10) needs to be installed with-in arms-length of the cockpit. Tie or splice block (7) to the lower reef line. Tie a stopper knot at the end of the upper reef line and pull it through the upper sail grommet (1). Run line through the first sheave on block (2). Run line through block (7). Run line through the second sheave on block (2). Run line down through block (5). Feed line through lower grommet (4) and tie a stopper knot. Feed the lower reef line (now attached to the upper line via block 7) through the mast base block (8). Feed the line through the bullseye (9). Run the line back to the Clamcleat (10) and tie a stopper knot.

Use:

When the reef line passing through the Clamcleat (10) is pulled towards the cockpit, the downhaul block (7) will evenly pull the upper reef line loop towards the deck and collapse the sail up against the mast.


Kris’ concept could be modified to have the Clamcleat removed from the deck and replaced with a suitable cleat on the end of the boom. This variation however might require to have the sail mast lowered (like when stowed) since reefing the sail lifts the boom higher away from the operator. Also, the Ronstan blocks could be replaced by simple stainless steeel rings although some increased friction might occur on the reefing line.
I am sure that some will find this reefing concept too complicated but I am very thankful to Kris for his contribution to this blog; he has find a solution for solo sailors that want to use the reefing on the FEKS Code Zero sails.


.