30 December 2011

PHOTO: surfing with Flat Earth Code ZERO sail

I finally had the opportunity to give the new prototype Flat Earth Code Zero sail a decent test.
I had the perfect conditions: 15 knots of tail wind on a opposing tidal flow that created short waves.
The steep waves kept me on an edge while trying to manoeuvre the kayak and prevent myself from being dunked. A few very fast braces were necessary every so often when the kayak tried to broach. Eventually I got tired but the smile on my face lasted for hours.

Brace sailing FEKS_1
Tail wind makes for easy sea kayak surfing with the new Code Zero Flat Earth sail

.

21 December 2011

GEAR: Greenland paddle_The Hammerhead™

Guest article by Greg Schwarz.

Hammerhead storm_ret

Because I carry a "Storm paddle" as my spare, I like to practice with it quite often so it's not a problem should I really need it one day.
I now enjoy the sliding stroke so much that sometimes I forget that I'm using the storm paddle. This, however, can be a problem (in my case anyway) if I suddenly need to brace, and I extend the paddle only to find my inboard hand empty! ( a butterfly roll is a handy skill to have here!)
I decided that if I made the end armour wider than the blade, I would have a built in "stop" to let me know that I had reached the end. Hydrodynamics is a pet interest of mine, so it appealed to me to shape the armour to optimise it's "end plate" effect, ie:- To help prevent the loss of water that could be used for lift, instead of escaping over the tip. This is by no means a new concept! Greenlanders, for centuries have been putting enlarged tips of bone and ivory on their paddles to protect the timber when smashing ice etc. But was that it's only purpose? As these people relied on their equipment for their survival, I'm inclined to think there is more to it. We now know that the Greenland paddle can be as efficient as a modern wing paddle when used correctly. As the son of a professional fisherman, I know that nothing is kept onboard that is not functional. So why the enlarged tips on some paddles ?….I decided to experiment.

Oiling the stick_ret

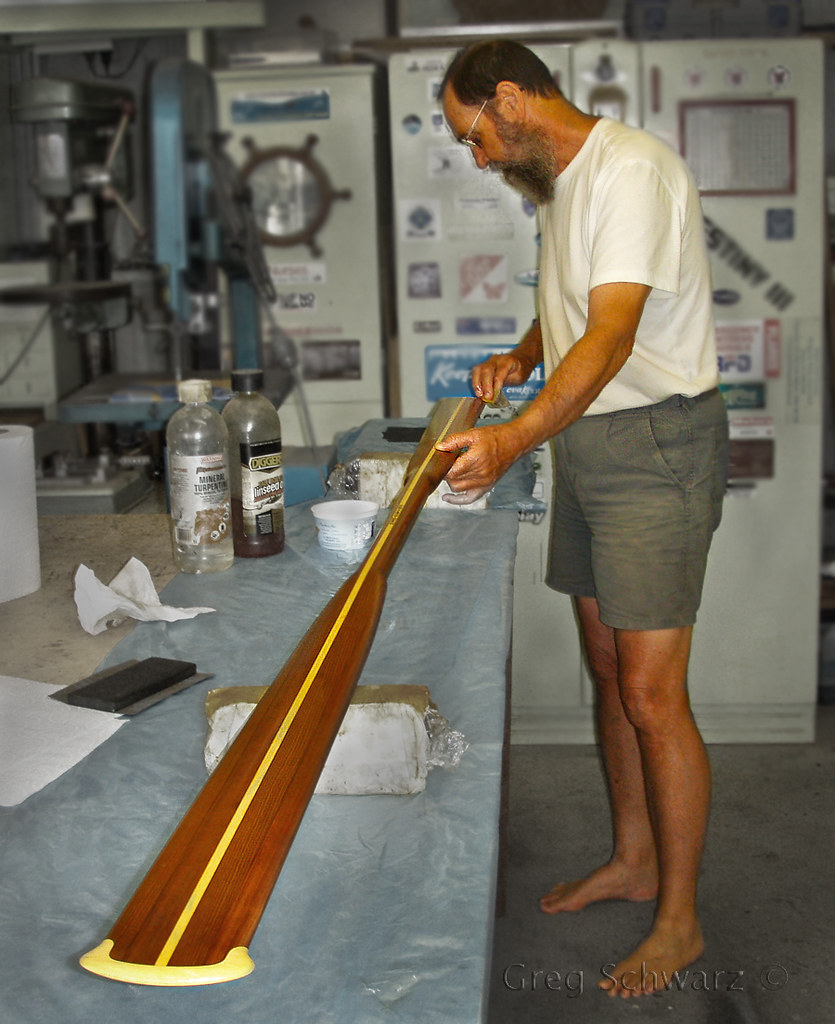
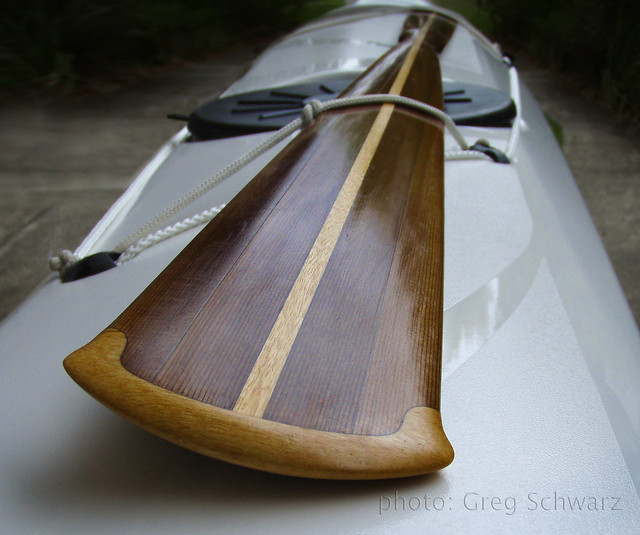
I built a new storm paddle with widened tips. Although it was only 6.5mm (1/4") wider overall than the blade, it felt very smooth through the water. Everyone who tried the paddle made this comment unsolicited. It also appeared to give more lift, but this paddle had 1.5mm (1/16") finer edges on the blades than my normal blade, was that just the difference?

Hammerhead on deck_1

My paddling mate Steve needed a new paddle so I decided to expand on the theory and make the "flanges" larger, now 16mm (5/8") wider than the blade….We could always trim them down if they didn't work.
Steve likes fine edges on his paddles so I have yet to try this style of end armour on a thick edged blade, however, the paddle feels like it's another step up again in lift. Comparing it with a same sized, conventional paddle of mine, there is definitely an increase in lift and it is very smooth through the water.
My biggest concern was the entry into the water, but it is whisper quiet and again felt smooth. I had keep the tips of the "flange" quite fine for this reason, so I will have to get Steve to refrain from breaking ice with it… a real problem here in S.E. Queensland ;-)
I am keen to try even larger tips now! The sad part is that I now feel, all of my own paddles are obsolete!

Hammerhead on deck_2

last edited 21DEC

.

13 December 2011

GEAR: the invisible paddle.

The latest development in superlight paddles has lead to thin incredible pinnacle of engineering: the Invisible paddle.
Strictly designed for Greenland style rolling it is aimed to the advanced kayaker.
Beginners will find this paddle way too light, unsupportive and downright too difficult to use.


Expert paddlers however will cherish the flexibility that this laminated paddle (according to Helen Wilson) offers. It is also one of the lightest and most compact paddles for air travel.
I am sorry Paul, but your Northern Light paddles have met their match :-)

.

12 December 2011

SHOP: reefing the Flat Earth Code Zero sail

In a previous post I have reviewed the new Code Zero Flat Earth kayak sail.
It features reefing point to make the sail smaller when the wind is really blowing and a smaller sail is called for.
My solution to reef the sail is simple: two little loops that pull the sail to the mast and reduce the surface area. One drawback: I need somebody to help me with the reefing since I can’t be seated in my cockpit and reach the loops; they are just too far away from me.
Gnarlydog News reader Kris Carlson, a designer from Swansea MA, USA has designed a relatively simple way to reef the Code Zero sail when paddling solo.
Most of his sea kayaking is usually alone and he wants to have the ability to safely reduce the surface area when seated in his kayak.
He sent me some drawings and explanation of his idea.
Here is his concept


click on image to enlarge


Above is a composite image of his concept using Ronstan superlight plastic blocks.
Below are the itemized components from Kris:

1. Upper Reinforced Grommet in Sail

2. Upper Double Reef Block

3. Upper Webbing Strap

4. Lower Reinforced Grommet in Sail

5. Lower Reefing Block

6. Lower Webbing Strap

7. Reef System Downhaul Block

8. Mast Base Turning Block

9. Bullseye

10. Clamcleat

FEKS CodeZero_reefing_det

Installation:
Webbing straps (3,6) need to be sewn onto the mast sleeve of the sail. A double block (2) needs to be lashed to the upper webbing strap. A block (5) needs to be lashed to the lower webbing strap. A block (8) needs to be lashed to the base of the mast. A bullseye (9) needs to be installed near the edge of the deck to guide the line down the side of the boat. A Clamcleat (10) needs to be installed with-in arms-length of the cockpit. Tie or splice block (7) to the lower reef line. Tie a stopper knot at the end of the upper reef line and pull it through the upper sail grommet (1). Run line through the first sheave on block (2). Run line through block (7). Run line through the second sheave on block (2). Run line down through block (5). Feed line through lower grommet (4) and tie a stopper knot. Feed the lower reef line (now attached to the upper line via block 7) through the mast base block (8). Feed the line through the bullseye (9). Run the line back to the Clamcleat (10) and tie a stopper knot.

Use:

When the reef line passing through the Clamcleat (10) is pulled towards the cockpit, the downhaul block (7) will evenly pull the upper reef line loop towards the deck and collapse the sail up against the mast.


Kris’ concept could be modified to have the Clamcleat removed from the deck and replaced with a suitable cleat on the end of the boom. This variation however might require to have the sail mast lowered (like when stowed) since reefing the sail lifts the boom higher away from the operator. Also, the Ronstan blocks could be replaced by simple stainless steeel rings although some increased friction might occur on the reefing line.
I am sure that some will find this reefing concept too complicated but I am very thankful to Kris for his contribution to this blog; he has find a solution for solo sailors that want to use the reefing on the FEKS Code Zero sails.


.

01 December 2011

SHOP: removable sail rigging

In my previous post I have detailed how I install cat rigged style sails (Flat Earth Sails for example) onto the deck of my kayaks.
The anchors, cleats and mast base are permanently secured to the deck and require several holes to be drilled through the fibreglass deck to have the bolts secure the items.
Some people cringe at the idea of drilling holes in a brand new kayak especially when experimenting with equipment that they are not familiar with.
My early sail rigs had the cleats mounted too close to where my hand would occasionally brush when paddling in a low angle style.
A few hits of the knuckles on the sharp edges of the cleat made me relocate them and plug the holes left behind by the fasteners.
My friend Jim has not done a lot of kayak sailing before and was unsure if he would like it on his Nordkapp LV.
He decided to minimize the damage that an ill fitting sail rig would do to the deck and devised a system that would keep his deck clean when he did not want to use a sail.

For the mast he used the existing recess where normally a 70P compass would be fitted. He fabricated a base out of fibreglass that has the identical hole location as a compass. He does not use that type of compass but he believes the recess and the complex fibreglass profile of the deck in that area is a very solid location for the mast base. He did not need to reinforce the deck since no flex is detected when the sail is deployed, even in heavy winds.
Jim's set up3

Jim had to drill holes for the stay anchors; unfortunately a Nordkapp LV does not have perimeter-line anchors suitably located to double as stay anchors.
The rest of the cleats and pulleys (blocks) are mounted on a custom made piece of fibreglass that contours the deck of the kayak.
Jim's set up1

He simply waxed the deck of his kayak with mould release compound (even grease would work in a pinch) and laid up several layers of glass cloth and resin. Once the laminate cured he padded the underside with a thin layer of closed cell foam to prevent scuffing of the deck and installed the necessary hardware to secure the uphaul and trim the main sheet. He used sections of stainless steel welding rods embedded into the laminate to create guides for his lines but stainless steel saddles could be used as alternative.
Jim's set up4

His "plate" is held back by a thin line that loops around the coaming of the kayak, and in the front, under the deck bungee cord. The coaming line takes most of the load, the front bungee just keeps the plate close to the deck.

Jim's system can be removed in seconds when he does not use his sail. The base for the mast remains attached up front but there are no cleats and pulleys to clutter his deck.


PS 02DEC
Owen Walton has sent me these images of his sail set up.
It requires one more stay (back stay) but the sail can rotate freely 360 degrees.
The plastic cleats are low profile.
Deck cleats

Deck fittings