Showing posts with label waterproofing. Show all posts

28 June 2011

GEAR REVIEW: dry bags selection

Dry bag are a pretty much a necessity for sea kayaking. We all want to keep our stuff dry and the easiest way is to do it is in a dry bag. But not all dry bags are the same: the quality and durability varies incredibly.I have used more than 9 brands of dry bags and not all performed equally.
Dry bags come in so many different types, shapes and sizes that one is often puzzled by the choice.
My findings stretch over 15 years of using dry bags, and not just for paddling.
Unfortunately the old adage that says: "you get what you pay for" is not always true.
I had some dry bags that despite costing much more than others performed poorly.

The most critical thing for me is the shape and size of a bag and how well it fits in a sea kayak.
When I transitioned from canoeing to sea kayaking I found that most of the dry bags I owned were too large. For efficiently packing of my gear and food for long trips, small bags fit better in the tight confinements of the hatches.
While a large dry bag will contain obviously more gear and cost less than two smaller ones, I find that dry bags that are larger than 15 liters are not as easy to use as smaller ones. I have a bag of 25 liters that I never use for sea kayaking: it just doesn't fit in my boats.
Since sea kayaks tend to have limited size hatches and the hull shape is long and pointy at the ends, small bags can be arranged easier around the confined space of the hatch. Of course if your kayak is a barge you have to pay much less attention to how you pack. :-)
2weeksfoodx2
14 days worth of food for two paddlers
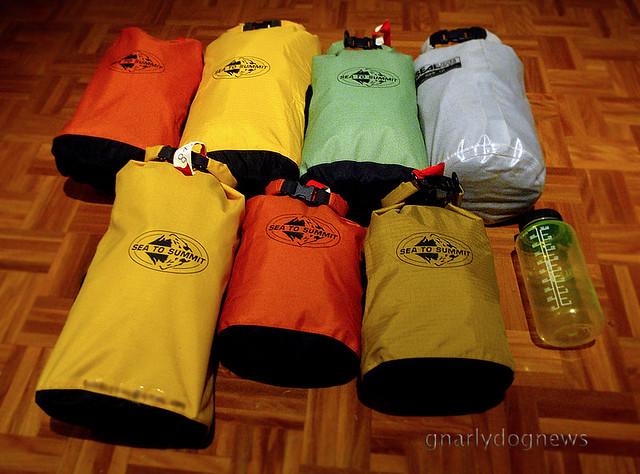
I don't own tapered dry bags since I find the very skinny bow and stern of the kayak suited to store items that don't need to be kept imperatively dry (like tent poles). My favorite size bag is 8 liters.

The material/fabric of a dry bag is very critical in my opinion. The very light ones made from siliconized nylon are not suited for waterproofing items placed in the hatch.
While a decent kayak should have dry hatches most don't. A combination of sloppy workmanship, bad design, user error and deteriorated hatch covers lead to leaks in the supposedly dry hatches.
Items tend to get wet occasionally. Experienced showed me that Silnylon just isn't sturdy enough to prevent being punctured, on the surface of the fiberglass or around camp. Even if some of my kayaks are perfectly smooth inside, the items that the bag contains are often hard and abrade the fabric when jammed inside the hatch.
The clear PVC bags usually seem to offer good protection against abrasion, for a while, but when they puncture they are really hard to repair (I had no luck). Over time mine failed where the fabric folds over at the closure area.
My favorite dry bags are made of woven nylon fabric exterior that have a waterproof coating on the inside of the fabric.
As the bags get dropped on sharp ground and occasionally abraded against the hull, repairing the nylon fabric is extremely easy.
SeamGrip repair_c
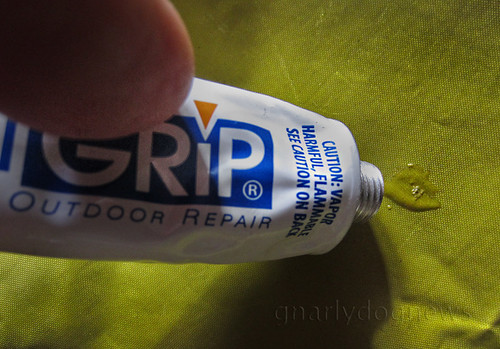
A dob of Seam Grip will patch any leak.
Fabric-type bags also tend to be less bulky when folded over to seal and slide easier when pushed inside the hatch. They also don't have the sticky surface to grab your pots or hard shiny object when cramming them.
Siliconized nylon is however a great material for storing you sleeping bag that should be then placed inside a second dry bag.
Dry bags are NOT submersible and, in the event of a hatch flooding, the water will seep inside a dry bag; so it's good practice to keep the sleeping bag in a double dry bag, especially if the hatches aren't positively sealed.

The ultimate dry bag has two roll-down-buckle closures. The first one will keep most of the water out and prevent a pressure leak on the second one. The second one will prevent any moisture that has crept past the first closure going inside the bag.
These double dry bags are the bomb:
OR doubledry

Obviously when backpacking all I need is a decent siliconized nylon dry bag since there is no water pressure on the closure, just potential rain that leaks inside backpack.
Like all fabric items, dry bags require some minimal maintenance: keep them relatively clean and dry.
A bag left wet inside the kayak for a prolonged period of time will develop mould and probably fail prematurely.

My favorite bags:
Sea to Summit Big River, for most of my "hard" gear when sea kayaking (food, utensils, repair kit)
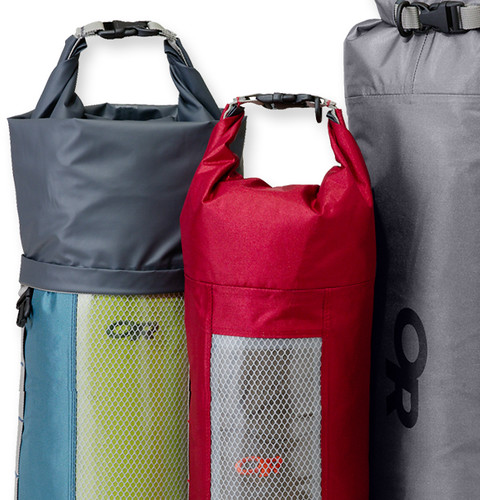
Outdoor Research Durable Dry Sack for clothing and sleeping bags (inside a second bag) when sea kayaking.
Outdoor Research Ultralight Dry Sack for clothing and sleeping bag when backpacking.
I also use some Seal Line bags for items that might have hard items stored (kitchen)

06 April 2011

GEAR: cameras_function follows design

I photograph a lot from the cockpit of a sea kayak. I believe in having a compact digital camera at hand to to capture dynamic shots, therefore I seek cameras that fit into the pocket of my PFD.
I understand that cameras that use a small chip (CCD) have limitations, even if manufacturers want to make the consumer believe that more megapixels will yield a better picture. Images produced from a compact will always be less sharp than a decent DSLR. I am fine with that. I seek images that depict the action of paddling, often in rough conditions. A DSLR in a waterproof housing wouldn't work for me.
For the last 5 years I have been using waterproof cameras that see a lot of exposure to the marine environment. My cameras usually get wet at least once a week, often stay wet for at least a few hours and are regularly rinsed in fresh water once back home.

Recent problems with one of my cameras ( I would like to keep the brand name undisclosed but users of that camera will recognize it) had led me to investigate a bit.
It appears that my problem is not isolated, actually quite common.
The manufacturer designed the shell to withstand water immersion and impact.
The core of the chassis is made of fibre reinforced plastic. To make the camera more appealing face plates of aluminium are covering the core.
Why aluminium? doesn't that material have problems in salt environments?
Well, aluminium comes in different grades and it seems that the manufacturer used a 7000 series that, while cheap to produce, has a terrible corrosion problem in salt water.
corrosion on rear_c
eventually stopped working; 6 months old
Different striking colors can be used for the anodizing of the aluminium plates that offer limited protection for corrosion, however bright orange, yellow, red etc. can be used to create visual appeal.
There is a prolific use of colored anodized aluminium in compact cameras these days.
The problems arise when the aluminium is used in marine environments.

While the manufacturer is very aware of the corrosion problem (on previous models) they insist in designing the new models of the waterproof camera with the same old aluminium plates.
The dirty part is that the manufacturer is NOT willing to honor the warranty when the cameras eventually fail due to corrosion.
corrosion on rear_2_c
In my case the corrosion crept into the button's contacts and, even though the camera never had water intrusion, stopped working.
I had a bit of a "heated" email exchange with the Hong Kong warranty dept. and eventually they warranteed my camera.
A reader of Gnarlydog News contacted me and had a different story.
The official Australian importer representing that brand refused warranty replacement to him claiming that the camera was not rinsed in fresh water within one hour after salt water use.
ONE HOUR!
Erin's camera_2
Erin's camera: used a couple of times, 3 months old!
C'mon. Real pictures are taken in real outdoors environments where rinsing the camera within an hour is totally impractical. To my reader I suggested to seek compensation under the "not fit for the purpose intended" claim.
The manufacturer can not expect that a waterproof camera that is designed for snorkeling should be washed within such short time.

To the manufacturer I suggest:
1)  drop the aluminium plates and use stainless steel or polycarbonate instead (other manufacturers are doing it)
2)  make sure that you design a camera that is fit for what you claim. Lab test are one thing, real world is an other
3)  honor legit warranty claims. You are doing more damage to the brand than the cost of replacing those few units that actually get used in the environment that the pretty advertising campaign suggests.

17 August 2010

PLB problem and modification

I have been using a Personal Locator Beacon for a few years.
While Australian Maritime laws require that I should carry an EPIRB while paddling offshore (more than two nautical miles from shore in non sheltered waters) I find that for sea kayaking a PLB is possibly a safer unit to have in case of emergency.
I believe that a beacon should be carried on the person and be readily accessible in case of emergency instead of being stored below deck when kayaking.
Current EPIRBs are too bulky to be carried on my PFD.

I have my PLB attached to the back of my life jacket and is exposed to the marine environment, often submerged while rolling or swimming.

While the manufacturer does assure that my PLB (model GME MT 410G) is a waterproof and submersible unit there are several documented cases (that I am aware) of malfunction of the unit by water intrusion.

On a trip to the Whitsunday Islands our group had one GME unit activate by itself without any prompting by the user.
The PLB started to beep suddenly giving the same signal as transmitting an emergency call.
We were able to paddle to shore and had the presence of mind to quickly deactivate the unit by disconnecting the battery.
Here are the steps that we performed to disable the PLB:
To do so, the top cap had to be unscrewed and removed.
unscrewing cap
removing cap


After removal of the cap the plug that connects the battery was separated from the electronics.
removing battery connector
water droplets on battery
salt water present inside the PLB
At close inspection and careful analysis I noticed the small "O" ring under the central screw was deformed.
It appears to be a design flaw.
GME designed the unit to have the "O" ring under the screw under compression but did not create a suitable receptacle for the "O" ring to be housed and prevent lateral expansion.
So, after a while the "O" ring slips away from the screw's head and allows leakage. The faulty unit was returned to GME and repaired under warranty.
I was assured that it was an isolated case but after the recent reports of other GME units malfunctioning I have my doubts.
GME has not recalled the units nor updated the design.

I have therefore decided to address the problem myself and modified the unit to possibly prevent the same problem occur again.
The central screw on the cap is recessed deeply into the shape of the cap.
I simply cleaned the area and applied a liberal amount of polyurethane sealant (not silicone) to the cavity and worked it really well to ensure good adhesion of the sealant.


In a few years time when the battery of the PLB unit will need replacing there might be a bit of a problem reaching that screw but in the meantime I hope that at least my unit will possibly not malfunction there.

26 October 2009

SHOP: leakproof through bulkhead hose

In a previous post I have described a solution for a hydration system.
The water bladder sits under the deck, on a “shelf”, and the drinking hose sits in front of me on the deck.
In the Nordkapp LV the deck is lower and less space is available in the foredeck.
Water bottles positioned under the bungees on deck just don’t cut it as they often end up in the sea, especially in rougher conditions.
While on short trips carrying water on the PFD is a possible solution (small amount of water) in the heat of summer in Queensland a liter of water does not get you far.
Hydration in a subtropical locale is a serious consideration.
The water bladder could not go behind the seat (Valley makes sure that the rear cockpit bulkhead is tight against the seat) so the best solution was to place it in the day hatch.
I wanted a positive seal between the drinking hose of the hydration system and the bulkhead.
A simple hole that is just undersized drilled in the deck might not do the job: small amounts of water could still get through and wet items that are otherwise totally dry in a Valley hatch.

I decided to position the drinking hose to the left of the cockpit.
On the right hand side there is the day hatch cover and the outlet spigot for the electric bilge pump.


After drilling a smaller hole with a high speed drill (Dremel_ I use high speed or gel coat chipping can occur) I enlarged it to a slightly undersized dimension for the clear PVC water hose.
I placed an “O” ring on the hose that is slightly constrictive and let it sit on the hose for a while.
The “O” ring would create a small indent in the hose making sure it will really seal well.


I roughened up a circle on the gel coat around the hole, clear off the “O” ring, cleaned the surface with acetone and inserted a slightly greased up (mold release) hose and “O” ring hard against the gel coat.

roughened-up circle on gel coat; hose and "O" ring inserted
I mixed up a small quantity of West System epoxy 105 with 207 hardener (UV stabilized), added some tint (I didn’t like the pale yellow color) and thickened it with microfiber (for strength and workability).
With a toothpick I carefully covered the “O” ring creating a full encasement of the ring.
After curing it overnight I removed the hose (it released easily since it was greased up) and shaved away the excess epoxy to make a smooth “fitting”
epoxy still needs polishing
The “O” ring is now encased in the resin with the rubber surface against the PVC hose making it really leak proof.

PS MAR'10 For a much simpler solution that does not require epoxy Kiwibird managed to source just the right size rubber grommet.
It apppears that her solution is just as effective as mine.
If you can get hold of a grommet that fits the hose tightly I suggest to follow her set up.

The hose can still be slid in-out to shorten or lengthen it according to the paddler's needs.
The hose end inside the day hatch has a quick release coupling that came with the bladder so removing and filling up the bladder is a breeze.
The hose is usually stashed under the deck bungees and can be easily reached when needed for a drink.

After trying different solutions for a drinking system this one seems to address all the shortcomings of the other(*) systems.

* other systems that I tried:

-1) water bottle on deck: not enough water, fall off and hinder some paddle strokes.
-2) water bladder on PFD: if enough water in bladder for a day’s supply PFD becomes rather heavy on the shoulders. Also hinders rolling.
-3) water bladder in cockpit and drinking hose threaded through tunnel of spray deck: bad idea in case of wet exit (rough waters) and inevitably pain in the butt when forgetting to remove before landing :-)
PS: Kiwibird simplified the drink hose system by using a rubber fitting that needs no epoxy work; details here