03 September 2015

Photo: camp at Japanese Gardens

After one of the most intense days of paddling and sailing in swell against rebound against high cliffs the sheltered camp location we found was stunning.
The carefully arranged although natural setting of little ponds and low vegetation reminded me the look of Japanese gardens.

Aland sunset_4_c
more images appear on my photo blog

Polished granite slabs make camping easy as nothing gets dirty while sitting down and dinner can be had without sand in it.
Sunset only came very late and was not fully dark when we finally retired for the night.
Sea kayaking at very high latitudes has its advantages even if sea temperatures are not as balmy as back in Queensland.

.

25 June 2015

Digital camera hand grip modification

.
I reached the limit of tolerance with my pocket compact digital camera as I realized my images were lacking sharpness when light conditions were not ideal.
Most of my images are displayed on monitors (web use) and only occasionally I print the very best pictures of mine.
While all images look great when displayed small things don't look so good once they are enlarged.
Add, low light and the tiny lenses of most compact cameras suddenly look a bit fuzzy.
If you believe that the images you take on your smart phone are good enough, then don't need to read any further: you are wasting you time.

I want better results for my photographic efforts but I refuse to schlep a large camera with me.
Weight and bulk are always my concern (some say, personal too :-) but gone are the days of toting around a large heavy camera.
If the subjects that I want to photograph would be within reach of a short walk away from the car I would worry less, but when I take my cameras in a backpack and lug it around for days in the back country, or it has to fit inside my kayak on extended trips, then size does matter.

Oly vs Nikon_lens
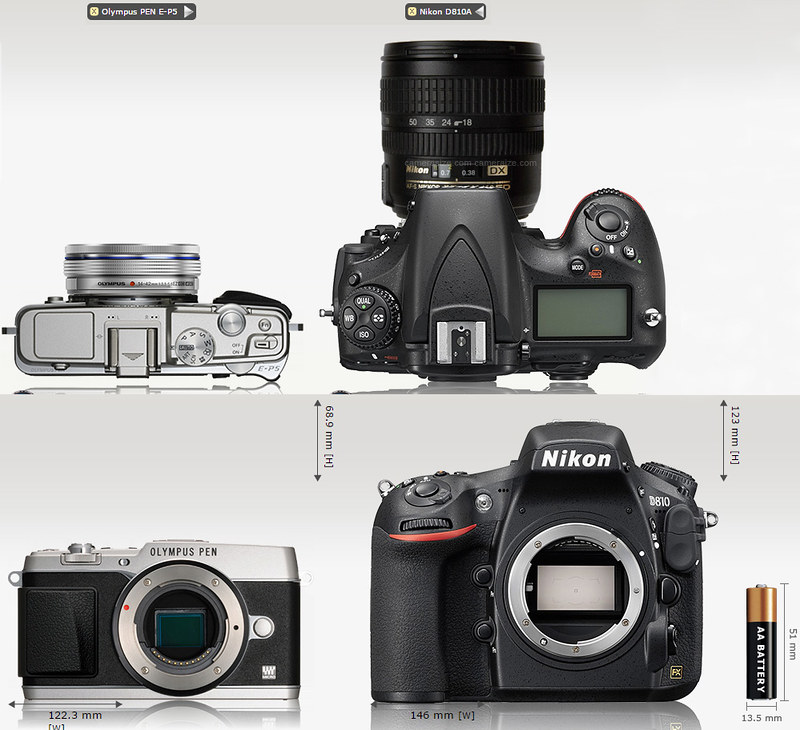
Olympus camera and lens compared to Nikon, similar focal length, same f/stop
For my second trip to Scandinavia I wanted to have a higher quality camera, one that allows me to apply my skills and one that would reward my creativity. My intention was no longer to simply record my trip, I wanted images I would be happy to hang on my wall.

The Micro Four Thirds system of cameras is the perfect compromise for me: images are sharp and the cameras have features than no other system has, size being one of the major ones.
I can afford to have a camera body and a couple of lenses with me and not really feel it in my backpack, something I could not do with a lot of DSLRs.

But where the Micro 4/3 system excels it also poses some problems with users with slightly bigger hands: the hand grips are often a bit small.
As I started to attach larger/heavier lenses on my Olympus cameras I felt that the grip was a bit diminutive and I had to clutch the camera too tightly.
I could use their Pro models but that would defeat the idea of compact and light: I just wanted a better grip, not a bigger camera.

camera size comparison_3
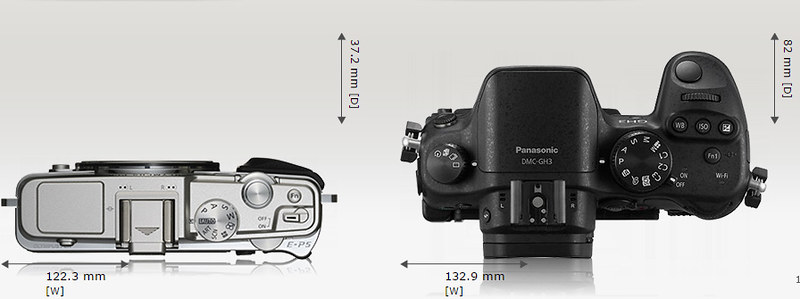
same image sensor, different body, same image result
Commercially available add-on grips look too bulky (no need to have a base plate bolted to the bottom if one is not needed) and the glue-on aftermarket grips were not available for the camera I was using.
However those aftermarket grips looked really good and that prompted me to come up with my own DIY modified hand grips.

8653856259_d099d50b12_z
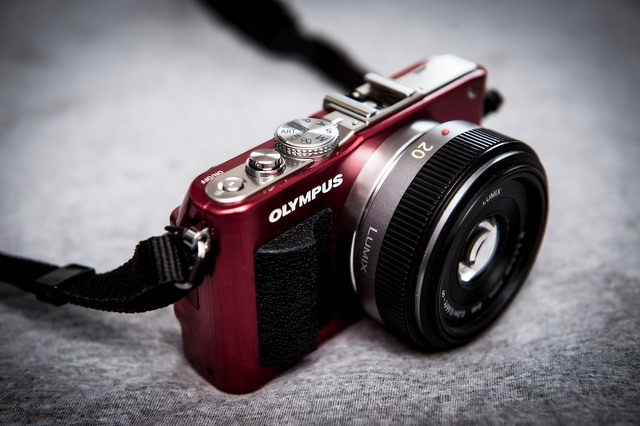
commercially available stick-on grip, here

I used Sugru, a silicon putty that feels like Plasticine but cures hard like rubber, sticks well and does not feel too slippery.
A small packet of Sugru contain enough material to shape a single grip if a large one is desired, or just enough for two smaller ones. Bright colors are available but I went with conservative black.
I have so far modified an Olympus E-PM2 (smallest of the M4/3 series) a couple of E-P5 and several E-M5.

grip mod on PM2
Olympus E-PM2
Once the putty is kneaded and then firmly pressed onto the existing small protrusion where the fingers grip the camera, I shape the soft material with a small bladed knife to create a clean edge.
A moistened index finger keeps on shaping the putty until I am happy with the overall shape, then I run the back of the knife blade to create a perfectly uniform surface (not bumpy).
If the form of the grip is in its final shape I like to add some texture to enhance the surface and create more friction for my fingers.

Sugru grip on P5_3
Olympus E-P5
Here I use a combination of pins, pen ends (to create little circles) and an old toothbrush for finer texture.
I try to achieve a look that matches the existing camera finish but I simply will never be able to replicate the faux leather surface.
Before I let the camera rest to cure I check that there are no bits of stray silicon putty on the grip, where I don't want it.
While the cured silicon does become hard like rubber it is not impossible to remove it mechanically but one needs to scrape vigorously to get it off.

Sugru grip on M5_2
Olympus E-M5
I have seen some photographers push their fingers into the soft putty before it's cured to have an "imprint" look; I go for a more universal one where the grip is an extension of the original one and less fully-custom.

Sugru grip on M5_3
Olympus E-M5 and E-P5, modified grips

The grip on my Olympus cameras is now much more positive: my fingers don't have to clutch the body so tightly and the softer grip fatigues my hand much less when on longer photo shoots.

Photographing the sunset_c .

15 June 2015

Hail hell

by Tess Dodd_Adveturetess

 I am almost halfway across, enjoying leaving the demands of a busy morning further behind me with every paddle stroke. My thoughts are filled with plans to paddle in Alaska.

Reading Audrey Sutherland’s books (87 days solo kayaking in Alaska, swimming and kayaking remote sections of the Hawaii coast); I recognized her spirit and felt inspired by her adventures. I spend many hours vicariously sharing her inflatable canoe. A deep rumble draws my attention to my right. I was no longer sharing Audrey’s inflatable canoe in Alaska, but alone in my Nordkapp in Moreton Bay.
Looking south, I can see darkness on the horizon. It’s distant and appears to be moving across the lower bay, out to sea, away from me. I can see the strip of white sand where my friends are camped. I know it’s not far for me to paddle now. I stop day dreaming and increase my cadence, keen to reach the beach before any rain falls. I don't fancy setting up my tent in the rain.

 Loud rumble. The storm is moving closer to me but still appears to be tracking out to sea. I stop paddling to hydrate and consider my options: I am closer to my destination than any other land.
If the storm moves towards me and not out to sea, no matter which direction I take now, I am going to get wet. I decide to continue my original course.
Before I move on, a sea turtles large head breaks the surface nearby, taking a huge gasp of air before sinking below. I notice a large shadow to the right, too big for a turtle, maybe a dugong? The shadow moves closer, rising from below to bump my boat, moving it with its body. Far out, a shark! It brushes my kayak as it moves away; I drop my drink hose, pick up my paddle and get moving.

Hail storm at Bakesleys_Gill
Storm approaching, viewed from Blakelseys Landing _photo Gill Booysen

 I can see 2 motor launches near the island heading for anchor. Other watercraft have disappeared. At least I won’t have to worry about being hit by a boat out here.
BOOM… a BIG thunder clap. Louder. Closer.
The cell is moving as fast as my heart is beating – fast! I know I will soon be engulfed by this heaving beast. OK Tessie, don’t panic. Relax, think clearly, and make a plan. Stow the sail securely on deck. Point the kayak into it. Prepare to brace. (Larry Gray ‘storm brace’ technique – it works).

I glance behind me and see sunshine and blue sky. Bizarre. Ahead, I see people moving about on the beach, the storm cell has not quite reached them. I think about my friends and wonder if they can see me out here, knowing they can’t. I don’t want them to be worried about me. I wish I was with them right now. Looking into a sky that is now a deeper green than the water, I realize it’s going to hail.

I think of Australian Ironman Grant Kenny who was out training on his ski when a sudden hailstorm hit. The hail stones cut his head open. He flipped his ski over and used it for protection until the storm passed.
After the earlier shark bump, I was really hoping I would NOT end up in the water today, but knew I may not have a choice. I also hoped for small hail stones and a fast storm. The transforming beast of green and black was almost upon me. I could feel my body trembling, adrenaline I guess.

BOOM. …BOOM…crackle…The vibrations travel through me. I can no longer see the beach. The wind increases slightly as large drops of rain begin hitting the water around the kayak. It is a strangely beautiful moment. A bird sitting in the water just ahead dives below and does not reappear. Darkness wraps around me. Shit! A wave of anxiety washes through me. My senses tingle as I wait. Suddenly, a raspy sound becomes an almighty roar, heralding it’s arrival. I try to point the bow into it, bracing. The ferocious blast is more than I have ever experienced in the kayak before, EVER.


meanwhile on shore...
I struggle to stay upright, my ears fill with the roar of the wind, waves wash over my deck, my body is physically forced backwards over the deck. I bend forward trying to lessen the effects of the wind on my body. The drops of rain become bigger and the waves smaller. My saturated hat brim is down around my face. I can’t see or hear over the roar and have no idea what’s coming next. I focus on staying upright. A new sound joins the melee. Crack. Crack. Crack. Then, I feel it. HAIL! Hailstones begin hitting my head, my arms, my hands. Hail ricochets off the kayak painfully hitting my face and teeth! The hailstones increase in size. Taking one hand off the paddle, I cover the top of my head until my fingers hurt from the stinging ice. There is no relief. The noise is deafening. The hailstones bruise and sting where they hit my body. If this continues, I will have to get in the water for shelter. I don’t know how long the storm lasts, but neither of my hopes comes true. The hailstones are large and the storm is not over quickly. I endure an icy beating from Mother Nature until the storm cell eventually moves over me, the hail and wind easing to leave only gentle rain hitting my bruised face and body.

After storm selfie
After storm selfie
 Once again able to see, I look towards the island. It is further away but, in front of me is the bizarre sight of half the beach covered in grey sky, half blue sky with a rainbow…half storm, half rainbow! I self-assess. My kayak is still upright. I am beaten up but OK. I am close to tears, instead of crying, I begin laughing. Strange, stress relief laughter. I feel spent, alone and ready to resign the ‘Adventure’ from AdventureTess.

AFter the storm_Tess

But, I am in the middle of the bay and need to get moving again. The storm is north of me now, cutting a swathe over the water and Dunwich on the west coast of the island. I have a clear view of blue sky either side of this intense black and green field of energy. Eager to see my friends, I pick up my paddle and begin the work to reach them. I have been blown away from the island, so have additional distance to make up. While paddling, I reflect on the experience and my choices that day. I believe I made good choices and would have felt some comfort with company, but would company have created an additional concern? Using the last of my energy, I reach the beach. People are moving about, fixing campsites, and checking boats. I see my friends and call out. Relief floods through me as they make their way to the water’s edge to meet me.

Tess' arrival_Gill

Note: I launched just after lunch to paddle 10km to meet my friends, who were waiting at camp. Conditions were mild. The water was bumpy with a 10 to 15kn headwind. A possible late thunderstorm was forecast. It was early and there were no signs of a storm when I launched. I often paddle alone and am familiar with this stretch of water. I have been asked about the wisdom and safety of my paddling alone. Even for these short distances in familiar water. I enjoy social paddling with a few close friends but feel confident in my skills and decision making ability to kayak alone.

Recounting the story_Gill
great campsite story...                                                                                                                                       photo: Gill Booysen

.

11 June 2015

Photo: Pot of Gold

Legend goes that there is a pot of gold at the end of the rainbow.
Maybe it's true.

Commander at Straddie_1_c
SeaDog Commander in the sun shower

.

03 June 2015

VIDEO: Restocking supplies on expedition in the Baltic

Paddling a sea kayak along the archipelago of the Swedish Baltic coast required occasional restocking when on a 5 week trip.
Drinking water was available on most inhabited islands where a hand pump was most times operational. Only on the outer skerries we had to carry water for several days.
Food could be had on some larger islands but Rödlöga topped them all.
The little village had a green-grass square with a children's swing hanging from its large tree.
The shop owner is a very happy passionate man that loves his work.


you can view this video at 1080p

The attached bakery and coffee house was incredibly busy with customers, considering the island is tiny with a small population. Sitting outside under the shade of the large "main square" trees and watching the relaxed atmosphere of the unpretentious locals was like stepping back in time.
Children would play and run freely without overbearing parents fearing that they might get dirty.
The local dress code seemed to be short fashionable gum boots and the occasional life jacket, worn at all times, even at the cafe. Then I realized that just about all of them were sailors that came in the morning to get a java fix. The little harbor was abuzz with beautiful small sailing boats; motor boats were rare and jet-skis not existent :-)

Unfortunately this year my expedition route will not be in Sweden but in Finland. I would love to stop again at Rödlöga.

.

25 May 2015

GEAR: SeaDog Commander.

I fell in, again.
I have been surfing for an hour and now I was heading home.
I sailed for a while but then I turned directly into the wind and I wanted to stow my sail away.
Stretching myself forward trying to reach the shock cord to secure the folded bundle of my sail made my loose my balance and I kept on falling in.
I realized that I needed a sail that would fold easily on my kayak deck.

Commander testing_1

My high aspect SeaDog sail (0.7 Code Zero) catches the wind beautifully and allows me to cut into the wind at a higher angle than before, but I had a problem with it.
Since I like to have my spray deck area clear my sail is mounted differently than a typical set up.

Commander1 at Peel_r
image courtesy of SeaDog
A typical mount for the sprit style sail (SeaDog, Flat Earth etc.) calls for a tall mast with stays mounted below the boom.
I prefer to have my sail mounted lower to allow the mast not to protrude in my "paddling area" when stowed on deck.
I don't like a folded sail that encroaches the deck where my hands swing when paddling.
It's simple: I want that area clear so my hands don't catch the sail.

On my high aspect sail the boom is substantially shorter than the luff (mast section) resulting in an uneven bundle when the sail is lowered down: the boom is much further away from me when I lower my sail onto the deck.
In need to secure the sail firmly onto the deck I use a section of sock-cord to wrap around the mast, battens and boom to create one solid bundle that I know will not fill up with water when waves wash over the deck or I roll the kayak.
In the bumpy waters, I was now having trouble reaching that boom and I was loosing my balance.

SD_CodeZero 07_c_gd
SeaDog CodeZero 0.7, folded. In order to reach the boom this sail intrudes the cockpit area.

It has been in the back of my mind for some time now: I wanted a sail with a slightly lower aspect and a longer boom.
I consulted with SeaDog sails and after I proposed my design to Richard a technical compromise was hatched: the design I had in mind might end up less efficient and might cause some loss of upwind reach.
One other trait that I really desired in my new sail was that it would be quiet.
Douglas Wilcox aptly calls it "motoring"; the sound that the leech makes when sailing cross-wind.
I don't like that at all and a highly value a quiet sail.
I proposed a double batten to Richard and after some measuring we decided on an optimal length, given my initial request of "neat bundle" when folded.

SD_commander_5_c_gd
SeaDog Commander Mk1, folded on deck

SeaDog sails distinguish themselves for utilizing the very best high tech materials and superb cut and manufacture.
I love the pattern that the carbon fibre makes in the sail cloth used for the batten pockets; it looks really high-tech matching the finish of my Greenland paddles :-)
The twin battens shape the sail perfectly and there are no areas where the sail puckers; the sail stays aerodynamically shaped to catch light breezes allowing a high angle of head wind sailing.
My concerns for decreased upwind performance did not materialize: the SeaDog Commander stays inflated at really high angles too.

SD_commander_3_c_gd
SeaDog utilizes a special thin thread that is incredibly tenacious and UV resistant: the results is beautiful stitching.

I asked for a combination of sail cloth that would be stretch resistant, dry fast and remain stable. I also wanted to add the Clear-View feature into the bottom panel so I could easily see where I was going. Somehow vinyl windows cut into my previous sails never really helped with forward vision; they were just too milky and were ruining a smooth surface with a puckered section of sail (different stretch).

The new Clear-View panel really offers a better vision of on-water obstacles and boat traffic while the sail surface remains perfectly tensioned and smooth.
The orange tip adds incredible high visibility on the water while the pattern in the other panels makes for a stunning sail. The SeaDog Black Diamond series (with the Clear-View TM lower panel) are the highest technology sails that I have see so far: a true masterpiece.

SD_commander_2_c_gd

The new SeaDog Commander has a surface area of about 0.8m² to match the sail I most use in winds up to 20 knots.
Above 20 knots, in a beam wind, there is more heeling (pushing over) that I am comfortable with while my kayak does not really go any faster (max. hull speed).
If I know that there will be high winds forecasted I rather use my SeaDog CodeZero 0.7m²
I mounted this SeaDog Commander sail high enough on my carbon mast so I can reach it when folded onto the deck but not too high to intrude into my paddling area.

SD_commander_1_c

Disclaimer: my association with SeaDog has grown where we now collaborate on new projects. After purchasing my first sail from SeaDog I started to offer feedback and stimulated Richard with new ideas. Richard recognized that there was room for improvement with the original sprit sail design. Being able to quickly accommodate to special needs or requests with custom sails, SeaDog is able to blend high-tech sailing cloth to create sails that I wanted to realize for a while. I paid for the materials and he offers his workmanship: we both benefit from it.
 

02 April 2015

Video: I Have A Dream

Some dream of power, some dream of money.
Some dream of a slimmer waist and a bigger chest, some dream to have more hair on their head.
Some dream of a fast red car or those pretty shoes they saw in the window...
My dream is different.


reward yourself with full screen viewing in high definition on a larger screen, this one was not meant for mobile devices...

My dream is to be lost in a sea of islands, midnight sun and good friends.
A place where I don't need to keep time or answer my phone, no updates and no "likes".
And then the presence of mind to take it all in.

.

10 March 2015

Photo: beach army

Emerging from their hiding places below the surface they invaded the beach.
As the sea retreated at low tide they came in swarms and like a massive stampede they roamed the exposed sand.

Soldier crab_3

I could hear the noise they make when their tiny claws; hundreds of them collectively sounded like a swarm of locust.
I lowered myself to a foot above ground and a magical world appeared in front of me.

Soldier crabs_5
army of soldier crabs

But as soon as I creep a few feet closer they start to move hastily away from me.
I chase them, I want to observe them close-up.
They can not outrun me but they can hide again, quickly burring themselves into the sand with a funny circular digging motion.

Soldier crabs_1

I must have looked like a child running after the micro monsters, camera in hand, hovered a foot above ground. I would get close enough but by the time I would compose my image and focus the lens they would be gone below the surface.
Pesky little soldier crabs: so captivating yet so elusive.

I was camped at my favorite little island in Moreton Bay; in front of me the somehow less attractive stretch of beach to the power boats as they can't access it for being too shallow.
I calmly waited for the evening to come and replace that harsh midday tropical light; ideal time to capture photographs.
Some call it happy hour, I call it golden hour, for different reasons.

Coral at Peel_c
.

24 February 2015

Video: Petra surfing Dugong

Let's name her Dugong!
Short, stubby and just a bit "a face only a mother could love" look... the Whisky16 (designed by Nigel Foster) is not a pretty kayak in a traditional sense.
Dugong seemed an appropriate name for Petra's new kayak.
While looks are often deceiving, this kayak fits Petra very well and being very maneuverable spurs confidence in rough water.
The inspiration for the name came from the previous day's event where Petra and I were kayak-sailing back from my favorite play spot. A dugong suddenly surfaced too close to my kayak and looked at me with spooked eyes: I don't know who got the bigger fright, me or the dugong.
Then he quickly dived, his tail flew inches away from my face wetting me completely while I ducked my head avoiding the slap as he desperately tried to miss my kayak.

That evening a sail was hastily mounted to the Whisky16's deck as next day's forecast was promising conditions for a pseudo tidal race: wind against ebbing tide.
With the new SeaDog sail mounted up front Dugong really brings smiles


click on image above to play video

Edging and rolling the Whisky16 seemed easier than the borrowed kayaks: a good fit where one can brace without having to splay the legs too far could be the reason.
The keyhole cockpit where the legs can be kept relatively close together, allowing some wiggle room but still offering a solid wide area of contact, is probably a better solution than the diminutive thigh braces wings I see in most kayak cockpits.
So far the two kayaks that I own with such keyhole cockpits are way more comfortable than the other system I have tried.
The rear deck is not particularly low in the Whisky16 however layback rolls are still reasonably easy since the seat is not jammed right against the rear of the cockpit rim.
For once the seat is not shaped as a racing short-pan paddler crunched-over design: a lower front lip allows for more relaxed seating.
My experience with short seat that have a higher front has not been positive as I often end up with "dead legs". A flatter pan and longer seating area is key for longer paddles where my thighs don't suffer from blood circulation cut off.
Petra, while being the exact opposite of my bio-metrics, seems to agree: she dislikes short peaked seats and loves the flatter pan. The seat of the Whisky16 is here to stay.

The front deck however has already been modified to accept a sail and place it at closer reach. Details here.

12 February 2015

Photo: walking on the beach

A walk on the beach helps me to focus on what matters in life.
Even more rewarding if remote and later in the day.

Red Beach FEB15_2

Barefoot, at water's edge, the sun close to the horizon.

.

03 February 2015

SHOP: filling-in the compass recess

.
Mounting a sail on a sea kayak requires a few considerations: position and deck strength.
On the newly acquired Whisky16 the front hatch is positioned surprisingly way far forward.
In front of that there is a deck-mounted compass recess.
The previous owner of that kayak had a small sail mounted there and I used the existing holes to mount mine.

PT65N_Whisky16_bow
first run with the Whisky16
A test run revealed that the sail worked well on the Whisky16 but the reach was a bit too far for grabbing the sail and stow it on deck, securing it.
Most other sailing buddies use a 3 stay set up ending with a rather long mast.
I see their stowed sails going past the front of the cockpit ending with a sail mast half way across the spray deck. I prefer to have mine clear off my deck so I do not rub it with my hands when paddling.

The Whisky16 however has the sail mounting spot just a bit too far out or reach for the sail to fit nicely on deck. As I use my sails on several kayak I need to have them fit all decks well, with the same stay lengths.
I could increase the size of the mast and bring the sail higher (and make an ill-fit on other kayaks),  but I prefer to keep the sail as low as possible and minimize the heeling force of a beam wind exerted on the sail.
The compass was not really needed on that kayak so I removed it and decided to utilize that space to mount the sail closer.
I wanted to fill the void left (recess on the deck) and create a solid base for the mast fitting.
I could have used a simple block of wood somehow attached to the deck but I knew I could do better.
I shaped a block of foam (polystyrene) to fit a bit loose within the cavity of the recess. Shaping the foam was easy: a bit of coarse sandpaper on a cork block.

Once the foam was shaped I placed kitchen cling wrap (Glad® wrap) over the deck and wetted out some fiberglass with epoxy. I draped the block of foam (under side) and pressed it into the cavity.
Once cured (overnight) I removed the excess and trimmed the glass.
The finish was really rough; maybe I could have used wax and mold release to have a perfect fit but nobody was going to see that part.
The top was done similarly.
I carved out foam from the area where the screws for the fitting would go for my mast base and filled it with epoxy glue (mix of epoxy and microfiber). While wet I then used a few layers of glass for the top and a scrap of carbon fibre for where the main load would be.
Polystyrene foam compresses easily when spot loaded so I needed a sturdy surface.

compass fill-in1
the "black patch" is carbon fibre cloth over the carved-out foam filled with epoxy glue.

The next step was to clean and cut back the edges a bit leaving a bit of a gap between foam block and kayak deck. I filled that with epoxy glue again to create a hard edge and seal the two surface together creating a monocoque style item. Of course I waxed and prepped the kayak deck so epoxy would not stick to it...

compass fill-in2
the new mast-base fitting placed only for testing

The last step was to add a nice layer of carbon fibre weave: partly structural, partly looks.
A few coats of UV stabilized epoxy later and my block was ready for installation of the mast base.
I used wood screws that secured the mount very solidly: the epoxy glue is very dense.

compass fill-in3
the foam block now covered with carbon fibre cloth

Final step: securing the foam block to the deck.
This one was simple: a small bead of polyurethane all around the edge (only!) to then seal perfectly against the deck.
The original deck void was now sealed and the sail mounted closer to the cockpit.

compass fill-in4
notice the difference between old position and new closer location for the mast base. The old holes will get filled with matching gel coat

So, do 4" make a difference? *
Not in handling of the kayak but when reaching for the sail to be bundled on deck when stowed (reaching for the boom particularly) is now much better.

*Hell yes, she said :-)

28 January 2015

Video: Best Moments of 2014 in Moreton Bay

Once a year a new video is edited focusing specifically on local paddling's best moments.
This one was shot over 2014 in Moreton Bay alone.


Of course, only a very small portion of "the fun stuff" is recorded despite spending most weekends on the water.
I compiled mostly "orphan" clips that were not previously included in a other videos; the shots are short and highlight the best moments of a day's outing.

In order of appearance: Gnarlydog, Vanilla and Petra.

PS: work has already commenced on the 2015 edition...

.

12 January 2015

Photo: sail-surfing the New Year

Conditions were just right: a running out tide met by an opposing 15 knots of wind created waves steep enough to be caught by a small sail.

Surfing Dugong Jan15_1

Petra sail-surfing with Northern Light paddle and SeaDog sail.

.