Showing posts with label skeg. Show all posts

28 May 2013

Review: carbon-fibre skeg by Norbert Gancarz

A carbon-fibre skeg is the ultimate bling aftermarket accessory for any kayak.
If however one considers a kayak just a tool and has little affinity with his/her craft then I don't think this skeg blade would excite them.
Just as some consider a car just a car and see no point in retrofitting it with performance accessories I am sure that to some a carbon-fibre skeg might seem an unnecessary replacement.
I don't care that much about my car but I will not say the same for my kayaks.

As all of my kayaks are rudder-less and incorporate an adjustable skeg for directional stability, I often wondered if the deployment of my skeg had as much effect on drag as when I would lower a rudder (it has been a few year since I have paddled an over-stern ruddered kayak).
In my Impex Kayak the skeg is a rather chunky HDPE blade (same material as the common kitchen chopping board); if I fully lower that skeg my kayak seem to slow down a bit and become a tad sluggish.
When Norbert Gancarz ( norbertga@o2.pl from Poland) offered me to test his latest creation, a carbon-fibre blade to retrofit the Valley skeg, I was keen to try it.

Norbert skeg_1

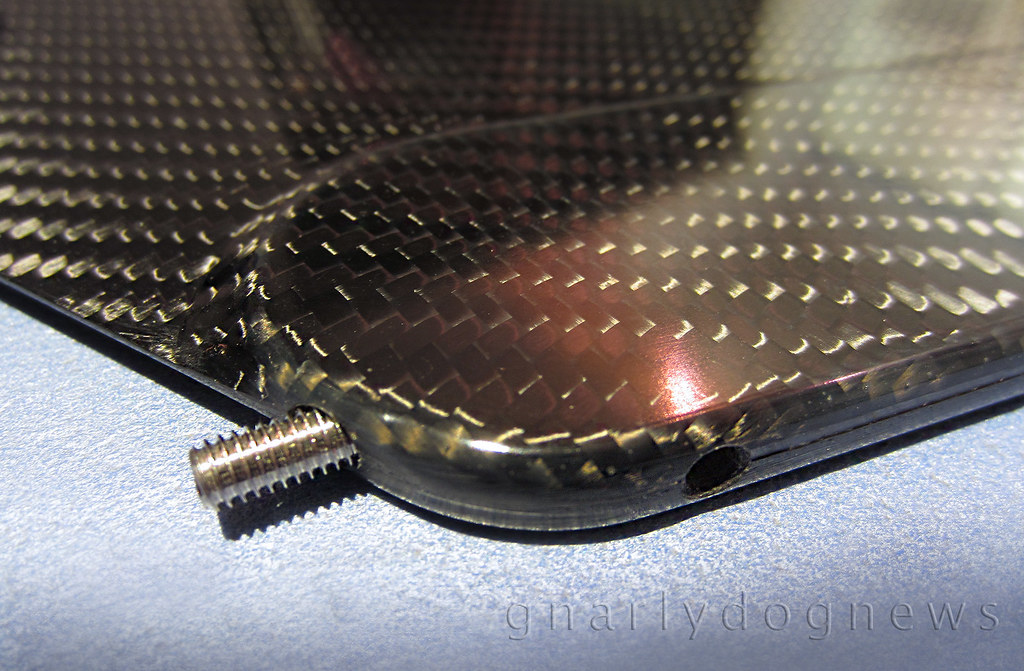
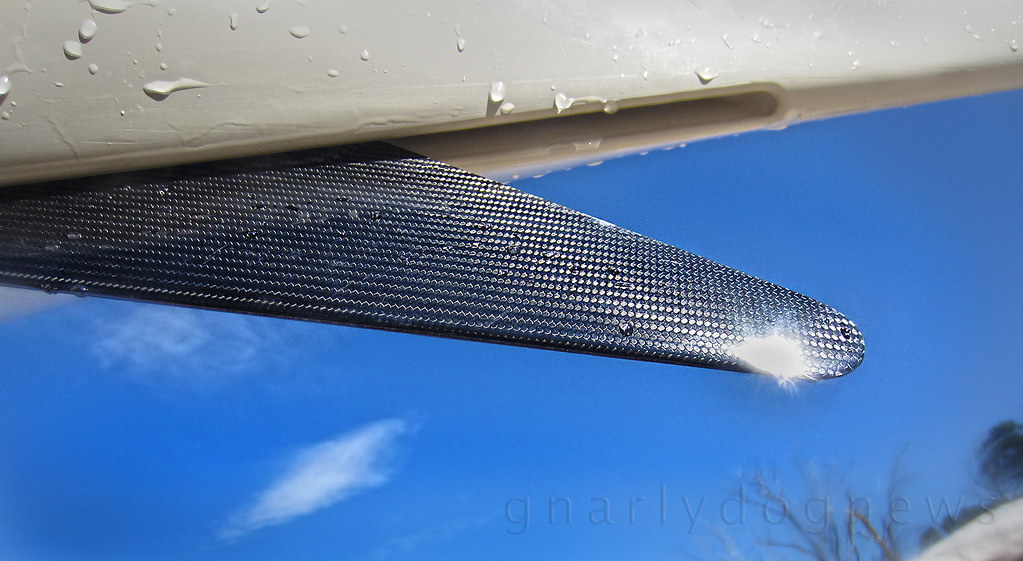
The skeg blade is of the exact outer shape as the VCP factory standard grey plastic one but this carbon skeg has features that the Valley skeg does not.
The blade is foil shaped like the wing of an aircraft with the leading edge thicker than the back of the blade. This shape minimizes turbulence and promotes an easy flow of water over the blade when the skeg is deployed. Less turbulence equals to less drag that leads to less effort and possibly more speed.
While speed has never been my goal, less effort is certainly welcome.

Norbert skeg_2

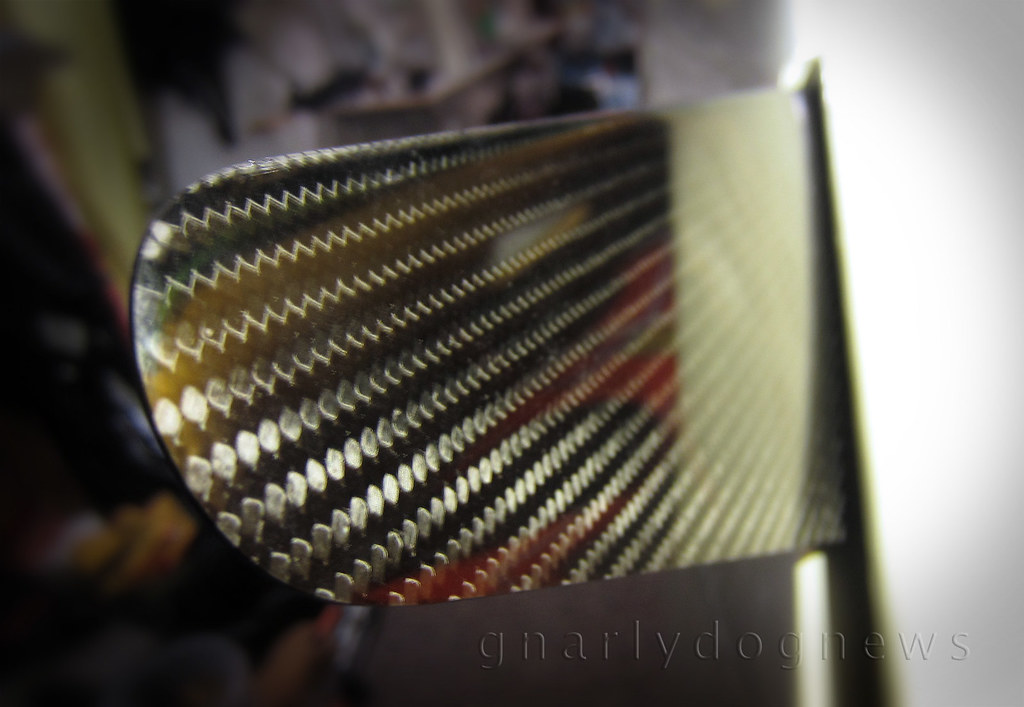
The skeg blade is a real work of art and the finish is incredible.
Somehow I felt that such a beautiful accessory looked out of place on the basic finish of the Nordkapp LV's skeg box but I was keen to find out if the blade would actually fit and how much effort the retrofit required. After all the existing skeg blade was still working fine...

Norbert skeg_5

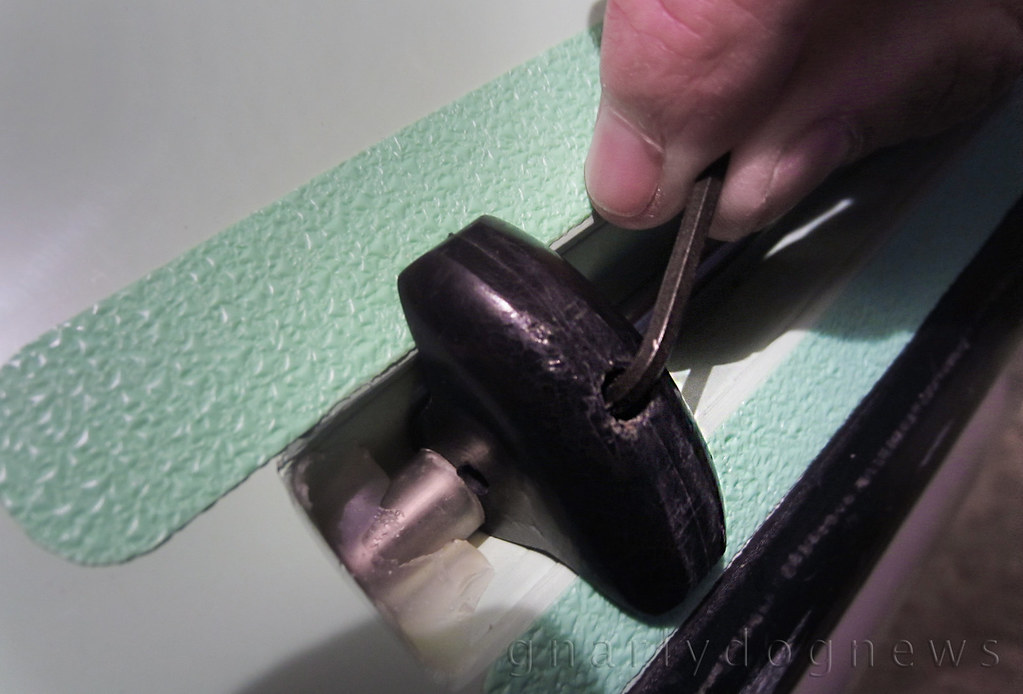
I inserted a 2.5mm Allen key (like the one you get with IKEA furniture, but smaller) into the skeg's control knob found next to the cockpit and tried to undo the grub screw. Initially it would not budge but a squirt of water dispersant (WD40) and a few minutes later the key turned and the pinch on the skeg cable was released.

Norbert skeg_6
salt built up under the skeg control knob,washes away easily...
The knob was free and now I could pull out the skeg blade past its normal maximum deployed setting; the wire came out easily.

Norbert skeg_7
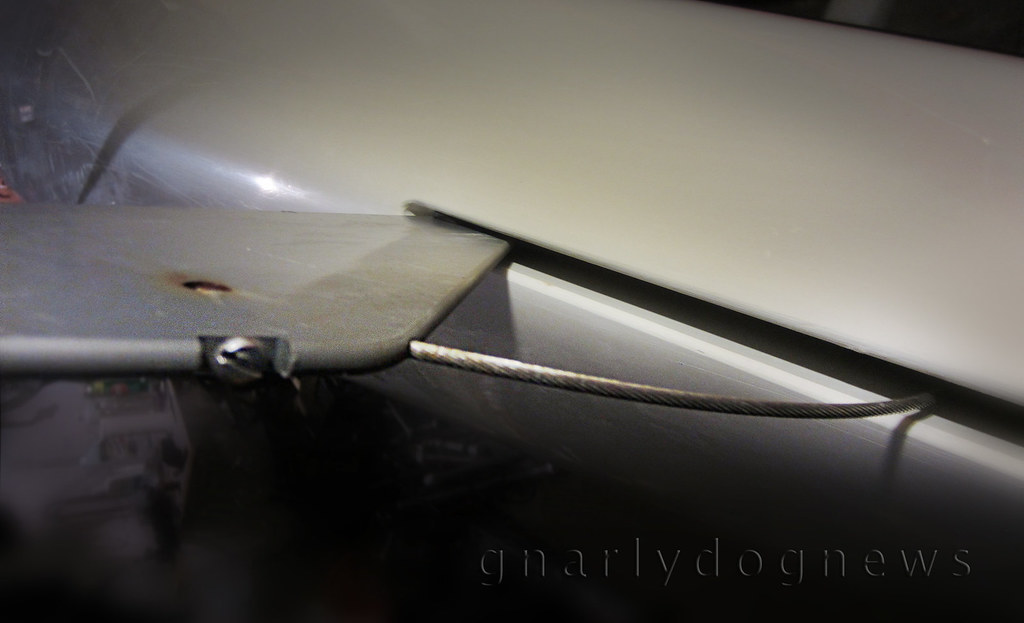
factory VCP skeg blade removal

Norbert skeg_3

Norbert supplied me with the stainless steel wire that I had to cut as each kayak model has a slightly different wire length .
The carbon skeg has a very neat grub screw that pinches the cable that is inserted into blade (not show here).  I measured the length of my existing Valley skeg wire and cut the new one to length with a pair of diagonal cutters (a decent pair of plier would have done the same job).
I fastened the grub screw on the carbon blade onto the wire, inserted the blade into the skeg box and easily wiggled the wire back into the housing all the way to the control knob. The skeg blade was sitting flush with the hull, all the way in the skeg box, before I aligned the knob over the hole in "slider tube" and secured it tightly with the Allen key. I made sure that the knob was in the "retracted" position or I would not be able to deploy that skeg all the way like before.

Norbert skeg_4

Norbert's skeg blade sits in the skeg box without any wiggle and the two little rubber washers on the pivot point offer just enough resistance to keep the blade in position preventing the skeg blade from creeping back up when the kayak is at speed (one of my kayaks does that and I am yet to fix it...).

But how does the skeg perform in the field, err water?
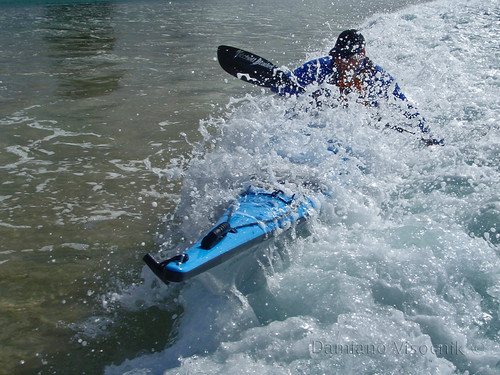
It seems to have a crisper feel with the lowering amount precisely translating to directional changes. There are no wobbles and no "skeg hum" as I have in some of my other kayaks when I speed down the face of a wave.

Norbert skeg_10

As for increased speed?
I can't attest to that as I don't have a GPS to measure precisely the speed of the kayak.
All I really want is to have the kayak on the beach, belly up, with the skeg standing up proud showing off that sexy carbon weave :-)

Norbert Gancarz can be contacted at norbertga@o2.pl
.

29 January 2013

GEAR: a rudder like no other

.
I found myself constantly sweeping on my right hand side with my Greenland paddle to keep away from the crushing waves against the tall cliffs.
The mild swell of 1.5 mt and the stern wind of 15 knots were affecting my British kayak like I have not experienced before.

Beecroft Pen_cliffs_JAN13
in a bay away from the heavy seas
I often paddle in environments where wind is the only reason for a bumpy sea.
Even on my extended trips I have dealt with following seas and breezes with ease where a bit of skeg control would balance the weather cocking of my rudderless kayaks.
I used to paddle kayaks with over-stern rudders and while I found the cruising much easier than in a skegged boat I eventually abandoned the pesky blade sticking from the end of my boat.

The deciding point of getting rid of those kayaks with “crutches” came when for the 3rd time my rudder was damaged when paddling in waves.
I was not happy with the unreliability of rudders.
As I transitioned to skegged kayaks I learned how to maneuver a boat with my body (by edging) and sweeping paddle strokes while directional stability was taken care by the adjustable skeg.
I now have 6 sea kayaks, all without rudders.
There is no denying that a skegged kayak is slower for me and that I don’t keep a perfectly true course in following seas. That does not bother me: I am in no rush and I usually don’t like to paddle too close to my buddies to be then bumping into them if my kayak sways a bit.

But all that I wanted right now was keeping myself off the big spraying smashing waves against the rocky coast. I looked over to my paddling buddy and I noticed that he was paddling with greater ease and I didn’t see any corrective strokes.
He was paddling a Hybrid550.

Hybrid550_1_c

The Hybrid550, designed by Andre Janecki, is a kayak like no other. It has features that I have not seen on any other boat. The thought process that went into designing and redefining that kayak is astonishing.
Unlike so many kayaks that capture my attention and look so similar to each other, the Hybrid550 is unique. Its cockpit concept is inspired by white water boats with outstanding ergonomics for this chunky body of mine while still perfectly accommodating a more nimble paddler. One thing that concerns me is the width of the cockpit rim since my, how can I put it, “love handles” might rub after a while.  I hope one day Andre will produce the Hybrid 550 L (larger cockpit) but I understand his priorities are with the “UNLIMITED”  www.hybridfoundation.org.au
 
What intrigues me however is the unique design of the rudder.

Hybrid rudder_1

As I was dissatisfied with my own rudder boats many years ago I looked at the alternative integrated rudder of Mirage kayaks. I liked the look and I like the idea of not having anything above deck, nothing to swing and insert in to the water with so many less parts moving resulting in a simpler design. What concerned me though is the fact that the Mirage rudder is always there, even when I want to seal launch or beach land and drag the kayak.
After repairing a few split rudder blades from friends' Mirages I decided that if I wanted a rudder boat it had to be stronger than that.

I did the initial mistake of confusing the rudder design of the Hybrid550 as a copy of the Mirage but I never had a real close look at the details.
I now know that the pivot points are totally different, the action of the swinging blade is different and the construction is nothing like the Mirage...
 
Hybrid rudder_2

I had a GOOD look at the rudder on the Hybrid550 and I have one thing to say: brilliant.
It can take a reverse surf landing, right on the blade. What other ruddered kayak can do that?
None that I have seen so far.

Hybrid rudder_3
rudder folding away and bending when being hit
I am a skeg man, I don’t paddle with ruddered kayaks. I came to the realization that rudders are not suitable for my style of paddling.
With the Hybrid550 however I now have to rethink my philosophy. 

Psychologists have found that familiarity breeds fondness: Repeated exposure to a new idea leads to progressively lower fear and avoidance and even, eventually, sometimes, to acceptance. (Megan Kimble)


28 June 2010

Feedback and advice: which boat is right for me?

From a recent email to Gnarlydog News:
>>
G'day Mate,
...I love the ocean paddles, my boat is a second hand plastic Tasman Express.
Having no knowledge of what to buy as a kayak I bought the first boat I saw.
The Tasman has done me proud and I am now looking to upgrade to glass.
I became a member of the sea kayak forum a short while ago and love everything on it, but yesterday I decided to have a look at your blog.
I have never had a look at anything like it before, I have to say I am blown away by your fantastic writings and knowledge.
I can hardly get away from the pc because you have so much for a bloke like me to read and study.
... I have paddled the new P.H. Cetus, a Valley, Shearwater, Tui, Sea Bear, Raider x and express, I can't make up my mind on what to buy and after reading just a small portion of all your information I am back at stage one....
Half an hour ago I read about how you made a new seat and a new back support and also the water storage system behind your seat.
Bloody hell, I'm out of me depth here I thought, this bloke Gnarly dog is a Whiz kid, how fantastic is your knowledge and the ability to pass it on to people like me.
My skill level is at the stage where I want a skeg boat because even in the Tasman I don't use the rudder unless I need it and that is only because the Tasman does not like a side wind, the rudder generally has to be used, except on the day where it packed up in two metre seas and twenty knot winds and I still paddled without the rudder by just sweeping and edging.
Now that was one hell of a day over thirty kms in heavy conditions, loved it...

....Do I just continue on trying out different boats till I feel comfortable with the way I handle it, do I buy a rudder or a skeg boat, remembering our conditions in the West similar to all Aust. Terry (...) has told me not to buy a boat without a rudder because why should I have to edge a boat and use a paddle to brace etc. when I can just move my big toe and the boat will steer.
That's Terry's thoughts and as you probably know he has done many thousands of miles in a kayak...
My idea is: I want to work on getting my skill level as high as possible.
I love the rough conditions and love winter paddling because my skill level accelerates pretty quick in the rough.
Les's boat looks and goes well with the people that bought one, and if I get one off him it will be custom made to suit me, my build and skills and be light enough for an old bloke like me to lift...

After all this writing here it only comes down to me wanting to say G'day to you and thank you for such an interesting reading blog.
Any ideas on boats etc will be appreciated, and I have weeks more reading to do just on your own web site...
Thanks again.

<< Dear "Reader",
thank you for your email and for your comments.
While some of my thoughts are somehow expressed in my blog there are a lot of ideas that I don't want to publish since a lot of paddlers (especially local ones) might get offended.
Please remember that in the end they are just the opinions of an average paddler with no formal qualifications.
I have however always had a critical eye for technical things.
While the industry tries to accommodate for so many different styles and tastes occasionally they produce untested or badly designed gear.

From what you say, you seem to be very active in the outdoors (way more than myself as weekend warrior).
I am familiar with only some of the boats that you mention: Cetus, Seabear, RaiderX.
You probably know my opinion about rudders: they are great for racing or comfortable cruising.
My skeg kayaks are generally slower and more demanding.
I often compare the two to cars: stick shift versus automatic.
What would I rather have? on a winding mountain road? or in day-to-day city traffic?
While I would love to drive a racy car on traffic-less sweeping-corners road the reality is that I drive an automatic car in city traffic.
Why? Because it’s easier than clutching and shifting gears all the time.
What has that got to do with kayaks?
For me paddling is fun, not just going form A to B with the minimal fuss.
If I paddled the way I drive chances are my kayaks would have a rudder.

rough waters (c)
I like to maneuver my kayak with my body, roll and occasionally surf. A ruddered boat is not generally ideally designed for that.
I had ruddered kayaks and they were good but not for what I wanted to do.
If my goal would be covering long distances in rather non demanding conditions with the minimum input from the paddler (myself) I would use a ruddered kayak.
I also have broken a few rudders in surf, but never a skeg.

Currumbin_surfing5 (C)
I cut myself on rudders in choppy waters, I damaged boats when rafted up with rudders and I caught towing lines in rudders… they just aren’t for me.
I do however use a bit more effort in edging my skegged kayaks in following seas while cross winds are taken care with the deployment of the skeg.
While ruddered kayaks are often the preferred choice for some expeditioners, just as often I see skegged boats used for demanding long trips too.
It’s a personal choice.
I do however have strong reservations towards ruddered kayaks that are very difficult to paddle in conditions (wind or waves) with the rudder retracted.
Storm kyking (c)
Imagine a rudder failure (quite an occurrence) on a long trip.
Most skegged kayaks are relatively easy to paddle with a malfunctioning skeg (has not happen to me yet) while most rudder dependant kayaks are sometimes impossible, when windy.

A kayak should be your choice not somebody else’s.
What suits very well one paddler does not necessarily suit me. Boat fit, weight and skill level will dictate what the perfect boat is for you.
And "perfect" is only a perceived attribute that will probably last for a relatively short time.
As my skills progressed and my objectives changed the “perfect boat” suddenly became limiting or boring.
I have owned only a limited number of boats and I can see myself getting a few more (maybe selling the current ones, one day….) as my skills will progress and my goals will change.
Will I own a ruddered boat again?
I can’t see that happening right now, maybe in the future if I become lazy and I want to take it easy. I can't see myself racing :-)

Once you have decided on the style of kayak you want/need for the goals you have in mind, boat fit should be the deciding factor.
I like good contact with my upper thighs (not knees) on the thigh braces (some cockpits lack decent thigh braces, some don’t have thigh braces altogether).

Sean's Arctic Raider_braces
I also like a bit of wiggle room for my legs too.
A kayak that finds me with the legs always stretched out to the floor is going to cramp me.
For a kayak that I spend paddling all day I like to see a bit of a bend in my knees.
While a comfortable seat does not determine the ultimate purchase (I have the skills to fabricate one that fits me) a person without the ability of customizing a seat should be wary of the seat that gives the dreaded “dead legs”.
And finally I look at the boat’s strength.
I have occasionally discarded a boat that I loved test paddling but that in my opinion was badly constructed.
While I can reinforce/modify/repair a kayak, I think that an top price brand new kayak should be right from the get-go and not spend weeks in my garage getting reinforced/modified.

Thank you for reading GnarlydogNews.

Best Regards.

Damiano

PS I would like to publish in GnarlydogNews your query (part of it) and my answer to you.
I would like to maintain your anonymity though...

18 May 2009

Sea kayak for skills development

I have experienced it myself and observed it over time in others but last weekend paddle certainly cemented my opinion: a good kayak will improve your skills.


Occasionally there is a paddler skilled and talented enough to make any kayak perform well but for the more common mortal often a decent kayak will improve things out of sight.
That moment for me occurred when I switched from a ruddered kayak to a skegged one.
Now, I know that a good tradesman never blames his tools but I don't call myself a good tradesman, actually an average one. I will seek the best tool I can get.
At the time there were only a handful of rudderless kayaks in my area.
All of them were too small and I could not test paddle them.
Finally I found a kayak that fitted me and had a skeg.

The skeg alone is not the ultimate component in a great kayak but generally is associated with tighter fitting cockpit complemented with decent thigh braces.
I found that if a kayak is loose it generally can not be edged and consequently is a dog to control (I am talking mongrel kind of dog here...).
I had enough of just cruising paddling. Speed has never been my goal nor have been bragging rights of how fast I can go (no GPS speed readings for me).
I see a kayak as a vessel for adventure and fun.
Since I regard adventure as a long trip that often my time constraints won't allow it, the fun factor has to be high when paddling a kayak.
Enter the surf zone.
Bracing Smurfy (c)
Since the local conditions don't offer rebound and rock gardens I have to content myself with surf alone.
In my ruddered kayaks I could not surf; they just were not built for that.
The design of a ruddered boat is such that even by retracting the rudder on the deck those kayaks just were not happy in rough conditions.
Needless to say that some were built too light and the surf would damage them easily but I never felt right in my ruddered kayaks.
So, when finally I came across a kayak that would fit me and that was a true British style kayak I bought it without test paddling.
I still remember my first paddle in it: bloody brilliant.
I have never looked back.

So, when a paddling buddy's skills started to improve in his considerably well fitted kayak I took him in conditions that were slightly beyond his skill level.
I would be there to pull him out of the drink, if necessary.
He did great but could only go so far in his ruddered kayak. *
He wanted more but eventually realized that he needed a better kayak to get there.
My buddy then paddled one of my boats and found it much more responsive than his ruddered one.
He wanted one.
And he was lucky to get the very last for sale in Australia.
Last Sunday we all met at our local surfing spot, him in his new Impex.
The conditions were gentle and very suited for a maiden voyage in a new boat, a new style of boat too.
I was expecting some initial embarrassment for him while trying to work out the skeg concept and the higher maneuverability of his new kayak.
It was amazing to witness the marked improvement in skills almost immediately.
He started to surf the gentle waves and quickly progressed to steeped and bigger ones.
Something I have not seen him do in his old kayak.
His comment after a short time paddling in the gentle surf:
"...I can't believe how much more maneuverable this kayak is and how much more fun I can have..."
Skills building in Smurfy (c)
I don't have any pictures of him surfing the bigger waves because that smile was worth a thousand words.

PS Readers have questioned my wisdom in selecting such low waters for skill development for my buddy. I am no expert but that's how I was taught by instructor Gary Forrest as seen in this video here

* PS MAY10: a very good article on how to improve skills in a ruddered kayak: here

16 February 2009

SHOP: kayak mods_ retrofitting a ruddered kayak with a skeg

My SeaBird Designs kayak came with a rudder.
While probably a faster proposition for the racer a rudder in my opinion hinders good sea kayaks. I have paddled the kayak for a while now and always with its rudder stored on deck. The kayak does weathercock slightly.
In winds of 15 knots or stronger some effort is needed to edge the boat and use corrective strokes to keep it from turning into the wind.
The rudder has been removed and I have embarked into the daunting task of fabricating my own adjustable skeg.
Pricing a ready made kit from a local kayak manufacturer made me think that I can probably make a better one possibly cheaper.
Greg Schwarz has been my inspiration and his work is truly outstanding and after some consultation with him I decided that it must be done.

The trickiest part was sourcing high quality housing for the stainless steel wire/cable needed to adjust the skeg.
I found what I needed at an industrial hose supplier. The exact product is a high density polyethylene hose used for compressed air. The fitting for the hose is brass and has a neat "olive" to securely attach the hose to the skeg box.
The next step was to decide what shape and what size I wanted my skeg.

The skeg does not need to be very large and a sloped triangular one was going to be the least obtrusive one inside the rear hatch. I cut a piece of "smoke" colored 5 mm tick polycarbonate (Lexan®) to the slightly oversized shape of my desired skeg. Note the slightly oversized; we will come back to that later.

I waxed up the skeg with mould release wax and placed it on a smooth flat surface. Mixed up some epoxy and tinted it with black die: I don't like the look of semi transparent fiberglass. I used 2 layers of double bias cloth (available at most marine chandleries) and draped it neatly over the skeg.

top half ready, bottom is freshly laid
Once the resin hardened enough (10 hrs approx) I trimmed the excess cloth away with scissors and left a flange of about 2 cm. I repeated the same operation by flipping the skeg and making the second half of the skeg box. The two sides were flat and matched well.

I roughed up the flange surface with coarse sandpaper to create a good mechanical bond. This time I mixed up some epoxy (tinted again with black) and some microfibre filler (extender) to create a thicker glue that would not run. I joined the two skeg box halves allowing for a slightly wider gap at the bottom/entrance of the box to create a slight taper.

the two halves are joined

the bottom of the box was separated slightly to create a taper
The joint was filleted with the tick epoxy paste to create a strong joint line.
Once the joint cured the excess fibreglass flange was cut away and the ridge line made smooth with sandpaper.
A slot was cut to accomodate the brass housing fitting.
The fitting was fibreglassed into the slot with epoxy paste.

slot cut into skeg box
fitting before fibreglassing
fitting with fibreglas and resin
The skeg pivots on a stainless steel 5mm bolt secured with epoxy in the skeg box. A washers was cut out of nylon (or polyethylene) for each side of the skeg to prevent friction between blade and box.
cutting the washer
washers in place, excess bolt still to be cut
A slot was cut into the skeg blade to allow the skeg to be attached/removed without undoing the bolt.

The skeg wire was attached directly to the polycarbonate blade. A hole was drilled into the blade, a slot cut for the cable, the cable end was frayed a bit to ensure a better grip for the resin.The cable was resined in with epoxy paste and a laid on baking paper to create a smooth surface. The excess resin was trimmed once cured.
cable before resin
resin before baking paper
skeg dimensions (in mm, sorry metric only) click on image for larger view
The skeg is controlled by a stainless steel wire.
A control box with a knob attached to the wire was fabricated.
I used a piece of PVC conduit to shape a plug for my control box.
I cut the PVC pipe in half and after heating it gently on a flame I pushed it into a “U” shaped section.

I used West System 105 resin, 207 hardener (UV stabilized) to impregnate some carbon weave cloth.
Draped the resin rich cloth over my plug and overlaid it with cling wrap (Glad Wrap®) to prevent it sticking to the two blocks of wood keeping close shape to the sides of the cloth/plug.The box once cured needed end “walls”. I cut a small section of plastic and used it to “dam” the ends.
control box with ends in place
A section of the deck had to be cut out to have the control box recessed flush with only the knob slightly protruding.
Would you believe that after all that careful measurement and attention I cut and installed the skeg control box in the wrong position?
I took great care to make sure it will be out of my legs and knees' way but forgot to allow for the cable that would protrude past the box.
And of all places I did align it perfectly with one of the deck fittings.
The cable would run into the fitting!
After much cursing (you can imagine) I had to cut out the carbon box, clean up the resin and repair the massive hole left by the box. A new box was fabricated and repositioned.
The deck was repaired (I kept the section of deck that was cut out) and the gap left by the cutting blade filled with color matched gel coat.
skeg control knob (slider)
The control knob was fabricated from a piece of clear polycarbonate.
The knob was shaped to fit neatly inside the box and a hole drilled at the base to allow the sleeve to fit through.
The sleeve is drilled to allow a bolt (or grub screw) pinch the cable and keep it in the desired position.
The whole assembly has to run smooth and care must be taken to ensure that there are no bends where the sleeve runs inside the housing or a jam will occur.
control knob secured onto the brass sleeve.
The skeg cable runs inside the housing until it reaches the control box.
Here it enters a stiffer tube (stainless steel is desirable, brass will do) that would act as a sleeve.
The sleeve has to fit tightly around the cable and still be able to fit inside the polyethylene housing. The stainless steel cable is never exposed and therefore the chance of kinking the cable is reduced.
gel coat repair still to be sanded and buffed
skeg box view inside under the deck
It was time to assemble the skeg blade into the box.
You should end up with the blade well inside the box allowing trimming for the hull thickness and curve of stern keel line.

Once I had my parts ready it was time to prepare the hull for cutting.
This is the most critical part.
Measure twice, cut once! (yeah right...:-)
A perfect centre line is needed along the keel.
I selected and area as close as possible to the stern of the kayak but not too far for being able to reach from the hole of the rear hatch. I would need to work through that hole and be able to glass the skeg into place!
I masked the area with masking tape and draw lines on it to have a very visible cutting line.

masking and marking
checking for gap width
Once I was positively sure that all was good I fired up the Dremel®.
You will need a high speed cut off wheel. Wear a mask and goggles.
I cut less than needed and enlarged the hole slightly as required to fit the skeg box.
I managed to cut away a very tight fit and my skeg box had a gap of only 1 mm in places.


the scary part
The box fitted well and with the blade in place I made sure it would not protrude once trimmed.

skeg box before glassing
The skeg box was then perfectly aligned vertically in the kayak
A spirit level helps.
I removed the skeg blade and inserted a piece of wood the width of the box protruding about ½ meter.
I used that to align the skeg box.
The skeg box was then glassed into place with epoxy paste first (to create a watertight seal) and fiberglass tape later for strength.
Once cured I trimmed off the excess of the skeg box. A flush finish is desirable.

I masked a small frame around the box, sanded it and applied some West System 105/207 epoxy since my hull is clear and I wanted to have a non visible joint line. I did two applications for wear abrasion.

skeg blade retracted

pivot point
the skeg fully extended
skeg box view inside hull

housing attached to skeg box.
Loop/guard of fibreglass to prevent damage to housing when loading kayak with camping equipment

I hope I have not bored you with my account of retrofitting a kayak with a skeg.
I also hope that I have not omitted something and made the instructions not clear enough.
Feel free to comment and I might try to amend/update the document.