
SEA KAYAK SAILby Damiano Visocnik © 2008
My first sea kayak (used) came with a sail.
I loved the thing. My background is windsurfing therefore using the wind was obvious.
The sea kayak had a step mast sail rig that I soon found out had several limitations over a windsurfer.
I realized that I will not be able to use as much wind as I used to on the windsurfer: the kayak lacks a dagger board and unfortunately drifts sideways a fair bit.
The rudder would prevent some drift and would give me some directional steering.
My step mast set up was however preventing me from paddling while I would sail: the boom was too low and close to me.
Never satisfied with a commercially available product (that's my motto), I set to design and fabricate my own sailing rigs.
After 8 sails and a few modifications I am getting closer to what I can be happy with.
A sail must be:a) light
b) easy to deploy and store
c) sturdy enough to take a stiff breeze (desirably around a max of 35 knots)
d) allow me to paddle when under sail.
The original design inspiration came from Sea Mongrel’s sail on his Polar Bear kayak.
In my opinion that sail could be improved in a few areas and therefore I set out to redesign it.
1) MAST
I started off with a mast and boom made from 16mm Ø aluminium tubing.
The tubing can be purchased from most hardware stores.
(MAY2008: After extensive research I discovered that generic aluminium from the hardware store is not good enough. A 6000 series alloy possibly anodised would be the preferred material.)I reinforced the tubing with a core of timber dowel. Unfortunately the mast would still bend under winds of above of 25 knots.
The second generation mast was made from thin walled stainless steel. I am not sure if this mast was any stronger but it still bent at 35 knots wind.
I am now using a custom made carbon fibre mast that has a thick wall.
Ready made fibreglass tubes are available from CG Composites.
The mast has an anchor point for the stays (rope/cables that hold the mast in position) at about 2/3 of the way. The anchor point is a stainless steel welded ring that is attached to the mast with a small shaped strap of stainless steel (alternatively a strong nylon strap will do). Drill the mast and pop rivet the strap into place.
.jpg)
The base of the mast is anchored to the front of the kayak very close to the bow. I found that this position neutralises weathercocking and the kayak could be sailed in any wind direction even with just a skegged kayak (a step mast rig requires ample use of the rudder).
2) REINFORCING THE DECK
The deck of the kayak must be most times reinforced.
Most kayaks have a relatively flexible deck and are not designed to be loaded with the force of a sail.
If the deck is peaked (not flat) then sometimes is possible to forego the reinforcement.
I prefer to have a very sturdy set up that won’t give me grief down the road… err, sea (?)
If the deck is very light I prefer to reinforce mine with a couple of layers of woven fibreglass (or carbon) and epoxy.
I usually create a ridge (with PVC tube cut in half, foam core material or half moon dowel, slotted) contoured to the shape of the under deck.
I use a heat gun to make the PVC soft and place it hard against the kayak to give it the desired shape. For the foam core or dowel I just slot them and shape to suit the undeck.
I place the woven fibreglass cloth with the resin already infused and drape it over the ridge.
The kayak is hanging belly up (hull side up) and I work through the tight confinement of the front hatch opening. Be prepared to get your hands dirty.
3) MAST ANCHOR TO DECK
The mast is typically attached to the kayak with a tiller extension device.The device allows easy attachment and removal of the sail kit.
A ) Ronstan makes a stainless steel model that is sturdy enough for the loads that the wind generates on the mast base. http://www.ronstan.com.au/marine/product.asp?ProdNo=RF1127

The base must allow the mast to be lowered and stored on the deck of the kayak while remaining attached to the kayak.
The base must also rotate on its axis to allow the mast to swing left to right according to boom position when trimming a sail (if boom is fixed on mast).
What the Ronstan stainless steel tiller extension unit does not allow though, is vertical side to side movement. Potentially this could cause some problems.
(PS MAY08: in high winds there is the chance to crack the deck when lowering the mast sideways)
B ) Alternatively a tiller extension that uses a polymer (rubber) knuckle can be used. Although promising, I am still testing the effects of side loads on the unit. (PS SEP08: after several months of testing this version is now the preferred one)
.jpg)
.jpg)
Base in epoxy resin and carbon fibre to spread the vertical load that is exerted onto the deck
C ) A third version of the mast foot can be made from the Ronstan tiller extension above (RF1127), a saddle and a D-shackle as base on deck.


I like this last version since it allows vertical and lateral movements of the mast.
Deploying and taking down the sail while at sea can create at times side loads that the standard tiller extension base (RF1127) transfers to the deck of the kayak.
(MAY 2008: THIS VERSION IS CURRENTLY UNDER REVIEW; some odd side loading issues with hardware)
4 ) BOOM ATTACHMENT TO MAST
The boom is attached to the mast with a Ronstan tiller extension. The base of the tiller extension (rotating knuckle) should be welded and attached to the mast with 4mm bolts.
The mast should be reinforced here since most of the wind load will be exerted to this spot.
A sleeve or internal reinforcement (dowel) is recommended.
The alternative is a canopy fitting but this will not allow the use a tubular boom.
A boom made from a fibreglass batten (canopy fitting) is in my opinion too weak. I have seen several fail.
In version B) and C) the mast does not rotate on its axis and the boom must be attached to the mast via a collar that will freely spin around the mast.
I have been unable to find such fitting (for a tubular boom) and I had to fabricate my own one out of a stainless steel strip.
At the top and bottom of the collar you can install a sleeve that keeps the boom in the correct position and prevents it from sliding up or down the mast.
.jpg)
collar for boom on mast
5 ) DECK RIGGING
The mast and the boom must be controlled from the cockpit of the kayak.
You have to be able to deploy the sail while paddling and be able to trim the sail for various wind direction.
The mast is hoisted with a sheet (rope) that is attached from half way up the mast (forestay) to the front of the kayak, through a little pulley, and then back towards the cockpit..jpg)

The sheet is then held to the deck with a cleat or a cam cleat.
.jpg)
B ) Alternatively a tiller extension that uses a polymer (rubber) knuckle can be used. Although promising, I am still testing the effects of side loads on the unit. (PS SEP08: after several months of testing this version is now the preferred one)
.jpg)
.jpg)
Base in epoxy resin and carbon fibre to spread the vertical load that is exerted onto the deck
C ) A third version of the mast foot can be made from the Ronstan tiller extension above (RF1127), a saddle and a D-shackle as base on deck.


I like this last version since it allows vertical and lateral movements of the mast.
Deploying and taking down the sail while at sea can create at times side loads that the standard tiller extension base (RF1127) transfers to the deck of the kayak.
(MAY 2008: THIS VERSION IS CURRENTLY UNDER REVIEW; some odd side loading issues with hardware)
4 ) BOOM ATTACHMENT TO MAST
The boom is attached to the mast with a Ronstan tiller extension. The base of the tiller extension (rotating knuckle) should be welded and attached to the mast with 4mm bolts.
The mast should be reinforced here since most of the wind load will be exerted to this spot.
A sleeve or internal reinforcement (dowel) is recommended.
The alternative is a canopy fitting but this will not allow the use a tubular boom.
A boom made from a fibreglass batten (canopy fitting) is in my opinion too weak. I have seen several fail.
In version B) and C) the mast does not rotate on its axis and the boom must be attached to the mast via a collar that will freely spin around the mast.
I have been unable to find such fitting (for a tubular boom) and I had to fabricate my own one out of a stainless steel strip.
At the top and bottom of the collar you can install a sleeve that keeps the boom in the correct position and prevents it from sliding up or down the mast.
.jpg)
collar for boom on mast
5 ) DECK RIGGING
The mast and the boom must be controlled from the cockpit of the kayak.
You have to be able to deploy the sail while paddling and be able to trim the sail for various wind direction.
The mast is hoisted with a sheet (rope) that is attached from half way up the mast (forestay) to the front of the kayak, through a little pulley, and then back towards the cockpit.
.jpg)

The sheet is then held to the deck with a cleat or a cam cleat.
.jpg)


All cleats should be fastened to the deck close to the cockpit and be easily operated but should not interfere with paddling.
Make sure that your knuckles will not bump into the cleats!
All fittings should have a decent size washer under the deck, especially if the layup of your kayak is light.
Every kayak deck is different and the perfect position of the cleats will be determined by the user.
Use only 3-4 mm size cord since it is more then sufficient for the loads of the sail. Use a sheeted polyester cord that will offer a decent grip on the cleats or slippage will occur especially on the forestay cleat.
.jpg)
The rope that trims the boom (main sheet) will pass through a small pulley attached to the deck of the kayak with a little saddle. To secure the sheet into position, a cam cleat (RF5001) is better then an ordinary cleat since the boom might be adjusted frequently while sailing.
.jpg)
6 ) STAYS
I have used stainless steel for my stays in the past but I found that the cable is too rough on the sail.
I prefer to use now 3mm Dyneema (Spectra) cord. The sheet is unbelievably strong (rated at 650 Kg) and very easy to work with.
The anchor points for the stays are two stainless steel saddles bolted to the reinforced deck of the kayak. Large washers are used under the deck and nylock nuts to prevent unwanted loosening of the fittings.
On some kayaks you can use the fitting that attaches the perimeter line as stay anchors (image below)
A D-shackle (with a wing (flared) pin end will allow install and removal without tools) connects the stay to the saddle.
.jpg)
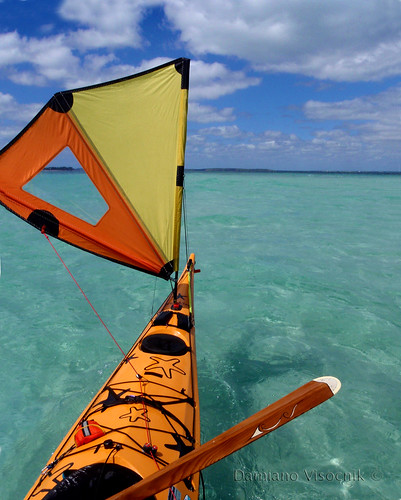
7 ) SAIL
The sail design itself is obviously the most important element.
The sail should not be too large or it might be overwhelming in high winds.
The whole rig, when folded on the deck, should not intrude over the cockpit area.
The top of the mast should be somewhere in the vicinity of the front of the coaming.
When specifying the length of the mast, boom and battens it is best if all 3 end up being the same length when folded on deck.
The mast will need to be slightly longer while the boom and batten should be of the same length.
The sail has a sleeve where the mast slips into.
A small cut off is needed where the stays are attached to (halfway up the mast).
A clear PVC window is desirable to allow you to view ahead of you when sailing.
The sail should have a slanted boom to create enough clearance for paddling or you will be hitting the boom when paddling.

sail for a mast of 1400 mm

sail for a mast of 1350 mm
The sail is not of my manufacture since it is a science and an art to create an efficient sail.
The sail must be shaped correctly to have enough draft and “catch” the wind.
Since I have very little knowledge in sail making, I have not bothered sourcing the materials and sew the sail myself.
The sail is not of my manufacture since it is a science and an art to create an efficient sail.
The sail must be shaped correctly to have enough draft and “catch” the wind.
Since I have very little knowledge in sail making, I have not bothered sourcing the materials and sew the sail myself.
Mick MacRobb from Flat Earth Kayak Sails (http://www.flatearthkayaksails.com/) is my current sail maker.
He can sew just the sail or he makes complete sails with all the necessary hardware.
Admittedly not everybody wants to spend the time (and has the knowldge) to make the hardware for the sail.
Mick's complete sails are ready to install often requiring little more than a cordless drill.
Notes:
- I have used all Ronstan fittings references because they are available locally. I am sure that other fittings of similar description are quite suitable for the job.
- Pacific Composites from Coopers Plains in Queensland, Australia have fabricated the carbon fibre tubes of the desired specifications.
- Despite my best efforts to engineer the sail rig and specifying my findings in this document I assume no responsibility if anyone replicates my design. It is the sole responsibility of the user to make sure he/she is totally satisfied with the design before they set out to the seven seas.

Flat Earth Kayak Sail on left, my design on right

For more images of sails used in the field (or should that be sea :-) check http://www.flickr.com/photos/gnarlydog/sets/72157600524255302/
Damiano Visocnik
.jpg)


Eric emailed:
ReplyDelete>>
Gday Gnarlydog,
I found your blog the other day and really enjoyed the diy sail
instructions. You have some awesom ideas. It would be nice to have
some more pictures of the completed rig with though for the rest of us
who don't understand how to put it all together. Happy sailing mate.
Cheers,
Eric
San Diego, CA
<<
Eric, thank you for your comments and for asking to post an image of the complete rig.
ReplyDeleteI don't have any pix handy but I will take some next time I'm sailing.
received via email from Andrew L.:
ReplyDelete>>Hey Gnarlydog,
I've got max value from your detailed info about kayak sails. I butchered an old windsurfer sail & gave it a hiding with the Singer. I used some old telescopic cross-country ski stocks for the mast & boom. The bottom section of the mast is doubled by sliding in an extra section. Given the alloy's 7005 I hope that will be strong enough. I beefed up the universal joint with a dozen nitrile washers from roof teks. The tiller fittings are a bit too bendy eh?<<
Andrew, the polymer universal joint that I use is from Riley and is not as supple as the one from Ronstan. There is some amount of lateral deflection but not enough to upset the geometry of the rig. So far it has proven to be very effective and I have seen now several other kayak sailors in my area using it with success.
I am trying to make my own rig. I was very happy to find this info but now I have more questions. I want to know can you put the rig away while you are sailing. Thanks.
ReplyDeleteAdam,
ReplyDeleteThe flexible mast base allows the sail to pivot and fold towards the paddler.
I store the folded sail on the kayak's deck secured by an "olive" (small plastic bungee retention fitting).
Best shown in this image: http://www.flickr.com/photos/gnarlydog/3715296410/
Hi gnarlydog
ReplyDeletethanks for your great posts. Interested to hear how you've gone with the Riley tiller extension as a mast foot: I've installed a sail using one, but had real problems due to lateral displacement of the polymer joint. Think I've partially fixed it by minimising the amount of the joint that is exposed out of the bottom of the mast, but have had major problems getting the sail to stay up under any decent load. I'm interested in your experience of this and how you might have solved it.
cheers
guy
Guy, I understand your problem.
ReplyDeleteThe Riley polymer joint does deform a bit.
Interestingly enough some are stiffer than others (I have 4 sails).
I find that it's good to have the stays a bit on the short side and when the mast is hoisted up the uphaul compresses the polymer a bit.
On the different kayaks I use a sail, the most stable one is on the widest stay's anchor points.
If your stays are rather close together and less than 45 degrees aft of the mast possibly the polymer deformation could cause some problems.
My stays are about 60 degrees on one kayak.
Mick McRobb (Flat Earth Kayak Sails) recommends 3 stays: two side ones and one directly behind the mast.
I prefer to have my stays attached higher on the mast, so a backstay would not be possible.
On the Nordkapp LV and the SeaBird I did not use the existing deck fittings but installed anchor points at the right location maximum width apart.
A suitable anchor can be like this: http://gnarlydognews.blogspot.com/2010/02/shop-recessed-deck-anchor.html
or like this: http://gnarlydognews.blogspot.com/2009/12/shop-bombproof-anchor.html
BTW, I use Dyneema line so I have no stretch in the stays. Using a nylon rope could probably cause too much stretch when wet.
Sometimes the little things make the difference.
Let me know.
Thanks Gnarlydog - great reply. Yep I certainly improved the original configuration by replacing original installation with spectra stays, but it's still not perfect - managed some ok sailing in 15-20kts, but would be suspect in anything more. Will adopt your recommendation re dyneema. more fine tuning required!
ReplyDeletecheers, guy
Gnarlydog - FYI and after much experimentation in prep for a trip to SW Tassie (where it will be windy :-)) I've binned the Riley polymer tiller extension and replaced it with the 'traditional' stainless steel universal tiller extension joint. This resulted in a massive improvement and the ability to sail confidently in 20kts without my sail falling over! This worked really well over New Year sailing back north from Gabo Island. I think it's possibly because, as you suggested, the stay anchors on my Nadgee were closer than in your configuration. I also have a bigger sail I think. Anyhow, conveniently the Ronstan stainless steel joint has screw holes at same centres as the Riley polymer joint so no new holes in deck required :-)
ReplyDeleteGuy, yeah, the Riley and the Ronstan have the same holes distance on the base plate.
ReplyDeleteI don't know what to say: I have mounted the Riley polymer mast base on 6 kayaks and all are working very well. I also have damaged a deck on one kayak by using the s/s Ronstan fitting. It must be the distance between the stays. Stay lenght is usually slightly shorter that then compresses under load. If stays are just a bit too long the mast falls down in a bit of a breeze. Sometimes 1cm makes a huge difference...
Hi - thanks for all the info - just wondering what the carbon base is that you mount the tiller extension that uses a polymer (rubber) knuckle? I can not find them anywhere - thanks, Garth
ReplyDeleteGarth, the base is a DIY custom job. It's a combination of fibreglass and epoxy filler paste (to create the shape) covered with carbon weave for looks. It distributes the load of the mast onto the deck.
ReplyDeleteThanks for your DIY instruction. We'are trying to build a sail for our Seabird Expedition HV plastic kayaks.
ReplyDeleteLike your first try, our mast is a 16mm*1mm aluminium tube. May it's ok for our conditions. But we think about a carbon mast as well. What make's your carbon mast a special fabrication? In some online shops they offer 16mm*1mm carbon tubes but there are quite expensive. Do you think fibreglass could be stiff enough?
And at least a question about your sail: Does it have a vault?
regards,stefan
Stefan, the carbon masts that I use on my rigs are a custom job manufactured by Excel Composites.
ReplyDeleteThey are expensive but light and strong.
Fibreglass could be OK (depending on quality) but a bit heavier.
Mick of Flat Earth Kayak Sails believes that a mast that is not bombproof is a good thing: better break a $20 mast than a $4000 kayak deck.
Very cool sail you have. Came across this looking into ideas for a fishing kayak sail I'm going to make. Like the fact you have carbon fiber poles.
ReplyDeleteIt would be great if some kayak sailing instruction video can be offered. I can see the merit of this rig on the large reservoirs I fish, but I am reluctant to try without some detailed instruction since I have never sailed.
ReplyDeleteSleepy, you might be able to find some "instructional" videos on Youtube but honestly sea kayak sailing is a bit like bicycle riding: you learn as you go. The upside is that you don't get skinned knees if you fail :-)
DeleteDo you prefer the Flat earth sails or Sea Dog sails? Which are better for sailing?
ReplyDeleteWhen Flat Earth was the only style of sail that I liked I did indeed use them exclusively, but once SeaDog came on the market I noticed a better workmanship and a more precise cut to their fabrics. With the development of the SeaDog Commander it became clear to me that it was a superior sail. I no longer use Flat Earth
Delete