Showing posts with label compass recess. Show all posts

03 February 2015

SHOP: filling-in the compass recess

.
Mounting a sail on a sea kayak requires a few considerations: position and deck strength.
On the newly acquired Whisky16 the front hatch is positioned surprisingly way far forward.
In front of that there is a deck-mounted compass recess.
The previous owner of that kayak had a small sail mounted there and I used the existing holes to mount mine.
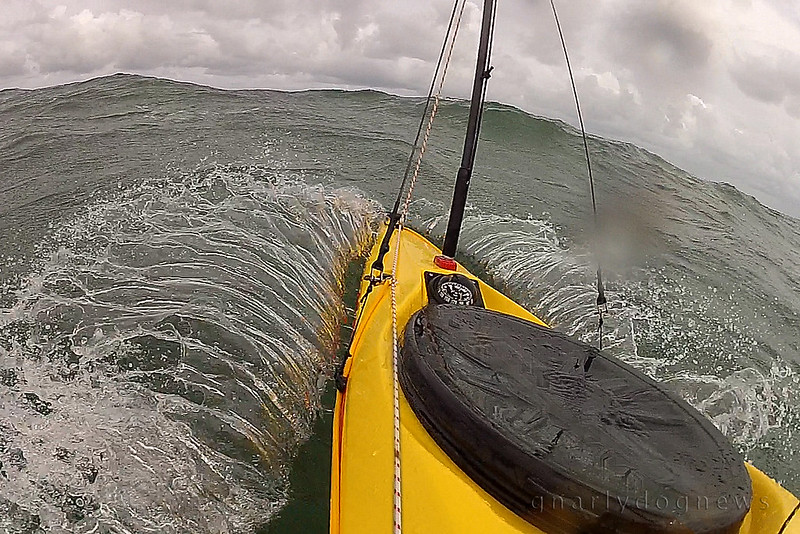
PT65N_Whisky16_bow
first run with the Whisky16
A test run revealed that the sail worked well on the Whisky16 but the reach was a bit too far for grabbing the sail and stow it on deck, securing it.
Most other sailing buddies use a 3 stay set up ending with a rather long mast.
I see their stowed sails going past the front of the cockpit ending with a sail mast half way across the spray deck. I prefer to have mine clear off my deck so I do not rub it with my hands when paddling.

The Whisky16 however has the sail mounting spot just a bit too far out or reach for the sail to fit nicely on deck. As I use my sails on several kayak I need to have them fit all decks well, with the same stay lengths.
I could increase the size of the mast and bring the sail higher (and make an ill-fit on other kayaks),  but I prefer to keep the sail as low as possible and minimize the heeling force of a beam wind exerted on the sail.
The compass was not really needed on that kayak so I removed it and decided to utilize that space to mount the sail closer.
I wanted to fill the void left (recess on the deck) and create a solid base for the mast fitting.
I could have used a simple block of wood somehow attached to the deck but I knew I could do better.
I shaped a block of foam (polystyrene) to fit a bit loose within the cavity of the recess. Shaping the foam was easy: a bit of coarse sandpaper on a cork block.

Once the foam was shaped I placed kitchen cling wrap (Glad® wrap) over the deck and wetted out some fiberglass with epoxy. I draped the block of foam (under side) and pressed it into the cavity.
Once cured (overnight) I removed the excess and trimmed the glass.
The finish was really rough; maybe I could have used wax and mold release to have a perfect fit but nobody was going to see that part.
The top was done similarly.
I carved out foam from the area where the screws for the fitting would go for my mast base and filled it with epoxy glue (mix of epoxy and microfiber). While wet I then used a few layers of glass for the top and a scrap of carbon fibre for where the main load would be.
Polystyrene foam compresses easily when spot loaded so I needed a sturdy surface.
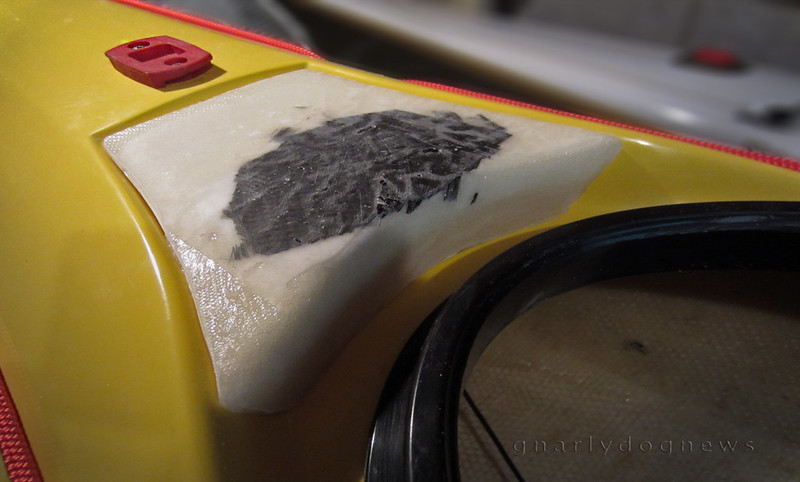
compass fill-in1
the "black patch" is carbon fibre cloth over the carved-out foam filled with epoxy glue.

The next step was to clean and cut back the edges a bit leaving a bit of a gap between foam block and kayak deck. I filled that with epoxy glue again to create a hard edge and seal the two surface together creating a monocoque style item. Of course I waxed and prepped the kayak deck so epoxy would not stick to it...
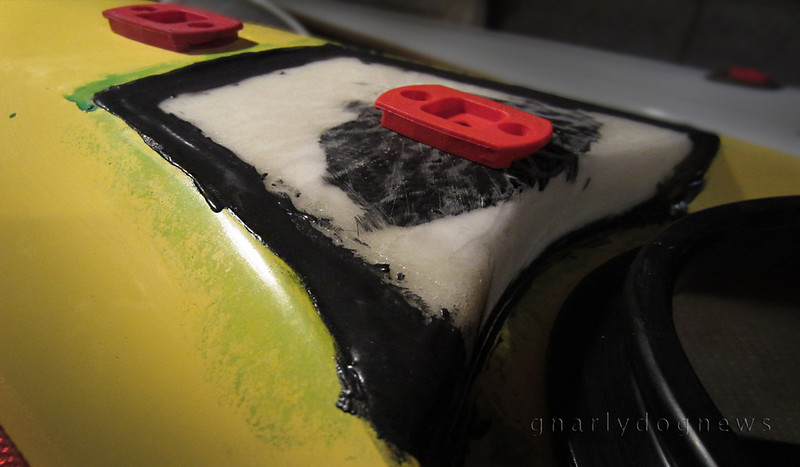
compass fill-in2
the new mast-base fitting placed only for testing

The last step was to add a nice layer of carbon fibre weave: partly structural, partly looks.
A few coats of UV stabilized epoxy later and my block was ready for installation of the mast base.
I used wood screws that secured the mount very solidly: the epoxy glue is very dense.
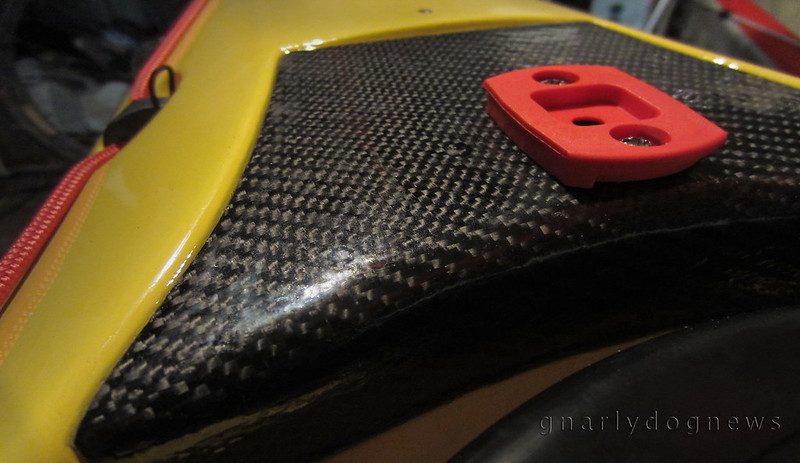
compass fill-in3
the foam block now covered with carbon fibre cloth

Final step: securing the foam block to the deck.
This one was simple: a small bead of polyurethane all around the edge (only!) to then seal perfectly against the deck.
The original deck void was now sealed and the sail mounted closer to the cockpit.
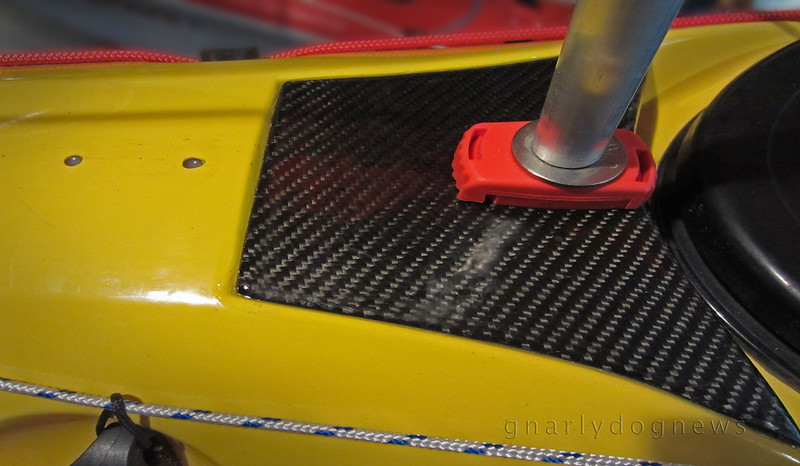
compass fill-in4
notice the difference between old position and new closer location for the mast base. The old holes will get filled with matching gel coat

So, do 4" make a difference? *
Not in handling of the kayak but when reaching for the sail to be bundled on deck when stowed (reaching for the boom particularly) is now much better.

*Hell yes, she said :-)

01 December 2011

SHOP: removable sail rigging

In my previous post I have detailed how I install cat rigged style sails (Flat Earth Sails for example) onto the deck of my kayaks.
The anchors, cleats and mast base are permanently secured to the deck and require several holes to be drilled through the fibreglass deck to have the bolts secure the items.
Some people cringe at the idea of drilling holes in a brand new kayak especially when experimenting with equipment that they are not familiar with.
My early sail rigs had the cleats mounted too close to where my hand would occasionally brush when paddling in a low angle style.
A few hits of the knuckles on the sharp edges of the cleat made me relocate them and plug the holes left behind by the fasteners.
My friend Jim has not done a lot of kayak sailing before and was unsure if he would like it on his Nordkapp LV.
He decided to minimize the damage that an ill fitting sail rig would do to the deck and devised a system that would keep his deck clean when he did not want to use a sail.

For the mast he used the existing recess where normally a 70P compass would be fitted. He fabricated a base out of fibreglass that has the identical hole location as a compass. He does not use that type of compass but he believes the recess and the complex fibreglass profile of the deck in that area is a very solid location for the mast base. He did not need to reinforce the deck since no flex is detected when the sail is deployed, even in heavy winds.
Jim's set up3

Jim had to drill holes for the stay anchors; unfortunately a Nordkapp LV does not have perimeter-line anchors suitably located to double as stay anchors.
The rest of the cleats and pulleys (blocks) are mounted on a custom made piece of fibreglass that contours the deck of the kayak.
Jim's set up1

He simply waxed the deck of his kayak with mould release compound (even grease would work in a pinch) and laid up several layers of glass cloth and resin. Once the laminate cured he padded the underside with a thin layer of closed cell foam to prevent scuffing of the deck and installed the necessary hardware to secure the uphaul and trim the main sheet. He used sections of stainless steel welding rods embedded into the laminate to create guides for his lines but stainless steel saddles could be used as alternative.
Jim's set up4

His "plate" is held back by a thin line that loops around the coaming of the kayak, and in the front, under the deck bungee cord. The coaming line takes most of the load, the front bungee just keeps the plate close to the deck.

Jim's system can be removed in seconds when he does not use his sail. The base for the mast remains attached up front but there are no cleats and pulleys to clutter his deck.


PS 02DEC
Owen Walton has sent me these images of his sail set up.
It requires one more stay (back stay) but the sail can rotate freely 360 degrees.
The plastic cleats are low profile.
Deck cleats

Deck fittings

02 November 2009

GEAR: compass for sea kayak

I often wondered what that recess in front of my bow hatch was.
Well, I have been told it was not designed for the snow dome that I mounted there :-)
OK, jokes apart I want to talk about sea kayak compasses.
I am not a big fan of GPS and while I know that are great in featureless coastal areas to pinpoint your position or when visibility is really low I prefer the old deck mounted compass.
I use a few different styles on my kayaks.
My Impex Currituck came with a Silva 70P mounted in the recess.
(For mounting instructions click here)
I think that compass is great: always there when needed and relatively out of the way.
I heard some kayakers with poor eyesight lament visibility issues since it's too far away from the cockpit.
In my case the Silva 70P is occasionally covered when I stow my sail on deck.
The mast base (red, in the above picture) is positioned in front of the compass and the folded sail covers the compass dial.
I have therefore started to use a different compass: the Suunto Pioneer.
While the rose is smaller and the cardinal points are not as bold, the casing allows me to mount the Suunto in alternative spots on the deck.
Suunto mounted on VCP hatch cover
The Suunto Orca comes with bungee cord style attachment, the Pioneer with a plastic base that can be hard mounted on the deck while allowing the compass to be removable.
I don't like the bungee style but I also don't like drilling any unnecessary holes in my deck.
On one kayak, the preferred position for the Suunto is the hatch cover.
Drilling holes in a rubber hatch cover could compromise waterproofness.
I therefore created a fibreglass base for the Suunto that would give me a flat surface for my mounting hardware.
using the existing holes in the rubber casing I threaded some cord to keep the Suunto in place on the fibreglass base plate
On the base I stuck some industrial strength touch tape (aka Velcro).
The self adhesive pads are water resistant and will stick to most surfaces like the proverbial sh*t to a blanket.
The Scotch branded touch tape is extremely tenacious and won't "fuzz up" after a while loosing it's holding power.
Scotch brand touch tape uses little interlocking "mushrooms" for its holding power even when wet
And while I like the holding power of the this touch tape I am not totally confident that a good knock won't dislodge the compass.
I tethered it with a small cord to one of the deck lines.
I also use a 3rd type of compass: the Silva 70UNE.
Basically the same as the 70P this compass is not designed for a recess in the deck (not all my kayaks have one).
Silva 70UNE on my SeaBird's deck, the "black tubes" are paddle parks
This Silva kayak is unique since it has a small light inside the rear handle that can be turned on for night navigation.
If you have ever tried to navigate in the dark you will understand that shining a flash light onto the compass to check your course is not the way to do it: you will loose your night vision.
The Silva 70UNE light is just strong enough to illuminate the compass' dial but not overpowering to kill your night vision.
On the other hand the Suunto can be adapted to night illumination by slipping a very small chemical light stick between the compass' base and its rose.
I purchase my light sticks from a fishing shop: they are designed to be used in conjunction with a fishing lure for night fishing.
prying the base open to slip in a mini light stick

And last but not least this little gem.
A "budget" compass that I picked up on a road trip to China.
To this day I still can't figure out to where it is pointing....
I guess the saying it's true: cheap, good: pick one :-)
WTF?

12 July 2009

Kayak deck: snow dome.

Modern sea kayak are every year more and more sophisticated.
Manufacturers are offering all sorts of interesting and sometimes thoughtful design additions to their kayaks.
While most kayak hulls are proven designs and some have been around for decades, most changes are happening to the deck of the kayak.
Day hatches (3rd hatch) are almost a must these days with occasional 4th hatch appearing on some kayaks.
Manufacturers are designing a lot of profiled lines and ridges to increase the strength of the deck and still have a light kayak.

Some kayaks have dimples for paddle float rescues, some have protruding dimples to fit your knees... dimples everywhere.
I also have noticed a recess up front on British style kayaks.
It looks like a rather deep dimple right in front of the forward hatch.
People often ask me what that dimple is for and finally I have found a great use for it.
Not sure what the original design was intended for but it's the perfect location for a snow dome.
WHAT? a snow dome?
I don’t know, but it looks like the perfect accessory that no kayak should be without.
I think that a snow dome is just the ticket.
You know that it should snow at least once every time you go out for a paddle... :-)


I found this great snow dome that allows a picture of your choice to be inserted into the plastic bubble. That's were I have stuck a photograph of my bitch and she smiles at me every time I look at her.

My bitch’s name is Foof. She is an Australian Sheppard that unfortunately I had to leave behind once I moved away from USA.
The picture in the snow dome shows Foof on an adventure in the High Sierra: