Showing posts with label sea kayak seat. Show all posts

27 February 2014

SHOP: DIY back band

.
Paddling comfort can make the kayaking experience great but an ill fitting cockpit keeps my mind away from truly enjoying my pursuit.
I have changed many seats in kayaks that did not fit me and often the back band is part of the equation.
In some kayaks the back band is directly attached to the back of the seat (Valley) while in others it is independently suspended by straps or webbing on the side cheek plates or coaming.

The seat of the Point65North XP was too narrow for my ass and too high up front; I replaced it by fabricating a new wider one out of carbon fiber.
The bulkhead on the XP is really close to the rear of the coaming offering just enough room for an electric bilge pump.
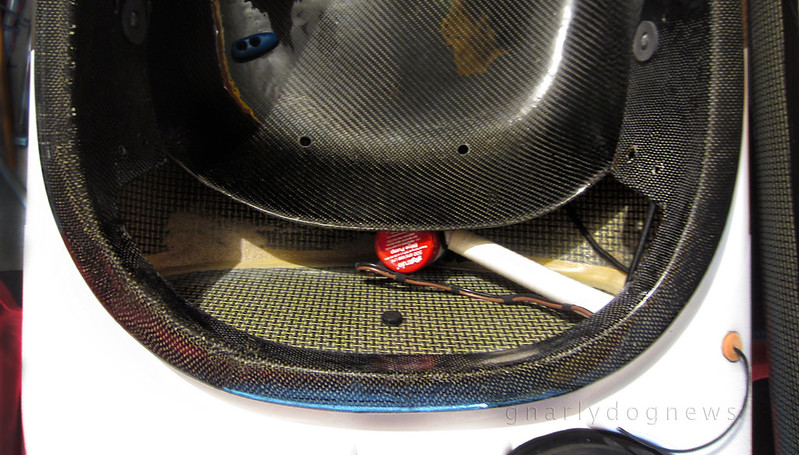
foam backrest_2

I did not like the original back band that came from factory; it was cutting into the carbon fiber laminate on the pivot points. I also did not like the large plastic tabs digging into my hips.
In some of my kayaks I have installed a Immersion Research backband with a ratchet buckle/strap system (similar to snowboard bindings): I love the support and the low profile it offers still allowing me to do laybacks.
In this kayak the bulkhead was so close to the seat that I could create a backband out of foam and have it resting directly against the bulkhead.

foam backrest_1

In some kayaks I have made a pillar from closed cell foam that is nested and jammed between seat and bulkhead; in the XP is wanted to try a floating foam block to be able to access the bilge pump.
As a prototype I wanted to use cheap foam and some discarded packaging from electronic goods was good enough for my first try. I laminated two pieces by gluing them together with contact cement.

foam backrest_5

This type of foam is very easy to carve with a sharp kitchen knife and in minutes I had a nicely contoured backrest shaped to allow layback rolls. My intention were to test the foam back first on a longer paddle and see if it fitted OK.
After some minor reshaping following my initial trial I was happy with the shape of it.

Initially I planned to use high quality closed cell foam for the final product but this cheap foam was working well enough to not bother with higher quality foam, like the one in a block used for yoga.
I just wanted to cover the rough surface with a bit of neoprene.
Again, I used contact cement to laminate the black neoprene.
I made a hole in the foam, the length of the block, to allow a bungee cord to secure it to the coaming of the kayak.
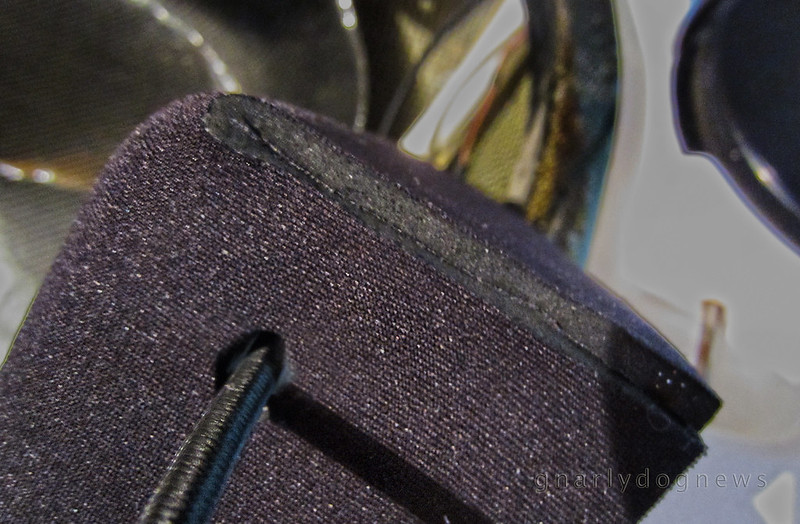
foam backrest_6

The bungee cord is attached to the underside of the coaming by little fiberglass saddles that I fabricated and bonded with epoxy glue. Alternatively small stainless steel saddles could be used instead.
I can tension the bungee with an olive cleat and while the backrest is firmly in place I can still access behind the seat to clear the pump from sand and debris.
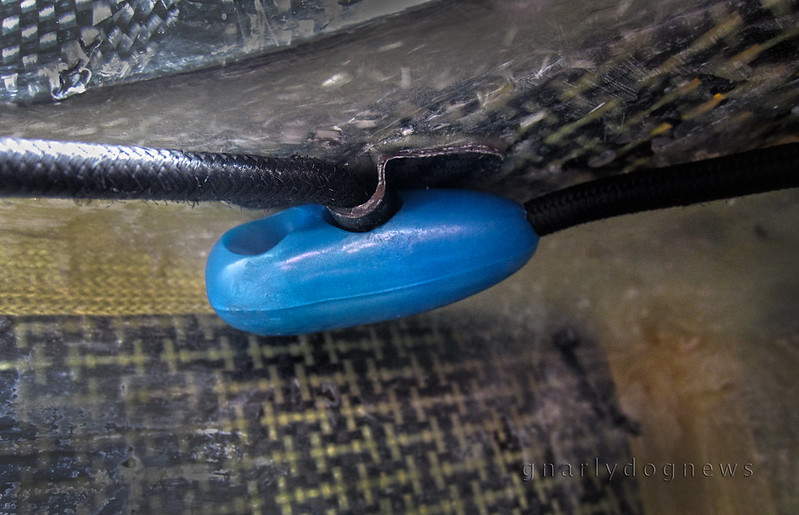
foam backrest_4

The main advantage with this style of back band is that it does not end up under my butt when I enter the cockpit. I can slide from the back of the cockpit coaming rim and it will not get in the way, ever.
While some find the pod-style seats with no rear back band a great solution to this problem, I did not like that set up in one of my previous kayaks. I felt that I could not brace myself from sliding backwards when actively paddling and leg driving.

foam backrest_3


.

07 August 2012

DIY: replacement carbon-fiber seat in Valley

.
Seats in kayaks seem to be often a deal breaker: some folk won't buy a kayak if the seat is not comfortable for them. Some kayak seats seem to fit more paddlers than others but there are also some seats that cause a lot of grief and paddlers go to great lengths to fix them.
The most common complaint I hear and read about from sea kayakers is the dreaded dead leg syndrome; after a while on the water (sometimes as brief as half an hour) some paddlers start to feel pins and needles or loose the feel of the legs altogether.
I am one of them: I find a lot of sea kayak seats not suitable for me. Maybe is my chunky thighs that force me to extend my legs lower to make them fit or something but I find most seats too short and too "peaked" (high up front) for my anatomy.
One seat that I have removed from more kayaks than any other one is the Valley plastic seat and the current model seems to be just as aggravating as the previous one.
In Adventuretess' Nordkapp LV I removed the seat and replaced it with a DIY fibreglass one removing the back band and replacing it with a foam block.
Steavatron recently borrowed Adventuretess's Nordkapp LV (Sialuk) and was amazed by the difference in feel and stability of the kayak.
Within half an hour of paddling Sialuk, he politely asked me if a similar seat was possible to be had in his own Nordkapp LV.
I agreed that with his help we could fabricate one for this kayak too, and we might as well go "bling".

carbon seat4

The plastic VCP seat is easy to remove: 4 bolts on the outside of the coaming hold the seat in place.
Once the fsteners were removed the seat came right out but revealed a little problem; the edge of the seat has been "shaving" the hull and a few layers of fibreglass have already been carved away by the motion of the seat slightly swinging when paddling. If not caught in time it would have holed the kayak from the inside out (the same problem occurred in Sialuk).
Patching that divot was dead easy and we restored the hull to full strength.

carbon seat2

The new seat is made from a laminate of glass fibre, double bias carbon under the sitting area and a veneer of the oh-so-sexy twill carbon fibre on top, for looks of course :-)
The edges of the seat have been reinforced with Kevlar to prevent the typical cracking that I have experienced in other factory chopped-mat kayak seats.

carbon seat1

The new seat does not hang on its own but I used "L" brackets to support it. The original VCP hardware was re-utilized and new stainless steel bolts are anchoring the carbon seat to the bracket.

carbon seat3

Stevatron was happy to reuse the original back band and hip pads. The back bands sling is attached to the seat with a short piece of webbing and a "D" ring. Existing straps firmly secure the back band to the rear bulkhead to prevent dislodgment when entering the cockpit.
After the maiden voyage Stevatron was happy with the position and height of the new seat and it was then finally secured to his kayak with a few dobs of polyurethane (Sikaflex) sealant to prevent any swinging and deliver a solid feel. In the event the seat would have to be removed for any reason a spatula will be inserted under the seat to break away those few spots of sealant.
Stevatorn finds the new seat a vast improvement on the stock VCP plastic one. The centre of gravity has been lowered and he finds that the Nordkapp LV has changed personality.
He is more confident on putting his kayak on edge and has gained stabilty when in textured waters.
Since the change and after a few paddles of several hours he no longer experiences the dead legs.

.

19 April 2011

SHOP: modifying a Tahe Greenland seat and cockpit

Tahe Marine Greenland is one of the few production kayaks specifically designed for Greenland style rolling.
Very low volume and low rear deck allow for advance moves that in most other kayaks are much harder to perform. A low rear deck promotes laybacks where the paddler can honestly lay with his/her back on the rear deck.
Some paddlers find that the position of the seat in the Greenland is a bit too close to the rear coaming and that the back band is a little bit uncomfortable. When laying back there can be localized pressure on the spine against the rim of the coaming.

Below is an example of a highly modified cockpit of a Tahe Greenland, customized to the needs and body shape of the owner of the kayak.


The seat has been moved forward and the fabric back band has been removed.
Thin closed cell foam (minicell) has been added to strategic points to alleviate pressure on the pelvis bone.
The back band has been replaced by a custom made contoured fibreglass extension of the existing seat that is hinged for behind-the-seat access.


Located behind the seat is an electric bilge pump that allows quick removal of water that might have entered during launch in rough waters. The Greenland has very little freeboard (that's the nature of low deck kayaks) and launching on shores with waves can be tricky trying to avoid flooding. The solid backrest pivots on stainless steel bolts anchored into the coaming. The flanges of the cockpit coaming have been extended to allow for the seat to be moved forward.


The owner of this Greenland found the stock Tahe seat a bit short and not supportive enough for long paddles. He wanted more support under his legs and modified the seat with fibreglass "wing" extensions, padded with closed cell foam. He also modified the underside of the deck to create "cradles" for his thighs and have a more positive area for boat control. Perfectly shaped closed cell foam now engages his thighs exactly the way he wants it.
Visible is also a custom made under deck "glove box".


View inside the kayak showing supports for the seat extensions.


UPDATE 13DEC12
After receiving numerous emails asking for details on the procedure for the above mods, here are some additional images of work in progress.
P1130598
EPS foam plug in place of back band

P1130600
lay-up with carbon/Kevlar and fibreglass

.

18 January 2010

SHOP: replacing a Valley seat

Valley has recently changed the seat in their sea kayaks (2010).

The previous kayaks were shipped with the above seat.
Some paddlers found a problem with the shape of the seat and the configuration of the back band.
The seat shape did not suit a lot of kayakers that would spend long time on the water and the backband would hinder some rescues.

As shipped from factory the back band would tend to fold down under the paddlers bottom when a rescue (assisted or self) is performed.
Some kayakers have modified the retention system to make the back band more secure and prevent dislogment and nuisance when reentering the cockpit.
But the more important concern is that the shape of the seat seems to cause severe rubbing with some users.
The "slope" of the pan on the rear is too gentle and when the kayak is paddled efficiently with pressure on the footpegs and consequently the body of the paddlers pushed back, the seat would rub the tail bone.
On long crossing some kayakers would rub all the skin off of the end of the spine area and consequently be in pain.
Comparing the Valley seat to other sea kayaks' seat I notice the pronounced difference and tried to rectify the problem.
The Valley seat seems to be made from polyethylene and I tried to use a heat gun and reshape some of the seat and create a better pan.
Unfortunately such solution only alleviated the problem but did not really fix it.
A new seat pan had to be made.

I was lucky to borrow Greg Schwarz's mold that he has made for replacing an ill shaped seat on a different kayak.
In a conventional lay up of double bias glass and 4oz cloth, I used epoxy as resin.
In some areas of high stress I used additional layers of carbon/Kevlar cloth to reinforce possible weak spots (something I have learned by repairing other manufacturer's seats).
A hung seat sees a lot of stress in the "bracket" area.
I did not want to carve a simple but effective closed cell (minicell) foam seat because it prevents the flow of water to the electric bilge pump located behind the seat.
Foam seats are great: easy to fabricate, very comfortable but don't allow water flow to the rear bulkhead.

Greg's mold allows for a channel to let water flow though the middle, under the seat.
Visible in the image above is the front of the new seat installed in a Norkdkapp LV. Expanding polyurethane foam was used for supporting the front of the pan.
The new seat has a much longer pan and offers outstanding thigh support.
This is the second seat that I have fabricate from that mold and to date is the best sea kayak seat for me. While some other seats would offer reasonable comfort others would give me the dreaded "dead legs" on long outings.
This seat however addresses the compression of the sciatica nerve problem and eliminates discomfort that some seats bring.
seat installed in Nordkapp LV, rear bulkhead with electric bilge pump
I decide to remove the back band all together and go for a foam block instead.
A well shaped foam block offers support where needed but eliminates the problem of back bands falling under the paddlers bum in a rescue.
Fabricating a foam back block required the lamination of 4 pieces of coarse closed cell foam (type of foam used for industrial packaging) and carving the centre section to allow for the bilge pump.
foam sections laminated with contact adhesive _ underside of foam back block
The back block is shaped to the contour of the rear bulkhead and fits snugly behind the seat.
To prevent accidental dislogment I used a bungee retention cord (with olive) threaded through the block.
The section of the back block that contacts the body has a softer last layer of quality minicell.
Shown here before final the layer of neoprene that will cover the block.
The new seat installed.
I used a simple anodized aluminium bracket fashioned from a 2" L section.
Stainless steel nuts and bolts to secure the seat to the bracket.