Showing posts with label accessory. Show all posts

25 May 2015

GEAR: SeaDog Commander.

I fell in, again.
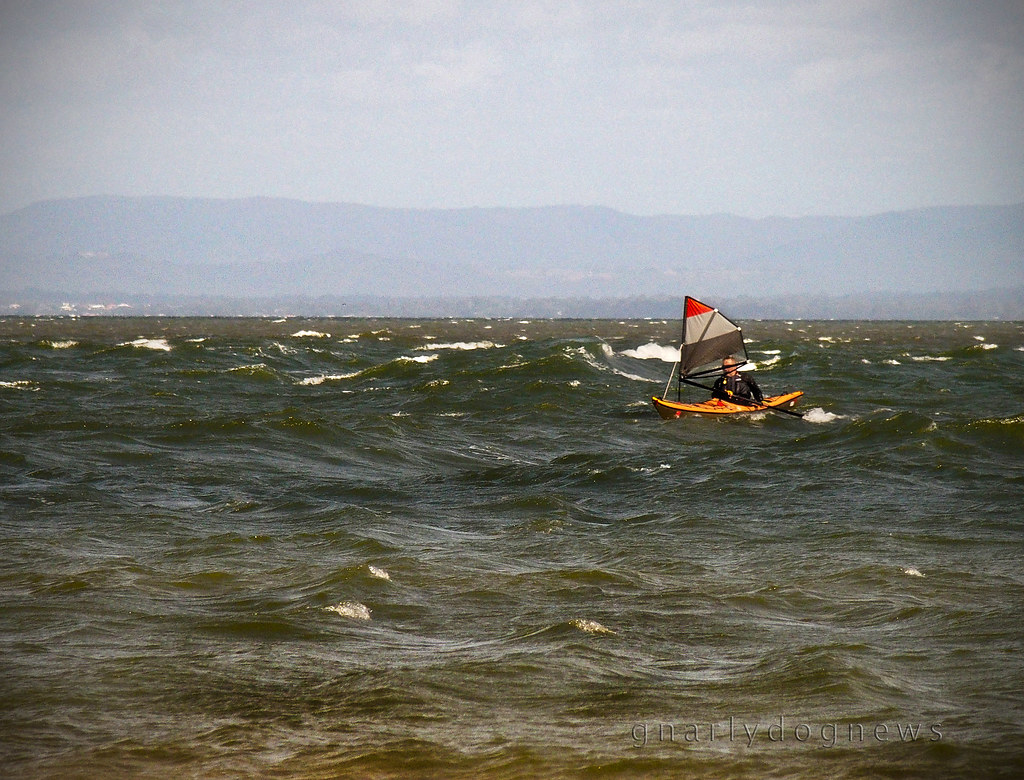
I have been surfing for an hour and now I was heading home.
I sailed for a while but then I turned directly into the wind and I wanted to stow my sail away.
Stretching myself forward trying to reach the shock cord to secure the folded bundle of my sail made my loose my balance and I kept on falling in.
I realized that I needed a sail that would fold easily on my kayak deck.
Commander testing_1

My high aspect SeaDog sail (0.7 Code Zero) catches the wind beautifully and allows me to cut into the wind at a higher angle than before, but I had a problem with it.
Since I like to have my spray deck area clear my sail is mounted differently than a typical set up.
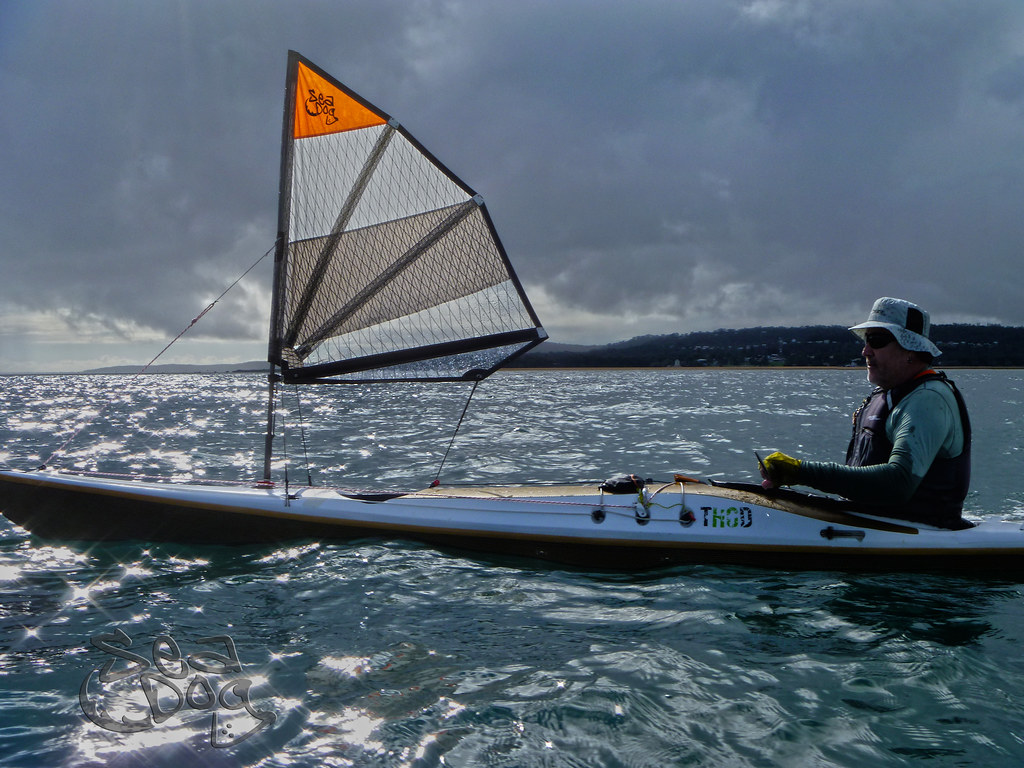
Commander1 at Peel_r
image courtesy of SeaDog
A typical mount for the sprit style sail (SeaDog, Flat Earth etc.) calls for a tall mast with stays mounted below the boom.
I prefer to have my sail mounted lower to allow the mast not to protrude in my "paddling area" when stowed on deck.
I don't like a folded sail that encroaches the deck where my hands swing when paddling.
It's simple: I want that area clear so my hands don't catch the sail.

On my high aspect sail the boom is substantially shorter than the luff (mast section) resulting in an uneven bundle when the sail is lowered down: the boom is much further away from me when I lower my sail onto the deck.
In need to secure the sail firmly onto the deck I use a section of sock-cord to wrap around the mast, battens and boom to create one solid bundle that I know will not fill up with water when waves wash over the deck or I roll the kayak.
In the bumpy waters, I was now having trouble reaching that boom and I was loosing my balance.
SD_CodeZero 07_c_gd
SeaDog CodeZero 0.7, folded. In order to reach the boom this sail intrudes the cockpit area.

It has been in the back of my mind for some time now: I wanted a sail with a slightly lower aspect and a longer boom.
I consulted with SeaDog sails and after I proposed my design to Richard a technical compromise was hatched: the design I had in mind might end up less efficient and might cause some loss of upwind reach.
One other trait that I really desired in my new sail was that it would be quiet.
Douglas Wilcox aptly calls it "motoring"; the sound that the leech makes when sailing cross-wind.
I don't like that at all and a highly value a quiet sail.
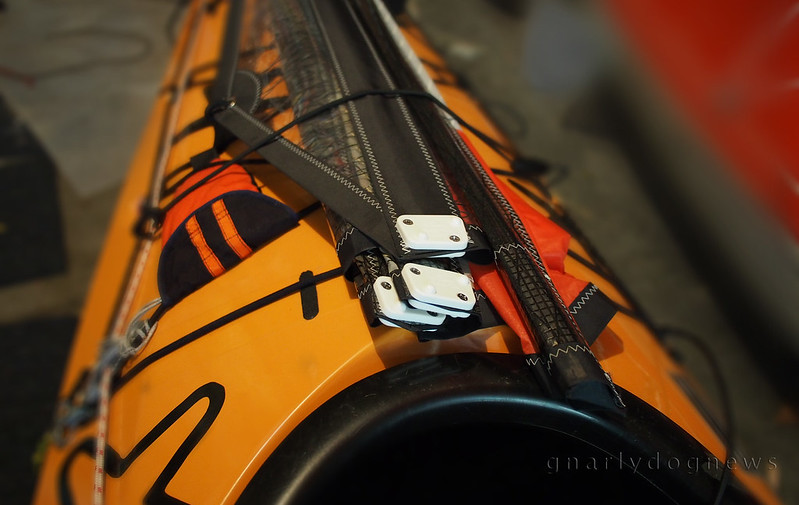
I proposed a double batten to Richard and after some measuring we decided on an optimal length, given my initial request of "neat bundle" when folded.
SD_commander_5_c_gd
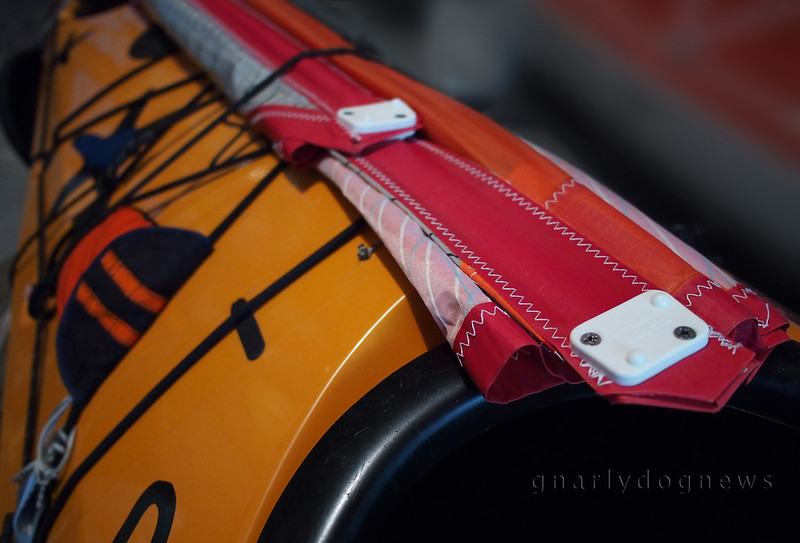
SeaDog Commander Mk1, folded on deck

SeaDog sails distinguish themselves for utilizing the very best high tech materials and superb cut and manufacture.
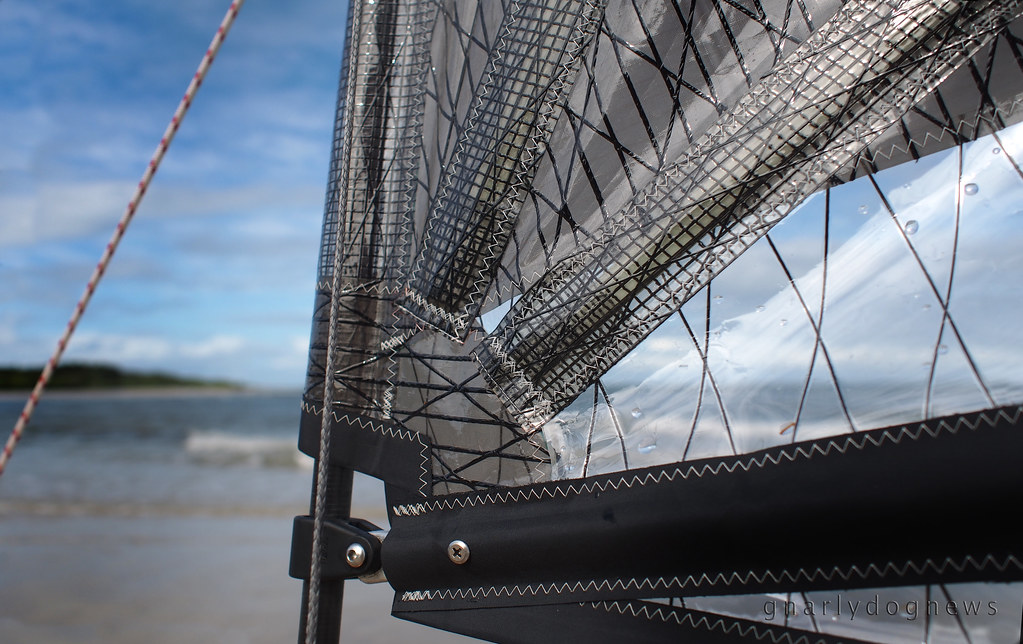
I love the pattern that the carbon fibre makes in the sail cloth used for the batten pockets; it looks really high-tech matching the finish of my Greenland paddles :-)
The twin battens shape the sail perfectly and there are no areas where the sail puckers; the sail stays aerodynamically shaped to catch light breezes allowing a high angle of head wind sailing.
My concerns for decreased upwind performance did not materialize: the SeaDog Commander stays inflated at really high angles too.
SD_commander_3_c_gd
SeaDog utilizes a special thin thread that is incredibly tenacious and UV resistant: the results is beautiful stitching.

I asked for a combination of sail cloth that would be stretch resistant, dry fast and remain stable. I also wanted to add the Clear-View feature into the bottom panel so I could easily see where I was going. Somehow vinyl windows cut into my previous sails never really helped with forward vision; they were just too milky and were ruining a smooth surface with a puckered section of sail (different stretch).

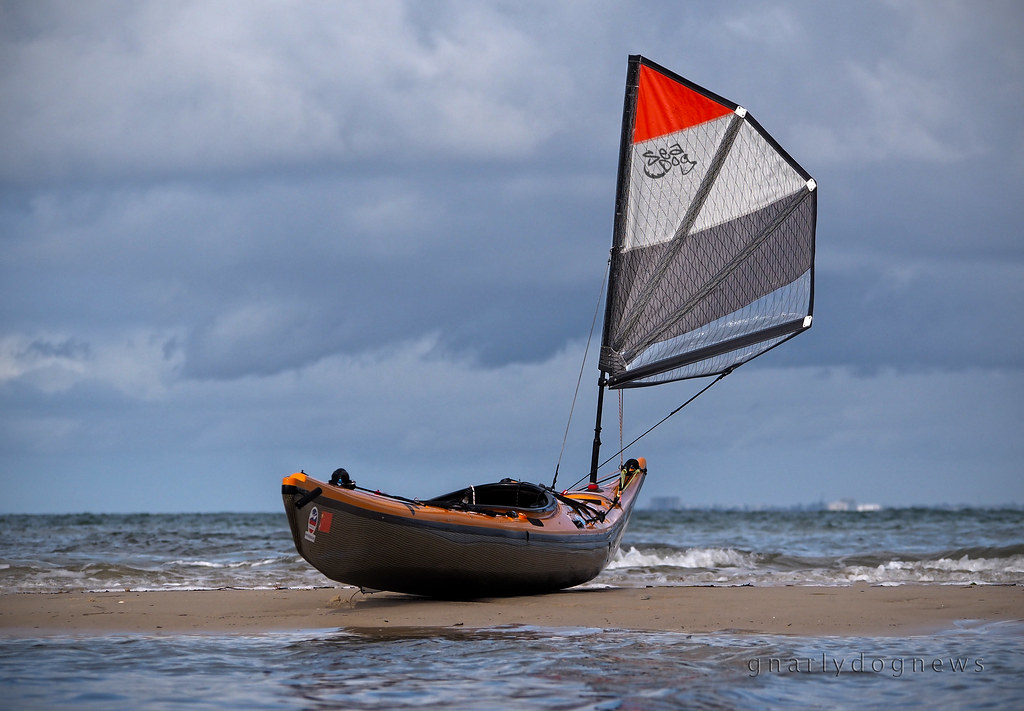
The new Clear-View panel really offers a better vision of on-water obstacles and boat traffic while the sail surface remains perfectly tensioned and smooth.
The orange tip adds incredible high visibility on the water while the pattern in the other panels makes for a stunning sail. The SeaDog Black Diamond series (with the Clear-View TM lower panel) are the highest technology sails that I have see so far: a true masterpiece.
SD_commander_2_c_gd

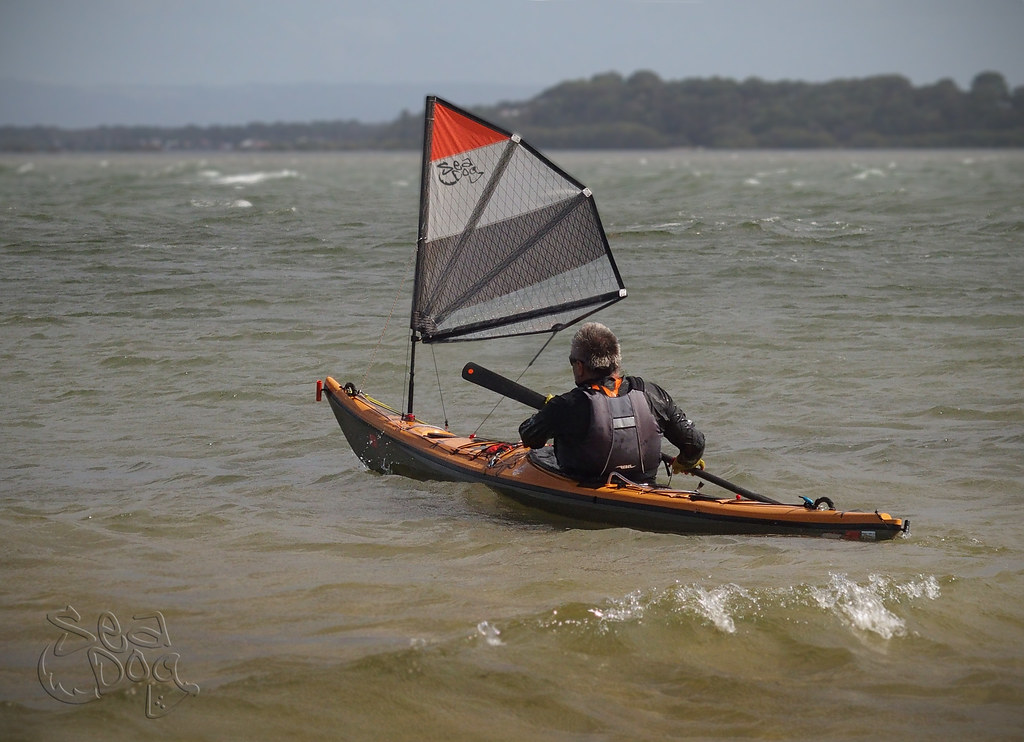
The new SeaDog Commander has a surface area of about 0.8m² to match the sail I most use in winds up to 20 knots.
Above 20 knots, in a beam wind, there is more heeling (pushing over) that I am comfortable with while my kayak does not really go any faster (max. hull speed).
If I know that there will be high winds forecasted I rather use my SeaDog CodeZero 0.7m²
I mounted this SeaDog Commander sail high enough on my carbon mast so I can reach it when folded onto the deck but not too high to intrude into my paddling area.
SD_commander_1_c

Disclaimer: my association with SeaDog has grown where we now collaborate on new projects. After purchasing my first sail from SeaDog I started to offer feedback and stimulated Richard with new ideas. Richard recognized that there was room for improvement with the original sprit sail design. Being able to quickly accommodate to special needs or requests with custom sails, SeaDog is able to blend high-tech sailing cloth to create sails that I wanted to realize for a while. I paid for the materials and he offers his workmanship: we both benefit from it.
 

25 November 2014

VIDEO: sailing with SeaDog 0.7

This time the wind was really blowing and I was glad that I had my smaller sail installed on my kayak: the SeaDog 0.7m².
I could feel that there was less heeling as I didn't have to transfer all my weight to the windy side.
My large sail of 1.0m² would have been too much and harder to handle while my SeaDog 0.7m² was still giving me plenty of speed to surf the waves with ease.

Here is a short video of a few different outings with the SeaDog 0.7m²


I believe that the SeaDog 0.7m² is a great sail for when the wind starts to blow and white caps appear on the water; it offers me plenty of power while still allowing me to handle my more tippy kayaks without a white-knuckled grip on my paddle.
I figured out that a kayak can only go so fast and no matter how big of a sail I mount on the deck it just won't go any faster. A larger sail however just catches more wind and when loaded from the side wind it wants to push the kayak over. I have been at times hanging way over the side of my kayaks trying to keep them from tipping while not noticing any increase in speed over a smaller sail.

Of course, if the wind is from behind (stern wind) and the waves have built up to a size that they start to lift the stern of the kayak where I can surf; my kayak will indeed go faster than hull speed.
It is these times that I find the SeaDog 0.7m² exceptional and easier to handle. As I surf down the wave (on a wind right behind me) the kayak will come to a point where the sail no longer seems to be inflated. At the bottom of the wave I will have the boom flap loose over the deck and wanting to swap sides. Then the gust of wind catches up with me and with a shuddering noise the sail slaps to the other side taken in by the main sheet. It is in this moment that a smaller sail will save me from a sudden imbalance and possible precarious lean that might result in a dunk. I don't feel the raw slap that bigger sails give me in high winds: the 0.7m² is easier to handle.

Another benefit of a smaller sail is when things do go pear shaped and I fall in.
I have been practicing rolling with a sail; starting from dead calm conditions to increased breezes and more bumpy seas. I find that a sail with a smaller surface has much less drag underwater and in a roll I can scull up without too much effort. Recently I have been trying to forego releasing the main sheet and just leave the sail alone while falling in. While slightly more difficult than releasing the main sheet (or uphaul) I am more confident in recovering with the sail just left as it was before falling in.

As winds increase to 20 knots and above I wonder if a smaller sail would not be even better?
Maybe that is something I should look into...

.

03 November 2014

GEAR: cheap light stoves

.
There are a few things easier than cooking on a gas stove when camping, eating cold food is one.
I love the simplicity of canister gas stoves: turn the control knob, light the flame and we are "cooking with gas"

stove comparison_c

I have made a previous post about the virtues of compact gas stove here.
I have since updated my stoves and opted for something that is stable but still light.
I prefer to cook with non-dedicated pots that are not part of a system (with flux ring, like JetBoil and MSR Reactor).
I like the flexibility of being able to use a small frying pan (that I picked up at K-Mart for under $10) when a fancy dinner or breakfast is in order.
Therefore I looked at stoves that are close to the ground, have a decent footprint for stability and have a large burner (Pocket Rocket's small burner head scorches light pots).
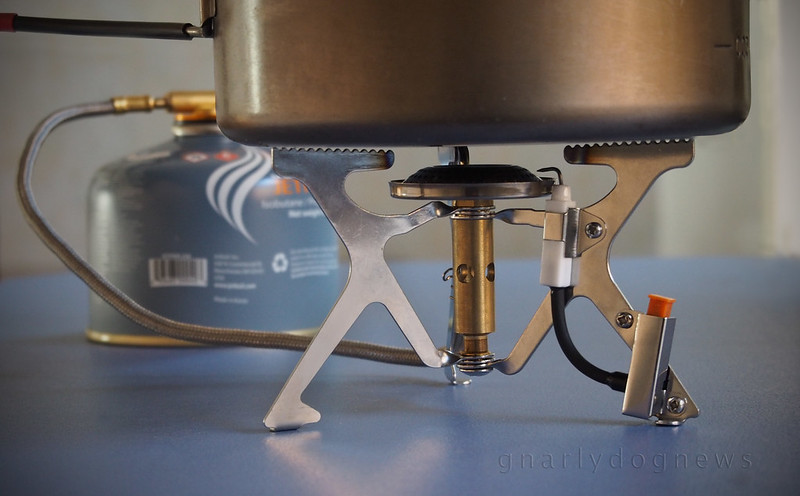
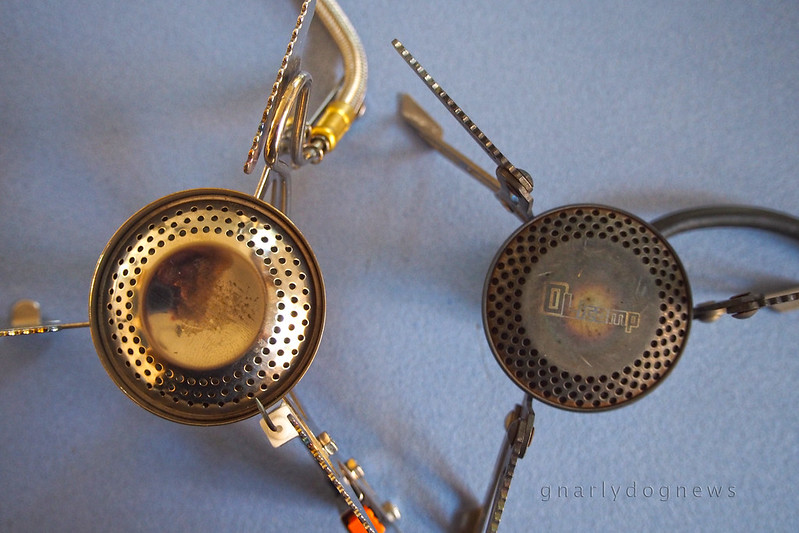
Above are two stoves: left is a very cheap one in stainless steel from eBay, right a bit more expensive one in titanium.

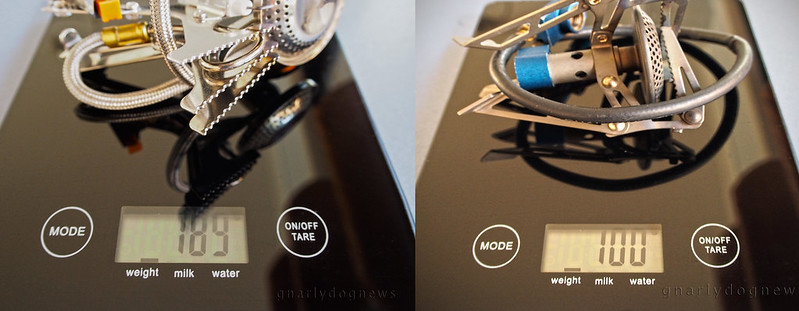
weight comparison

For the last 18 months I have been using a light titanium stove that sits low to the ground. At 100gr. is very light, packs away small and shows no signs of rust.
The stove is so light that a small movement of the flexible hose tips it over if no pot is on the stove

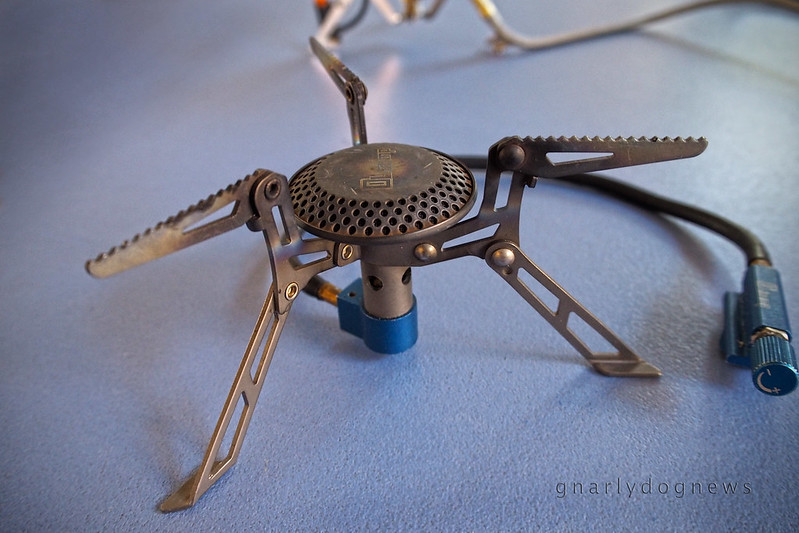
Olycamp Ti stove_c

I have used this stove for approximately 100 days, cooking extensively meals for two, occasionally for 4.
Coupled with a light windshield (very thin aluminium sheet) it has worked well in above freezing temps, even in very windy locations. The windshield is critical when there is a breeze as it retains heat and saves fuel.
When cranked to the max the stove roars and emits too much heat; I usually have it regulated at about half power.

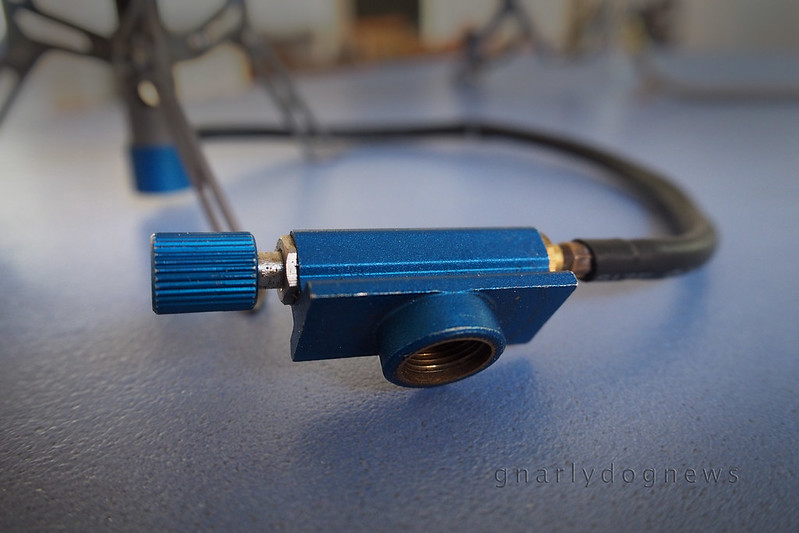
Olicamp fitting_c

The flame control knob is at the canister spigot, away from the heat of the burner and easy to adjust when the stove is going. I like that: no burned fingers trying to reduce the flame when I feel my risotto is about to get scorched.

Olicamp hose_c

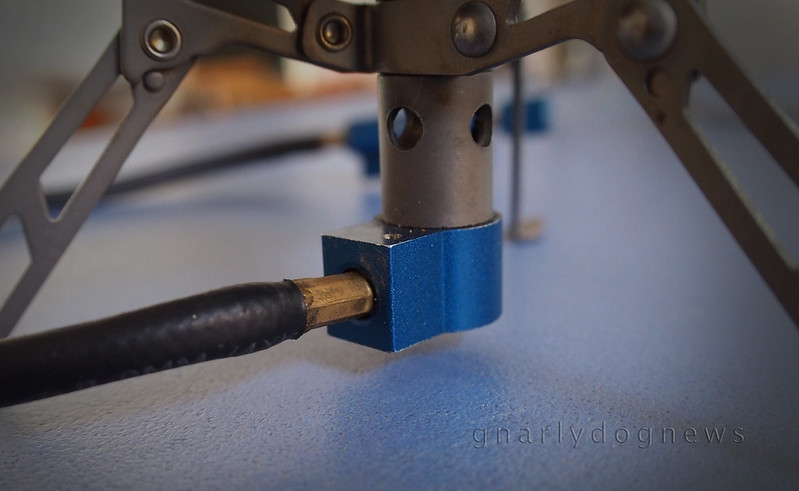
But there is little fault: the hose junction into the base of the burner's jet.
While the hose does have an O ring on the shaft of the hose intersecting the (blue) aluminum base, the hose can not freely rotate. A slight redesign would make this stove even better.

Trolling on eBay I came across this stove: a compact stainless steel design with large burner (did I mention I don't care for burned food?).
Labelled as "Lingyun portable gas butane stove..."  I was impressed by the price: $17.99
I ordered one as I thought it would be great as a back-up stove.

Lynun stove_1_c

The difference on this one are the legs, the fuel supply and the ignition.
I don't care about the piezo ignition where the stove can be started by just pressing a button: my experience is that they don't last. Luckily I can unbolt the unit when it will stopped working and use my trusty BIC lighter.
The legs of the stove are however made of one-piece sheet metal; they can not be accidentally folded and collapsed while operating the stove making this unit a bit more sturdy, requiring less care.
The downside is that this stove is not as compact as the titanium one, when stowed.

Lynun stove_2_c

Last but not least the fuel supply.
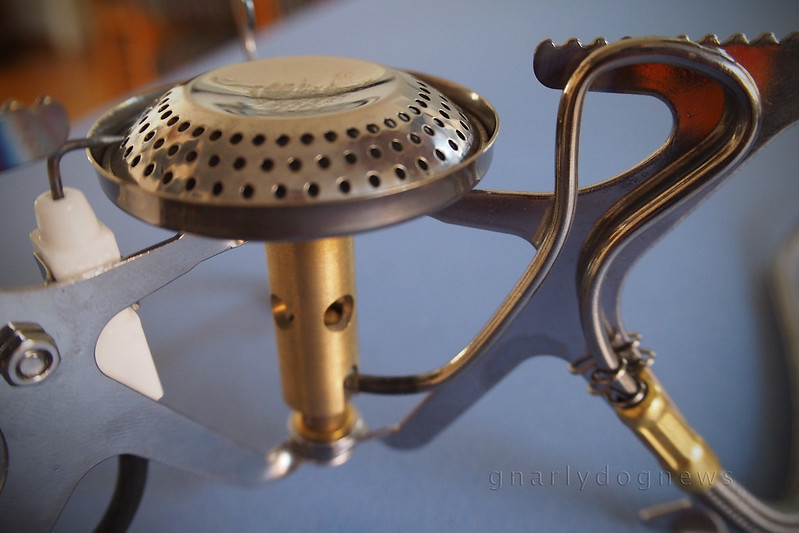
The gas travels from the canister to the stove via a flexible hose and then, just before reaching the jet is makes a loop of solid pipe passing close to the flame area.
It is intended to vaporize the butane/propane gas before it reaches the jet when ambient temperatures are low, close and below freezing.
While not really a concern to most sea kayakers in tropical locations, outdoor users in colder environments lament poor performance of gas canister stoves when temps are chilly.
The preheating loop takes care of that and delivers hot gas to the burner (once the stove has been operating for a minute or so).

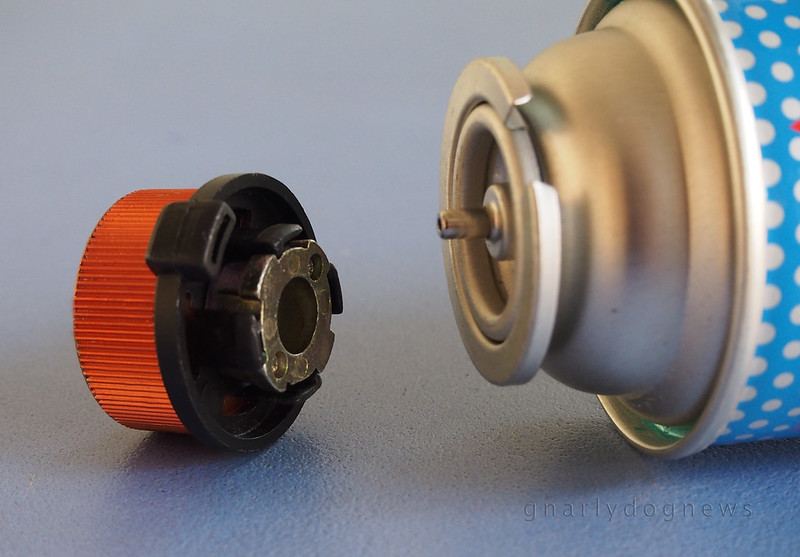
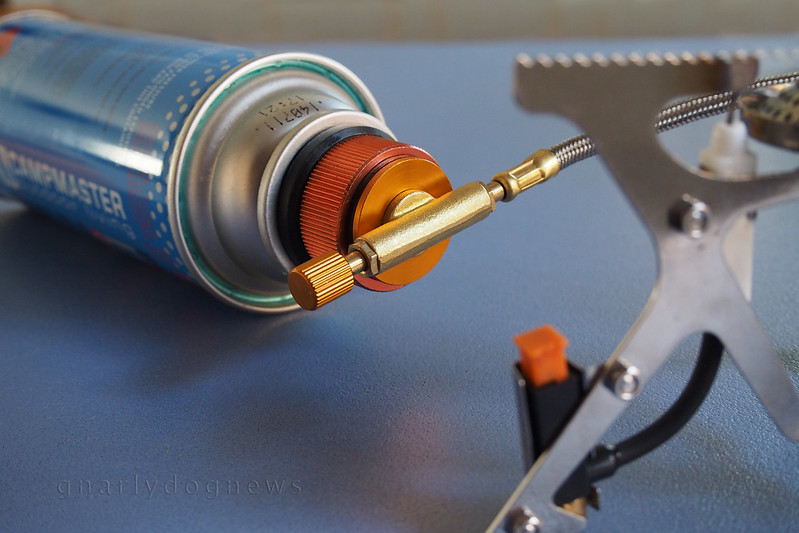
And while I write about gas stoves I should mention this little adapter.

adaptor1_c
*If you run the canister sideways with the notch up, your canister will deliver fuel vapors.  If you run the canister with the notch pointed down, your canister will deliver liquid fuel.

The gas canister stoves use a Lindal valve, where the stove or regulator are screwed-on to create a leak-proof seal. Gas canisters are usually a mix of butane/propane for better performance in low temperatures. They are readily available at good outdoor stores but not so easy to find elsewhere.
I had a bit of trouble locating the Lindal valve canisters in Sweden but I saw plenty of push-on style butane cans.
Again, on eBay I was able to source an adapter that allows screw-on stoves to be used with the much cheaper ($5 for 4 cans)  option of push-on cans.
The push-on cans are often just basic butane, more suited for warm climates; however I have also seen the butane/propane mix ones.

adaptor2_c

And to get that gas stove working well in windy places (cooking inside the tent is a bad idea) I sourced a matching windshield.

windshield2_c

This shield is a bit heavier than my super thin one that I have used for decades, the advantage is that it has little spikes that can be driven into the ground to keep the stove and shield well connected.

in the field_c

.

27 February 2014

SHOP: DIY back band

.
Paddling comfort can make the kayaking experience great but an ill fitting cockpit keeps my mind away from truly enjoying my pursuit.
I have changed many seats in kayaks that did not fit me and often the back band is part of the equation.
In some kayaks the back band is directly attached to the back of the seat (Valley) while in others it is independently suspended by straps or webbing on the side cheek plates or coaming.

The seat of the Point65North XP was too narrow for my ass and too high up front; I replaced it by fabricating a new wider one out of carbon fiber.
The bulkhead on the XP is really close to the rear of the coaming offering just enough room for an electric bilge pump.

foam backrest_2

I did not like the original back band that came from factory; it was cutting into the carbon fiber laminate on the pivot points. I also did not like the large plastic tabs digging into my hips.
In some of my kayaks I have installed a Immersion Research backband with a ratchet buckle/strap system (similar to snowboard bindings): I love the support and the low profile it offers still allowing me to do laybacks.
In this kayak the bulkhead was so close to the seat that I could create a backband out of foam and have it resting directly against the bulkhead.

foam backrest_1

In some kayaks I have made a pillar from closed cell foam that is nested and jammed between seat and bulkhead; in the XP is wanted to try a floating foam block to be able to access the bilge pump.
As a prototype I wanted to use cheap foam and some discarded packaging from electronic goods was good enough for my first try. I laminated two pieces by gluing them together with contact cement.

foam backrest_5

This type of foam is very easy to carve with a sharp kitchen knife and in minutes I had a nicely contoured backrest shaped to allow layback rolls. My intention were to test the foam back first on a longer paddle and see if it fitted OK.
After some minor reshaping following my initial trial I was happy with the shape of it.

Initially I planned to use high quality closed cell foam for the final product but this cheap foam was working well enough to not bother with higher quality foam, like the one in a block used for yoga.
I just wanted to cover the rough surface with a bit of neoprene.
Again, I used contact cement to laminate the black neoprene.
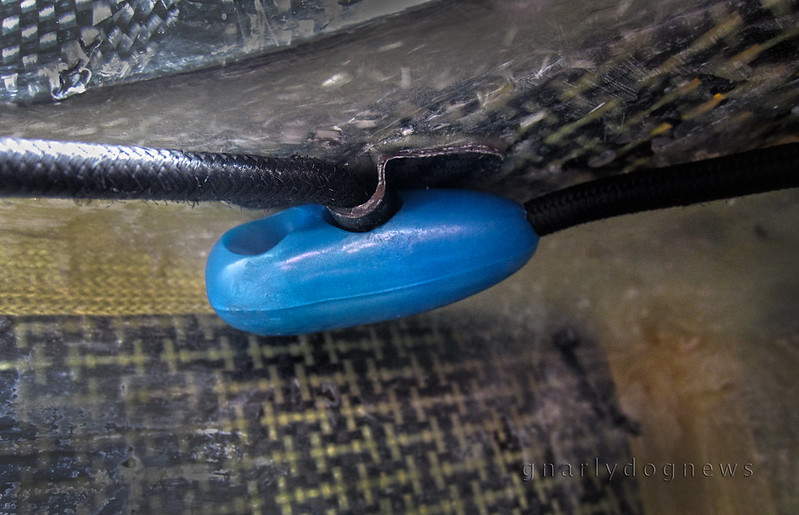
I made a hole in the foam, the length of the block, to allow a bungee cord to secure it to the coaming of the kayak.

foam backrest_6

The bungee cord is attached to the underside of the coaming by little fiberglass saddles that I fabricated and bonded with epoxy glue. Alternatively small stainless steel saddles could be used instead.
I can tension the bungee with an olive cleat and while the backrest is firmly in place I can still access behind the seat to clear the pump from sand and debris.

foam backrest_4

The main advantage with this style of back band is that it does not end up under my butt when I enter the cockpit. I can slide from the back of the cockpit coaming rim and it will not get in the way, ever.
While some find the pod-style seats with no rear back band a great solution to this problem, I did not like that set up in one of my previous kayaks. I felt that I could not brace myself from sliding backwards when actively paddling and leg driving.

foam backrest_3


.

04 December 2013

Accessory: Hobkey sea kayak keyring

.
What is that on your keyring?
Obviously he doesn't know what a sea kayak is, I thought to myself.

keyring2

It might be a talking point at a party or maybe a way to make myself not fit-in with the cricket loving fans but I like to remind myself of what makes me happy.
Marin from Hobkey has been following my blog for a while and asked me if I was interested in some samples of his unique sea kayak keyrings.
Turns out that he is one of my peeps from the old country and speaks my mother language: Slovenian. A very accomplished sea kayaker and rower himself (check his profile) he is passionate about this non main stream sport of sea kayaking.
He is the distributor of the sea kayak Hobkey and ships them directly to online customers but also wholesales them to retailers around the world.

keyring1

The miniature kayak is made of PVC and meticulously reproduces a Fish-form skeg kayak with a keyhole cockpit. It really is a good model that almost looks perfectly like one of my kayaks!
The keyring is secured by a crimped stainless steel cable loop making the attachment rather solid. The little kayak is slightly flexible and will not snap when I try to bend it making the pendant durable. Marin's personal Hobkey is well used with a couple of keys rubbing against it and while the paint is getting a little scuffed it is still holding up well.

Is that a canoe?
I rolled my eyes and politely explained: "Close: it actually is a sea kayak..."
.

14 November 2013

GEAR: sea kayak sail set up options

I was now heading for the cliffs fast and frantically tried to depower my sail.
I had been sailing in following seas with increasingly stronger winds and having a ball.
My kayak was humming along and surfing from wave to wave; it was one of the most exciting days of a month long trip in the Swedish East coast archipelago.
I was in a borrowed kayak and loaded with a lot of gear and food, my kayak was tracking pretty straight.

FEKS high mount_gdn
borrowed kayaks set up with Flat Earth sails and KariTec hardware

I let go of my main sheet, the rope that holds the boom in position and with the wind from behind the sail swung to the front. I felt relief as my kayak slowed down and I was travelling now at a much lower speed thinking I had avoided ending up against the cliffs.
I then let go of my up haul (the rope that holds the mast upright) and nothing happened. I tried to lower my sail altogether and stow it back on deck but that just would not happen; the wind kept on pushing my bow downwind and the kayak would not broach on the waves coming from behind! I continued to head to the cliffs…

FEKS high mount3_c
not actual footage of event
Desperately I pulled the main sheet again hoping to bring my sail around but the wind was too strong and the boom was just stuck in a forward position. I was not happy, actually a bit panicky to tell the truth; I have never experienced that before.

On my sails when the conditions become unmanageable I just simply let my uphaul rope out from the cleat, the kayak broaches pushed by the wave from behind and the sail falls into the water.
The forward momentum brings the sail close to the cockpit where I can collect it and secure it on deck: I have done it hundreds of times.
With the sail set up with the boom above the side stays, the boom could swing all the way around instead of stopping on the stays at about 90 degrees with the kayak. Once the boom is in the forward position I could not bring it back to me as the wind was exerting too much pressure on the sail; the mast stood up proud and solid.
Eventually, with monumental effort, great acceleration and strong sweep strokes I managed to bring my kayak around enough to let the sail fall into the water. I caught up with my paddling partner who was new to sailing; she was having the same problem as me and I helped her out of danger of the cliffs. It was an experience that I did not predict and did not want to repeat. However a few days later the same thing happened but this time I was in open waters and I had time to get myself sorted.

Things I learned from this experience:
- I prefer the predictability of my sail set ups: if the wind is too strong I can just drop my sail anytime
- While theoretically the full swing boom should make things easier in high winds it did not for me as I could no longer lower the sail.

I paid close attention to some sail set ups in my paddling circles and noticed somebody with an additional rope coming from the mast back to his cockpit. He had boom-above-3 stays set up and explained to me that the additional rope was to bring his mast down when sailing down wind. It made sense to me: he must have similar problems than me although he usually does not sail in stiff breezes.

FEKS_high mount2_gdn
sail set up with additional down haul rope

One question remains: to bring down the sail in a downwind situation he must use two hands to pull the rope back in?
That reminds me of V sails where one must actively pull the sail down instead of letting it just fall down on its own. It was one of the reasons that I opted out from those sails: I wanted a more efficient way of handling dicey situations.

I understand that my system of two side/back stays has a few problems:
- there is more pressure from the mast onto the deck of the kayak; decks need to be very stiff or reinforced internally
- the boom can not swing all the way around for de-powering in case of a stiff breeze, but as I found out that might not be a good thing?

The advantages:
- there is less pressure on the mast as the stays anchor higher up. I wonder how many mast would I have broken by now if I used the other system ( I do hear of people braking masts in higher winds)
- sail mounted lower therefore less healing (force of wind trying to tip me over),
- two less ropes to deal with on deck. On the 3 stays set up more ropes add to more chances of entanglement if tipped over and trying to roll back up? I know that occasionally I have to wiggle my paddle out of a loose stays before I scull my kayak if tipped over.

While there is an increased risk with ropes on deck I am used to them now and deal with them. However I rather not add any more than I have to.

These are my findings on sailing with both systems: 2 side/back stays and 3 stays.
I know that there is a strong following with the 3 stays set ups but I also hear that that is not recommended for winds that I usually enjoy sailing in.
I wanted to share my experience of sailing sea kayaks for ten years, the last 4 with Flat Earth.

.

25 September 2013

Technique: pitching a tent on rocky slabs


My favorite natural environment is rock; granite to be precise.
I am not a rock climber these days but I have always gravitated to locations where exposed granite forms the landscape.
Last season I traveled to the  High Sierras, to a familiar area.
This season I chose to undertake a sea kayak trip instead where thousands of little island gently emerge from the sea and create incredibly smooth landscapes.
There is a strong similarity between the High Sierra and the Stockholm archipelago; both have glacially polished granite, the latter at sea level.
For the Sierras I chose a very light shelter since I knew I didn't need an inner tent to protect myself from insects.

PeeweeLake camp_c

For Sweden I chose a tunnel tent: a known design able to shed wind well.
I chose a non-freestanding tent over a more pitch-friendly free standing one because of weight and bulk. I dislike travelling with heavy gear and flying across the word to reach my destination usually limits my choice of equipment; there is an incredible difference between car camping and international travel.

Tunnel tents however pose some problems when pitching on hard ground.
Staking out the ends of the tent is essential  to keep the tent erect (unlike in a freestanding tent).
Since polished granite offers too much resistance for conventional pegging (like rock-hard ground!) a little tinkering on my part is usually necessary to have a secure shelter for the night.

Sunset at Windy camp_c

Instead of relying on pegs at the stake point I collect a stick and a couple of decent size rocks.
I insert the stick into the stake loop of the tent and place it horizontally on the ground where a large rock will secure it in place. I find that a rock on top of a stick is generally a way better anchor than a typical tent peg pushed into soft ground.

Furthermore, where the ground is a polished slab there are usually a few cracks.
Here is where I like to place a little wired metal wedge designed for rock-climbing  (aka stoppers, nuts, rocks etc).
A carefully placed wedge is bombproof and no amount of wind will rip that anchor out.

rock anchor_c
Black Diamond stopper
In locations where there is little to no trees, or large boulders to create a wind break, I am confident that my tunnel tent will stand  up to strong winds, even without any pegs secured into the ground.

Windy on Magic_c

rock anchor_gdn
Omega Pacific wedgie


28 May 2013

Review: carbon-fibre skeg by Norbert Gancarz

A carbon-fibre skeg is the ultimate bling aftermarket accessory for any kayak.
If however one considers a kayak just a tool and has little affinity with his/her craft then I don't think this skeg blade would excite them.
Just as some consider a car just a car and see no point in retrofitting it with performance accessories I am sure that to some a carbon-fibre skeg might seem an unnecessary replacement.
I don't care that much about my car but I will not say the same for my kayaks.

As all of my kayaks are rudder-less and incorporate an adjustable skeg for directional stability, I often wondered if the deployment of my skeg had as much effect on drag as when I would lower a rudder (it has been a few year since I have paddled an over-stern ruddered kayak).
In my Impex Kayak the skeg is a rather chunky HDPE blade (same material as the common kitchen chopping board); if I fully lower that skeg my kayak seem to slow down a bit and become a tad sluggish.
When Norbert Gancarz ( norbertga@o2.pl from Poland) offered me to test his latest creation, a carbon-fibre blade to retrofit the Valley skeg, I was keen to try it.

Norbert skeg_1

The skeg blade is of the exact outer shape as the VCP factory standard grey plastic one but this carbon skeg has features that the Valley skeg does not.
The blade is foil shaped like the wing of an aircraft with the leading edge thicker than the back of the blade. This shape minimizes turbulence and promotes an easy flow of water over the blade when the skeg is deployed. Less turbulence equals to less drag that leads to less effort and possibly more speed.
While speed has never been my goal, less effort is certainly welcome.

Norbert skeg_2

The skeg blade is a real work of art and the finish is incredible.
Somehow I felt that such a beautiful accessory looked out of place on the basic finish of the Nordkapp LV's skeg box but I was keen to find out if the blade would actually fit and how much effort the retrofit required. After all the existing skeg blade was still working fine...

Norbert skeg_5

I inserted a 2.5mm Allen key (like the one you get with IKEA furniture, but smaller) into the skeg's control knob found next to the cockpit and tried to undo the grub screw. Initially it would not budge but a squirt of water dispersant (WD40) and a few minutes later the key turned and the pinch on the skeg cable was released.

Norbert skeg_6
salt built up under the skeg control knob,washes away easily...
The knob was free and now I could pull out the skeg blade past its normal maximum deployed setting; the wire came out easily.

Norbert skeg_7
factory VCP skeg blade removal

Norbert skeg_3

Norbert supplied me with the stainless steel wire that I had to cut as each kayak model has a slightly different wire length .
The carbon skeg has a very neat grub screw that pinches the cable that is inserted into blade (not show here).  I measured the length of my existing Valley skeg wire and cut the new one to length with a pair of diagonal cutters (a decent pair of plier would have done the same job).
I fastened the grub screw on the carbon blade onto the wire, inserted the blade into the skeg box and easily wiggled the wire back into the housing all the way to the control knob. The skeg blade was sitting flush with the hull, all the way in the skeg box, before I aligned the knob over the hole in "slider tube" and secured it tightly with the Allen key. I made sure that the knob was in the "retracted" position or I would not be able to deploy that skeg all the way like before.

Norbert skeg_4

Norbert's skeg blade sits in the skeg box without any wiggle and the two little rubber washers on the pivot point offer just enough resistance to keep the blade in position preventing the skeg blade from creeping back up when the kayak is at speed (one of my kayaks does that and I am yet to fix it...).

But how does the skeg perform in the field, err water?
It seems to have a crisper feel with the lowering amount precisely translating to directional changes. There are no wobbles and no "skeg hum" as I have in some of my other kayaks when I speed down the face of a wave.

Norbert skeg_10

As for increased speed?
I can't attest to that as I don't have a GPS to measure precisely the speed of the kayak.
All I really want is to have the kayak on the beach, belly up, with the skeg standing up proud showing off that sexy carbon weave :-)

Norbert Gancarz can be contacted at norbertga@o2.pl
.

26 February 2013

Buying a dream


I am a sucker for toys. Just like a bowerbird collects blue objects I love gear.
Some might say however that stuff means nothing if it doesn't get used.
But is that true? 
Sports Room "After"  
gear closet?
A collection of toys for the sake of just pure possession is often viewed as a pointless consumeristic decadence and I tend to agree. But I also see the other hidden side of the reason why often individuals find pleasure in just "owning stuff".
Let me tell you about my experience of a few years in retail at the largest outdoor gear retail chain in the world.
I used to manage the bicycle department in a massive shop and occasionally I would mingle on the floor and help customers with their purchases.
There were some genuine outdoor type guys that needed gear and pretty much knew what they wanted and knew how good/bad the offerings in the store actually were.
The vast majority  of people tho that came through the door were clueless and wanted gear for what they thought would give them a lifetime experience.
 
Him: “I saw this program on TV about Mt. Whitney; I want to go there. What do I need?”
Me: “Sir, what experience do you have in the outdoors?”
Him: “I walk my dog to the park and I play baseball. I am a real outdoors lover”
Me: “Hmm, OK, let’s see…”

I love their enthusiasm, the candour with which they approach life and that they have a dream.
They would ask me what  gear I use when I go in them “out of doors” places and inevitably they would buy the exact same product from the store. I knew that there was also no point in telling them that some of the gear that I had was home made or that it was no longer available, so I kept quiet ; who was I to disappoint them?
I also knew that they were not buying equipment to go to the mountain, they were buying a dream. 

A few years later, returning to Australia, I started sea kayaking.
The first kayak that I bought was “expedition” capable. I knew very little about paddling and even less about seamanship. My new (to me) kayak was large, had a great big rudder and even came with a sail. I knew I was going to be paddling and exploring far away places in about a week or so.
Fortunately reality checked-in before I got in trouble and I learned that the sea is not a forgiving place where I should really prepare myself before dreaming too big.
I recently read on a sea kayaking forum about somebody that wants to paddle from Australia to Papua New Guinea soon. His experience so far: paddling a few hours on a calm lake :-)
My second kayak was also a large big-guy boat, for expedition use of course.

Impex Assateague at Fraser Island (c)
 
Eventually it hit me: who am I kidding?
I rarely go away for an overnight paddle and maybe once or twice a year on a camping trip for a week or so.
I soon realized that that mighty big boat is not the best suited vessel for my day paddles. 
 
Just like those big stompers that my customer was now buying in my store, with a cart full of top end gear worthy of a Himalayan assault. He would have been better off with a lighter and nimble boot that would not give him blister the size of dinner plates, but I knew I could and should not convince him. He was dreaming.
And that is how far his dream went.
I saw him a few months later, now winter, in my store again. I asked him and he told me that he never got to that mountain: “Things got in the way”. I will do it next year, for sure.
All he wanted now was some full suspension bike because he was going to compete in a 24 hour mountain bike race.
I should have known: Discovery Channel showed a piece on that a few nights before. 
 
I loved that guy: he was enthusiastic about his dreams (and keeping my biz healthy).
I knew that the bike, just like his “Everest” jacket, would have a special place in his home.
Every so often he would open the wardrobe and look at the jacket and sigh: one day... 
 
Dreams is something money can’t buy, for everything else there is MasterCard.
Oh wait a minute, people are buying “dreams”
Some say that traveling and buying gear are the only two sure ways of converting dollars into happiness.

12 February 2013

GEAR: rustproof knife

There is no other subject that generates more interest than talking about knifes (Justin Bieber excluded). Websites and forums seem to spark seriously opinionated debates when it comes to the perfect blade.
Myself, I have been looking for a knife that would work well for sea kayaking.
I don't need no Bear Grills knife, no Crocodile Dundee blade or a knight's Excalibur; all I want is a knife that does not rust, and stays sharp.
No many knifes will not rust, in a marine environment.
While I can get plenty of sharp knifes that will do so well for general outdoor pursuits (like backpacking) finding a blade that will really stay rustproof in salt water is not easy.
I hear good reviews of some knifes that use some really high-end steel alloys; unfortunately those knifes are also ridiculously expensive.

I have a knife on my PFD, that despite being inexpensive, after years of regular exposure to salt water is still looking perfectly shiny. One problem: it ain't sharp, and no matter how much I sharpen it, it just does not hold an edge. The blade is also very soft and bendy (yes bendy... trying to pry open some oysters, the blade just bent!).

I was pleased that in the search of the perfect knife, that would cost me less then a small kayak, an importer of outdoor goods suggested I should look at ceramic knives.

open knife_c

I have seen and handled a few ceramic kitchen knifes but never have I seen a small pocket knife or one suitable for paddling. My search for one in a holder/sheet (diving style) was unsuccessful but I did find this great offering instead.

in hand_c

I sourced the knife on eBay for a silly price compared to sharp rustproof steel knives.
The size is perfect and fits my hand well, and my PFD pocket.
There are no spring to snap it open and it does lack a blade latching mechanism (there are other offerings that might have that) but I know that the knife will not rust.
The blade is very sharp (I could shave with it) and it folds neatly into the plastic handle. The retention of the blade is just simple friction between blade and handle.

detail_c

I am not sure if this knife is the perfect choice for a rescue situation (non locking folding blade) but suitable for other common tasks. And as somebody once asked: does it cut the cheese?
I will report: yes it does :-)

cutting cheese_c

.

15 January 2013

DIY: paddle retention on kayak deck

.
A few years ago I came up with a great on-deck retention system for split paddles.
It was also just about then that I stopped using Euro style paddles and transitioned to Greenland paddles. The new style became my regular paddle and soon I totally abandoned the fat blades.
My spare paddle became a shorter version of the full length GP (also known as "storm") or a slip sectional full size one.
While the split Euro paddles fitted well on the front deck, I did not like carrying the Greenland storm on the front deck.
Some argue that a spare paddle should be readily available in case the main one (the one in the hand) is lost; in ten years it has not happened to me once. I also use a paddle leash most of the times so I minimize the risk of parting company with my paddle. It is a risk that I am now willing to take that if one day I will loose a paddle I will have to reach for the spare paddle behind me. Then again I often wondered if I would have the presence of mind to grab that half paddle in front of me anyway, in the heat of the battle.... probably not.
I am happy to carry my spare on the rear deck, to create an uncluttered front deck.

NLP on rear deck_2

The kayaks in my fleet all have bungee cord on deck for the retention of miscellaneous gear that one wants to access while on the water. Some kayaks have strategically arranged these bungee in view of carrying a spare paddle. The idea is to slide the paddle under the bungee and hope to retain the paddle.
My experience however shows that if the bungee is not highly tensioned those paddles tend to creep out in heavy seas and occasionally dislodge in surf.
Sliding the full length of the paddle under tensioned bungee is often tricky while I scratch the shiny gel coat (considering resale value).
I wanted a system that retains my paddle but would not require a slide.
On my expedition kayaks I devised a flat strap with a Fastex buckle.

paddle retention_4

It worked well; I could attach my split Euro paddle there with little fuss.
With the storm GP there is only one shaft (loom) and the buckle of the Fastex clip was not working well there: it would slide and become loose.
Borrowing the idea from my simple paddle leash I now use this system for my spare paddle retention.

paddle retention_2
laminated Western red cedar storm Greenland paddle by Greg Schwarz

paddle retention_1
heat-shrink over the bungee joint

Removing/attaching the paddle is very simple: I just pop the bungee loop off the little plastic ball.

paddle retention_3
retention system released

While the bungee retention system works very well for paddles I recently found out that it works also in anger when I need to attach something on the rear deck quickly.
One of my camera mounts failed in heavy seas and I had to stow it away as it was dangling in the water with my camera still attached (I did NOT loose that one this time!).
I had to jump in the water, take down the remaining mount and attach it to the deck, while bobbing up an down in waves (I was also happy to be wearing a PFD). The bungee and ball system worked very well allowing a swift attachment of the hardware that I would not be able to carry any other way.
Reentered and rolled, pumped the water out of the cockpit and I was sailing again on my way in minutes.