Showing posts with label carbon-fibre. Show all posts

03 February 2015

SHOP: filling-in the compass recess

.
Mounting a sail on a sea kayak requires a few considerations: position and deck strength.
On the newly acquired Whisky16 the front hatch is positioned surprisingly way far forward.
In front of that there is a deck-mounted compass recess.
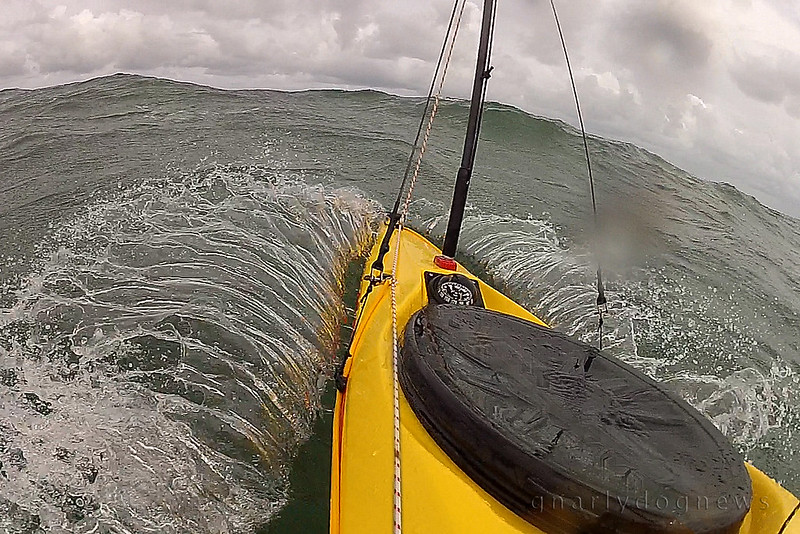
The previous owner of that kayak had a small sail mounted there and I used the existing holes to mount mine.
PT65N_Whisky16_bow
first run with the Whisky16
A test run revealed that the sail worked well on the Whisky16 but the reach was a bit too far for grabbing the sail and stow it on deck, securing it.
Most other sailing buddies use a 3 stay set up ending with a rather long mast.
I see their stowed sails going past the front of the cockpit ending with a sail mast half way across the spray deck. I prefer to have mine clear off my deck so I do not rub it with my hands when paddling.

The Whisky16 however has the sail mounting spot just a bit too far out or reach for the sail to fit nicely on deck. As I use my sails on several kayak I need to have them fit all decks well, with the same stay lengths.
I could increase the size of the mast and bring the sail higher (and make an ill-fit on other kayaks),  but I prefer to keep the sail as low as possible and minimize the heeling force of a beam wind exerted on the sail.
The compass was not really needed on that kayak so I removed it and decided to utilize that space to mount the sail closer.
I wanted to fill the void left (recess on the deck) and create a solid base for the mast fitting.
I could have used a simple block of wood somehow attached to the deck but I knew I could do better.
I shaped a block of foam (polystyrene) to fit a bit loose within the cavity of the recess. Shaping the foam was easy: a bit of coarse sandpaper on a cork block.

Once the foam was shaped I placed kitchen cling wrap (Glad® wrap) over the deck and wetted out some fiberglass with epoxy. I draped the block of foam (under side) and pressed it into the cavity.
Once cured (overnight) I removed the excess and trimmed the glass.
The finish was really rough; maybe I could have used wax and mold release to have a perfect fit but nobody was going to see that part.
The top was done similarly.
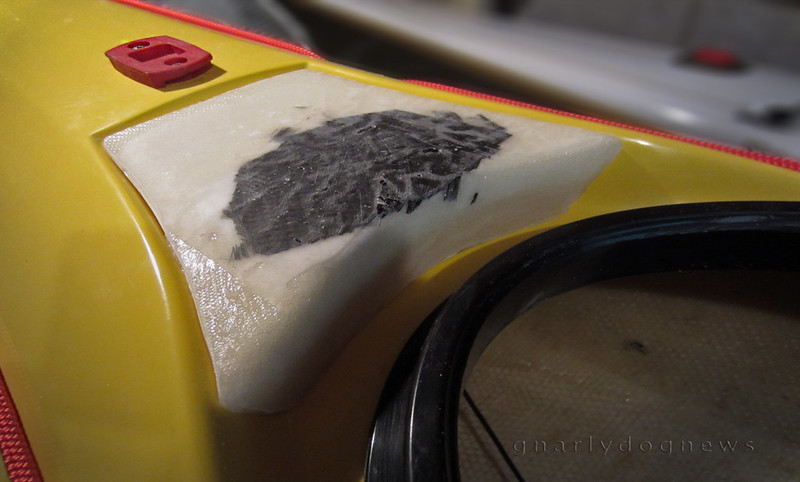
I carved out foam from the area where the screws for the fitting would go for my mast base and filled it with epoxy glue (mix of epoxy and microfiber). While wet I then used a few layers of glass for the top and a scrap of carbon fibre for where the main load would be.
Polystyrene foam compresses easily when spot loaded so I needed a sturdy surface.
compass fill-in1
the "black patch" is carbon fibre cloth over the carved-out foam filled with epoxy glue.

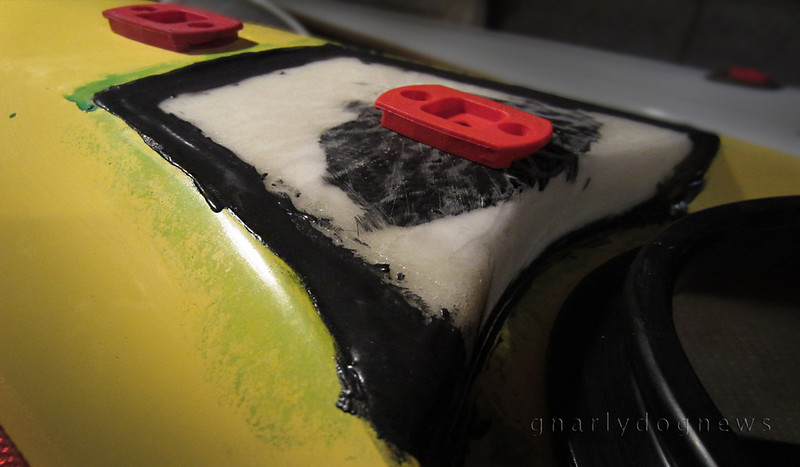
The next step was to clean and cut back the edges a bit leaving a bit of a gap between foam block and kayak deck. I filled that with epoxy glue again to create a hard edge and seal the two surface together creating a monocoque style item. Of course I waxed and prepped the kayak deck so epoxy would not stick to it...
compass fill-in2
the new mast-base fitting placed only for testing

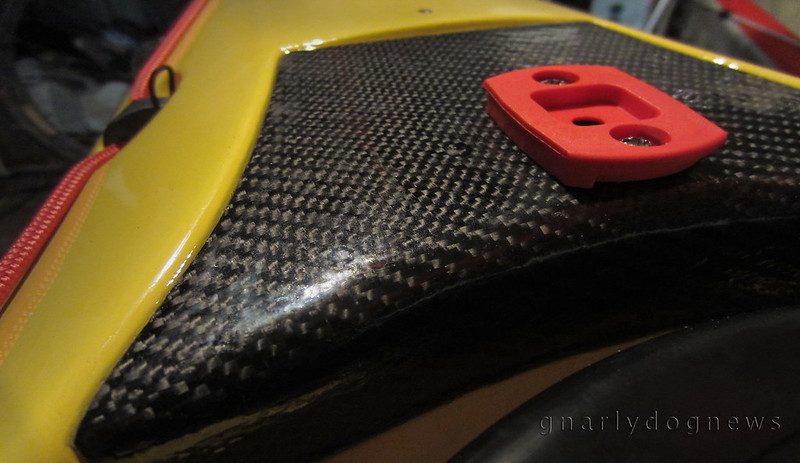
The last step was to add a nice layer of carbon fibre weave: partly structural, partly looks.
A few coats of UV stabilized epoxy later and my block was ready for installation of the mast base.
I used wood screws that secured the mount very solidly: the epoxy glue is very dense.
compass fill-in3
the foam block now covered with carbon fibre cloth

Final step: securing the foam block to the deck.
This one was simple: a small bead of polyurethane all around the edge (only!) to then seal perfectly against the deck.
The original deck void was now sealed and the sail mounted closer to the cockpit.
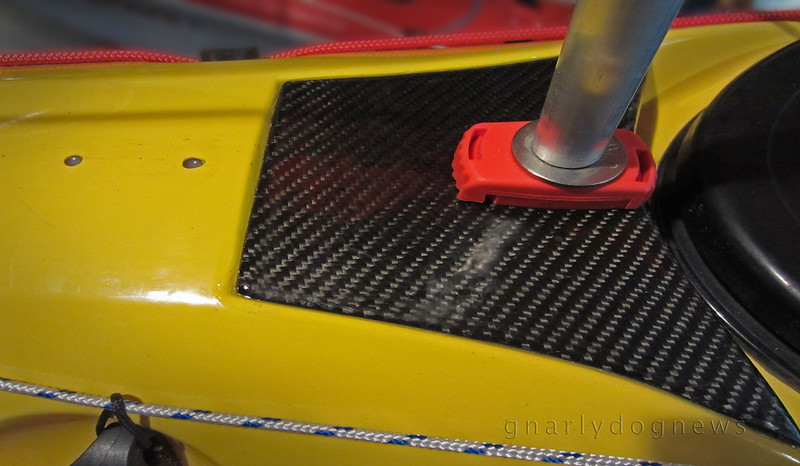
compass fill-in4
notice the difference between old position and new closer location for the mast base. The old holes will get filled with matching gel coat

So, do 4" make a difference? *
Not in handling of the kayak but when reaching for the sail to be bundled on deck when stowed (reaching for the boom particularly) is now much better.

*Hell yes, she said :-)

10 December 2013

VIDEO: Surfing Vixen

.
My new kayak is tippy, with me on board.
A narrow beam and a deep V hull give me less initial stability but allow slightly higher speeds.
I have used the Johan Wirsen designed XP on the bay a few times; in milder conditions I chased the little short wind waves with ease as I can glide where usually I can’t with my other kayaks.
In steeper waves however the longer and less rockered kayak becomes more difficult to keep straight on the short waves. The bow seems to get caught in the wave in front of me while the stern is still getting pushed by the following wave, broaching the kayak.
Then every so often I get a decent longer wave and linking the one in front I get a free ride.


Conditions were rather windy with recordings of winds in excess of 25 knots all around the bay. The tidal flow was opposing the wind and the waves were starting to get blown over, flattening them. After an hour of surfing I no longer could paddle out against the wind as it increased beyond my skills: I had to call it quits. I pulled the kayak back to my launching spot and battled the wind trying to keep it in my hands once out of the water. I was tired, a bit frightened but happy to have overcome the initial tippines that I felt in the XP.

.

19 June 2013

REVIEW: shoulderless Northern Light Greenland carbon-fibre paddle

The new Northern Light paddle recently received is different: it's a shoulderless version of the three piece carbon fibre Greenland paddle that Paul produces. 
The sectional loom is the same as all the other Northern Light paddles (Greenland and Aleut) but this blade is much narrower than my standard Greenland paddle, which I have been using for all my paddling.

NLP_nar_2_c

I have grown to love the Northern Light Greenland paddle that, despite my best efforts to destroy it, has never let me down.
Despite me abusing it, all I managed to create was a hairline crack in the insert after a wave dump and high brace onto a bank of sand, which was later easily repaired. 
No other paddle would stand up to the abuse I now subject my Northern Light paddles.

The new carbon-fibre Northern Light paddle is shoulderless and my hands slide along the shaft without feeling the familiar notch of the shoulder. Initially I thought I needed to feel my hands centred on the paddle and the blade’s shoulders of my Greenland were the reference point, but as I paddle kayaks with skegs I tend to wiggle a bit and often extend the paddle on one side.
Ruddered kayakers find it odd that waves slide my kayak sideways a bit and make it broach just so slightly needing corrective strokes.
To address directional changes I use sliding strokes where my hands let the paddle extend to one side; all without being even aware of such technique.
I no longer keep my hands in the exact same position on the loom (as I used to with Euro paddles); they are literally all over the place.
When I want to accelerate hard I extend my Greenland paddle to insert more blade into the water and create more resistance.  If I want to correct my direction a bit, I extend the paddle and slightly sweep, all unconsciously. This new paddle lends itself perfectly to my “wandering’ hands.

NLP_nar_3_c

The Northern Light “Skinny” Greenland is incredibly smooth and has an organic feel in my hands.
The edges are very fine allowing silent insertions into the water; canted strokes feel effortless. It
literally slices through the water.
The “Skinny” has been in the works for a while and Paul spent a lot of time talking to some of the best known Greenland kayakers like Maligiaq and Dubside before he and Carlos (his former partner) came up with the dimensions for this paddle.
The paddle has actually been in production, with prototype testing going on for over a year now.

I thought that such diminutive paddle (if compared to big blade Euro style) would lack purchase resulting in reduced kayak speed.
But as Maligiaq demonstrates, a fine edged Greenland paddle used with correct technique (canted) and a higher cadence can produce hull speeds equal to larger blades, the proof seems clear in his results against world class sprinters.

As the blade is so fine I expected to experience some flutter, as most Greenland paddles seem to have in the first ten minutes or so until my brain “learns” the traits of the new blade and adjusts.
The “Skinny” was immediately at home with me and no adjustment was needed. Canting it was super easy (maybe it’s the pronounced flat surface on the loom) and I noticed no splash, even if I purposely tried to use a sloppy stroke. It was also a surprise to see rank beginner kayakers trying this paddle and loving it immediately with very little wobble when sprinting.

 
comparison_1
Northern Light paddles size comparison: Aleut, Greenland and "Skinny"
Small hands will find this skinny paddle easier for sculling (compared to the standard Greenland) as it allows the blade to sit more comfortably in the palm closer to the end of the blade.
Furthermore the "Skinny" can be converted from a full size adult paddle to a perfect child paddle; this was a very important consideration when designing this paddle.  

With the use of the included insert the "Skinny" makes a smooth paddle for the budding new paddler. 
Weighing a bit less than the standard Northern Light Greenland the "Skinny" is just as modular as the original.
Paul has maintained the concept of a 3-piece paddle where the loom is the variable part to accommodate for different size paddlers.

The unique ability to break down the paddle in sections small enough to allow air travel as part of check-in luggage (fits perfectly inside a large duffel bag) makes this paddle a trusted companion for remote locations. 

NLP_nar_1_c
 

But how does it handle the choppy waves?
No different than the larger sister original Northern Light Greenland.


So why not use the “skinny” all the time?
All paddles have their strengths and the NLP “Skinny” is no different.  The sharp edges lend themselves to more technical paddling as it slices through the water allowing for a higher cadence when paddling distances and also for sculling rolls.  A lot of times a thicker paddle allows one to rely on the volume to auto correct a bit when rolling.  The “Skinny” requires good technique in this regard.
The noticeable difference I could feel was when I accelerated from a standing start; I felt just a little bit less resistance in the water and maybe a stroke more was needed to bring my kayak to cruising speed.
Side by side with my paddling partner Adventuretess we swapped paddles back and forth; using a perfectly synchronized stroke our kayaks maintained the exact same speed.
I can only conclude that the “Skinny” offers enough hydraulic resistance to propel a kayak to hull speed.

I had no chance to try the “Skinny” in the surf yet, where a big blade is desirable to be able to suddenly accelerate down the face of a wave; that’s where the Northern Light Aleut shines. 

On my planned trip to the land of the long shadows I was planning to take the standard “fatty”; I am now reconsidering and want to have the "Skinny" with me.


28 May 2013

Review: carbon-fibre skeg by Norbert Gancarz

A carbon-fibre skeg is the ultimate bling aftermarket accessory for any kayak.
If however one considers a kayak just a tool and has little affinity with his/her craft then I don't think this skeg blade would excite them.
Just as some consider a car just a car and see no point in retrofitting it with performance accessories I am sure that to some a carbon-fibre skeg might seem an unnecessary replacement.
I don't care that much about my car but I will not say the same for my kayaks.

As all of my kayaks are rudder-less and incorporate an adjustable skeg for directional stability, I often wondered if the deployment of my skeg had as much effect on drag as when I would lower a rudder (it has been a few year since I have paddled an over-stern ruddered kayak).
In my Impex Kayak the skeg is a rather chunky HDPE blade (same material as the common kitchen chopping board); if I fully lower that skeg my kayak seem to slow down a bit and become a tad sluggish.
When Norbert Gancarz ( norbertga@o2.pl from Poland) offered me to test his latest creation, a carbon-fibre blade to retrofit the Valley skeg, I was keen to try it.

Norbert skeg_1

The skeg blade is of the exact outer shape as the VCP factory standard grey plastic one but this carbon skeg has features that the Valley skeg does not.
The blade is foil shaped like the wing of an aircraft with the leading edge thicker than the back of the blade. This shape minimizes turbulence and promotes an easy flow of water over the blade when the skeg is deployed. Less turbulence equals to less drag that leads to less effort and possibly more speed.
While speed has never been my goal, less effort is certainly welcome.

Norbert skeg_2

The skeg blade is a real work of art and the finish is incredible.
Somehow I felt that such a beautiful accessory looked out of place on the basic finish of the Nordkapp LV's skeg box but I was keen to find out if the blade would actually fit and how much effort the retrofit required. After all the existing skeg blade was still working fine...

Norbert skeg_5

I inserted a 2.5mm Allen key (like the one you get with IKEA furniture, but smaller) into the skeg's control knob found next to the cockpit and tried to undo the grub screw. Initially it would not budge but a squirt of water dispersant (WD40) and a few minutes later the key turned and the pinch on the skeg cable was released.

Norbert skeg_6
salt built up under the skeg control knob,washes away easily...
The knob was free and now I could pull out the skeg blade past its normal maximum deployed setting; the wire came out easily.

Norbert skeg_7
factory VCP skeg blade removal

Norbert skeg_3

Norbert supplied me with the stainless steel wire that I had to cut as each kayak model has a slightly different wire length .
The carbon skeg has a very neat grub screw that pinches the cable that is inserted into blade (not show here).  I measured the length of my existing Valley skeg wire and cut the new one to length with a pair of diagonal cutters (a decent pair of plier would have done the same job).
I fastened the grub screw on the carbon blade onto the wire, inserted the blade into the skeg box and easily wiggled the wire back into the housing all the way to the control knob. The skeg blade was sitting flush with the hull, all the way in the skeg box, before I aligned the knob over the hole in "slider tube" and secured it tightly with the Allen key. I made sure that the knob was in the "retracted" position or I would not be able to deploy that skeg all the way like before.

Norbert skeg_4

Norbert's skeg blade sits in the skeg box without any wiggle and the two little rubber washers on the pivot point offer just enough resistance to keep the blade in position preventing the skeg blade from creeping back up when the kayak is at speed (one of my kayaks does that and I am yet to fix it...).

But how does the skeg perform in the field, err water?
It seems to have a crisper feel with the lowering amount precisely translating to directional changes. There are no wobbles and no "skeg hum" as I have in some of my other kayaks when I speed down the face of a wave.

Norbert skeg_10

As for increased speed?
I can't attest to that as I don't have a GPS to measure precisely the speed of the kayak.
All I really want is to have the kayak on the beach, belly up, with the skeg standing up proud showing off that sexy carbon weave :-)

Norbert Gancarz can be contacted at norbertga@o2.pl
.