30 June 2011
28 June 2011
GEAR REVIEW: dry bags selection
Dry bag are a pretty much a necessity for sea kayaking. We all want to keep our stuff dry and the easiest way is to do it is in a dry bag. But not all dry bags are the same: the quality and durability varies incredibly.I have used more than 9 brands of dry bags and not all performed equally.
Dry bags come in so many different types, shapes and sizes that one is often puzzled by the choice.
My findings stretch over 15 years of using dry bags, and not just for paddling.
Unfortunately the old adage that says: "you get what you pay for" is not always true.
I had some dry bags that despite costing much more than others performed poorly.
The most critical thing for me is the shape and size of a bag and how well it fits in a sea kayak.
When I transitioned from canoeing to sea kayaking I found that most of the dry bags I owned were too large. For efficiently packing of my gear and food for long trips, small bags fit better in the tight confinements of the hatches.
While a large dry bag will contain obviously more gear and cost less than two smaller ones, I find that dry bags that are larger than 15 liters are not as easy to use as smaller ones. I have a bag of 25 liters that I never use for sea kayaking: it just doesn't fit in my boats.
Since sea kayaks tend to have limited size hatches and the hull shape is long and pointy at the ends, small bags can be arranged easier around the confined space of the hatch. Of course if your kayak is a barge you have to pay much less attention to how you pack. :-)
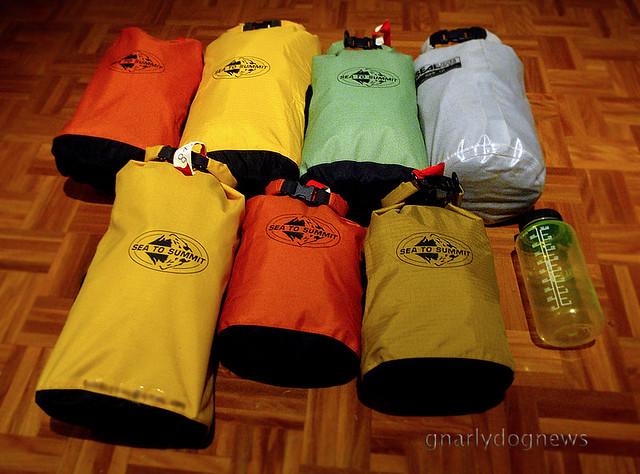
14 days worth of food for two paddlers
I don't own tapered dry bags since I find the very skinny bow and stern of the kayak suited to store items that don't need to be kept imperatively dry (like tent poles). My favorite size bag is 8 liters.
The material/fabric of a dry bag is very critical in my opinion. The very light ones made from siliconized nylon are not suited for waterproofing items placed in the hatch.
While a decent kayak should have dry hatches most don't. A combination of sloppy workmanship, bad design, user error and deteriorated hatch covers lead to leaks in the supposedly dry hatches.
Items tend to get wet occasionally. Experienced showed me that Silnylon just isn't sturdy enough to prevent being punctured, on the surface of the fiberglass or around camp. Even if some of my kayaks are perfectly smooth inside, the items that the bag contains are often hard and abrade the fabric when jammed inside the hatch.
The clear PVC bags usually seem to offer good protection against abrasion, for a while, but when they puncture they are really hard to repair (I had no luck). Over time mine failed where the fabric folds over at the closure area.
My favorite dry bags are made of woven nylon fabric exterior that have a waterproof coating on the inside of the fabric.
As the bags get dropped on sharp ground and occasionally abraded against the hull, repairing the nylon fabric is extremely easy.
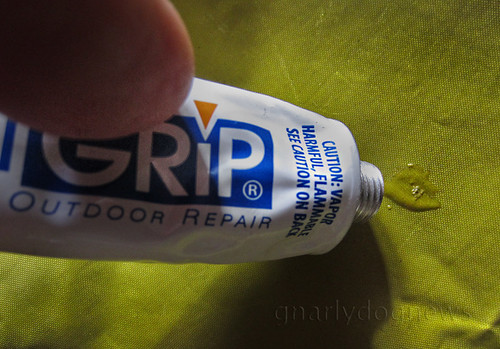
A dob of Seam Grip will patch any leak.
Fabric-type bags also tend to be less bulky when folded over to seal and slide easier when pushed inside the hatch. They also don't have the sticky surface to grab your pots or hard shiny object when cramming them.
Siliconized nylon is however a great material for storing you sleeping bag that should be then placed inside a second dry bag.
Dry bags are NOT submersible and, in the event of a hatch flooding, the water will seep inside a dry bag; so it's good practice to keep the sleeping bag in a double dry bag, especially if the hatches aren't positively sealed.
The ultimate dry bag has two roll-down-buckle closures. The first one will keep most of the water out and prevent a pressure leak on the second one. The second one will prevent any moisture that has crept past the first closure going inside the bag.
These double dry bags are the bomb:
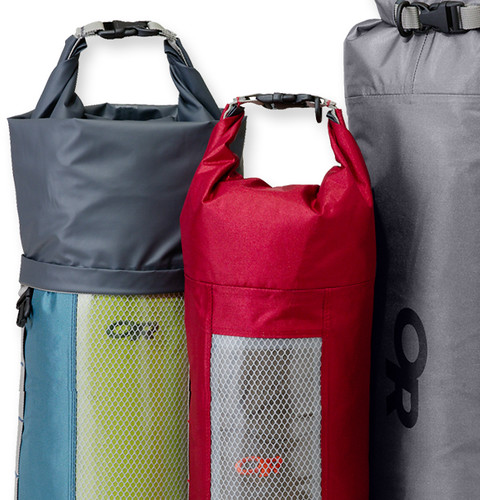
Obviously when backpacking all I need is a decent siliconized nylon dry bag since there is no water pressure on the closure, just potential rain that leaks inside backpack.
Like all fabric items, dry bags require some minimal maintenance: keep them relatively clean and dry.
A bag left wet inside the kayak for a prolonged period of time will develop mould and probably fail prematurely.
My favorite bags:
Sea to Summit Big River, for most of my "hard" gear when sea kayaking (food, utensils, repair kit)
Outdoor Research Durable Dry Sack for clothing and sleeping bags (inside a second bag) when sea kayaking.
Outdoor Research Ultralight Dry Sack for clothing and sleeping bag when backpacking.
I also use some Seal Line bags for items that might have hard items stored (kitchen)
tags
accessory,
camping,
review,
sea kayak,
silnylon,
storage,
travel light,
waterproofing
14 June 2011
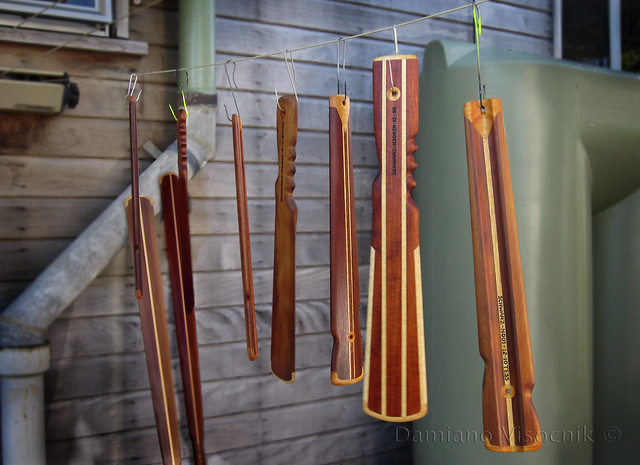
Photo: Norsaqs on the washing line
Norsaqs (rolling sticks) drying on the line after oiling.
Regarded as utterly useless by the "high and hard" (wing paddle) paddling brigade, the Norsaq is a perfect transition tool to learn hand rolling the kayak.
This fine collection of laminated wood Norsaqs is drying on the washing line. Several coats of boiled linseed oil and much polishing will be required before the wood will be silky smooth.
A real practical piece of art that will grace the kayak deck of a connoisseur.
08 June 2011
VIDEO: Capricornia Coast_part2
A rocky coast it's like a magnet for me: I'm drawn to it.
There are few things more exciting than paddling in a sea that is surging against the rocks. Obviously when on a trip far away from home and help (and repair facilities) I usually take it easy and try to keep a healthy distance to avoid even the mild chance of holing my kayak.
select 720P if you have fast Internet connection
To see part 1 of the trip click here
.
06 June 2011
Cheap advertising
Merrell in its latest contest says:
....
All entries become the exclusive property of Sponsors and will not be acknowledged or
returned. By entering the Contest, you grant Sponsors a perpetual, fully-paid, irrevocable,
non-exclusive license to reproduce, prepare derivative works of, distribute, display, exhibit,
transmit, broadcast, televise, digitize, otherwise use, and permit others to use and perform
throughout the world the Artwork and any digital depiction or representation thereof in any
manner, form, or format now or hereinafter created, including on the Internet, and for any
purpose, including, but not limited to, advertising or promotion of Sponsors and their goods
or services, and to use your name, likeness, and photograph in connection therewith, all
without further consent from or payment to you.
If one wins the contest he/she gets awarded $5000 towards a trip run by the promoter's chosen agency.
So, if my calculations are right, Merrell is legally appropriating thousand of images that later can be used at their own discretion. Merrell wants to avoid paying top dollar to Image Banks for a non exclusive rights to stock images (a commissioned photoshoot usually doesn't yield those unique images).
So why not run a contest instead?
I know, most of the images submitted probably are junk but I noticed some really good ones amongst the trash ones. The contest itself is great advertising for Merrell and at the same time they get awesome images for peanuts.
A win-win situation. People just don't realize the real value of a good image and give them away for pretty much free. Vanity and gullibility drives these contests.
tags
advertising,
copyright,
photography,
stupidity
Subscribe to:
Posts (Atom)